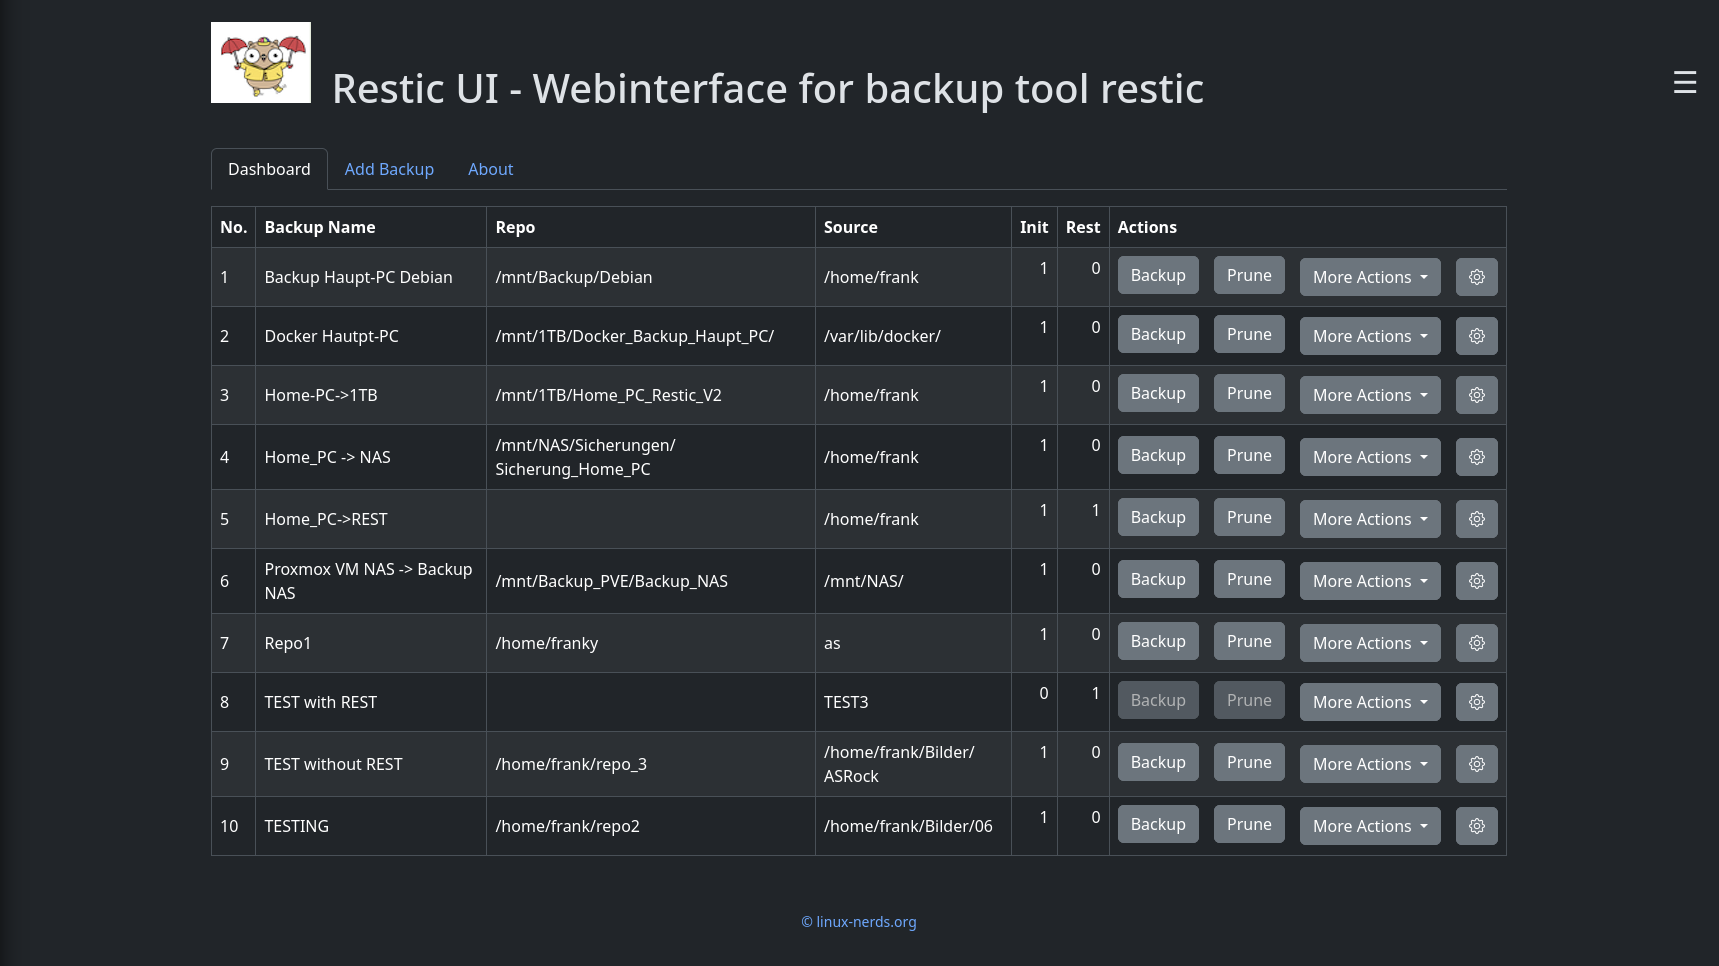
Skip to content

PyWebIO

Angeheftet PyWebIO
1 1 250
  • PyWebIO ist ein

    Low code Python web framework

    mit dem man, mit relativ wenig Aufwand, Webanwendungen bauen kann. Ich bin das im Moment intensiv am testen und habe dazu meine PyQt6 Anwendung Restic UI genommen und diese mit PyWebIO umgesetzt.

    1b7eed7f-441d-4b9f-9d04-6674865f3707-grafik.png

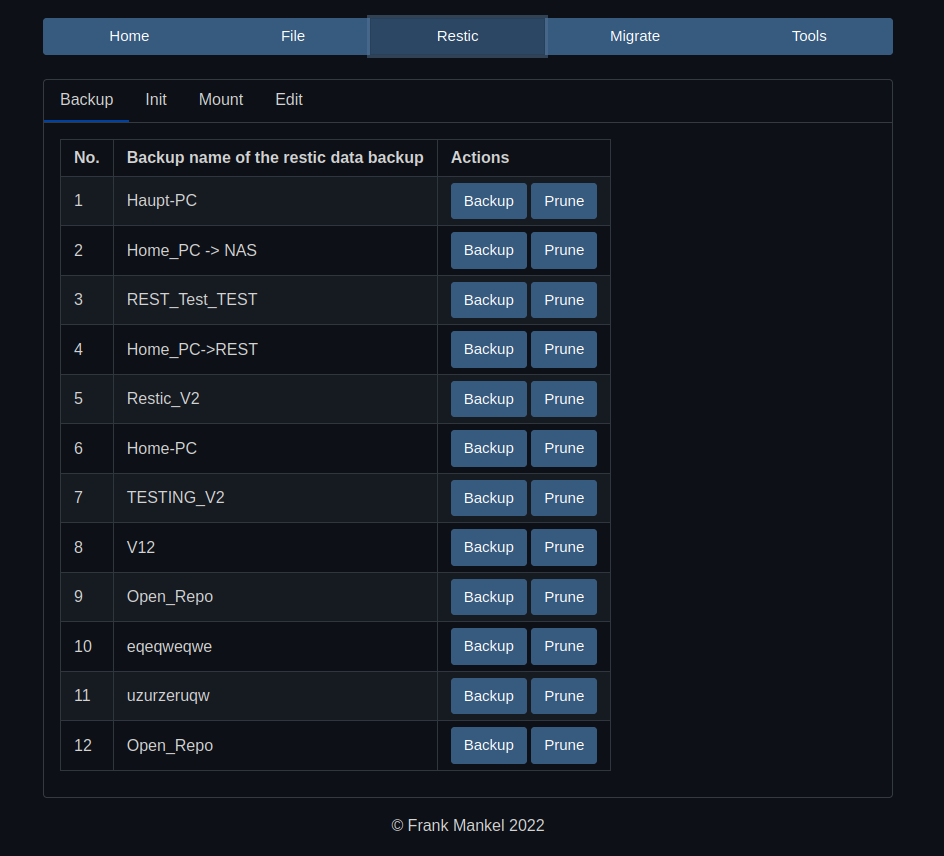
    Da sie aktuell zu 99% fertig ist, fange ich hier in dieser Kategorie mal an, ein paar Erfahrungen zu sammeln.

    Webseite -> https://www.pyweb.io/

    Dokumentation -> https://pywebio.readthedocs.io/en/latest/

  • FrankMF FrankM hat dieses Thema am angepinnt
  • Portfolio - mein kleines Flask Projekt

    Python3 python flask bootstrap ki-generiert
    5
    0 Stimmen
    5 Beiträge
    395 Aufrufe
    FrankMF
    Hab ChatGPT nochmal nach der Installation auf einem Production Server befragt. ChatGPT Certainly! Here's a short example of the steps you can follow to deploy a Flask application on a production server using Nginx and Gunicorn: Prepare your server: Set up a server (e.g., using a cloud provider like AWS, DigitalOcean, or a dedicated server) and ensure it has a clean, up-to-date installation of a Linux distribution (e.g., Ubuntu or CentOS). Install required software: Install necessary software packages on your server. You'll need Python, pip (Python package manager), Nginx, and Gunicorn. You can use your distribution's package manager (e.g., apt for Ubuntu or yum for CentOS) to install these dependencies. Deploy your Flask application: Copy your Flask application code and any required dependencies to your server. Set up a virtual environment (optional but recommended): Create a virtual environment for your Flask application to isolate its dependencies. You can use venv or virtualenv for this purpose. Install Flask and any required Python packages within your virtual environment: pip install flask Test your Flask application: Ensure your Flask application runs correctly within your server's virtual environment. Configure Gunicorn: Create a Gunicorn configuration file (e.g., gunicorn_config.py) to specify the settings for running your Flask application. Here's a simple example: workers = 4 # Number of Gunicorn worker processes bind = '0.0.0.0:8000' # The address and port Gunicorn should listen on Start Gunicorn: Start Gunicorn with your Flask application: gunicorn -c gunicorn_config.py your_app:app Configure Nginx: Create an Nginx server block (often located in /etc/nginx/sites-available) to define how Nginx should handle incoming requests. Here's a simplified example: server { listen 80; server_name your_domain.com www.your_domain.com; location / { proxy_pass http://127.0.0.1:8000; # Pass requests to Gunicorn proxy_set_header Host $host; proxy_set_header X-Real-IP $remote_addr; } } Enable the Nginx server block and restart Nginx: sudo ln -s /etc/nginx/sites-available/your_config /etc/nginx/sites-enabled/ sudo nginx -t # Test Nginx configuration sudo systemctl restart nginx Configure your DNS: Point your domain name to your server's IP address. Secure your server (optional but recommended): Set up SSL/TLS certificates for your domain to enable HTTPS. You can use Let's Encrypt for free SSL certificates. Monitor your application: Set up monitoring tools and logs to keep track of your application's performance and troubleshoot any issues. These are the basic steps to deploy a Flask application on a production server with Nginx and Gunicorn. Please note that this is a simplified example, and there are many additional considerations, such as database configuration, security, and optimization, depending on your specific application and requirements. It's also important to keep your server and software up to date and follow security best practices to ensure the stability and security of your production environment. Das werde ich doch mal ausprobieren
  • Flask - Erste Schritte

    Allgemeine Diskussionen flask python ki-generiert
    3
    1
    0 Stimmen
    3 Beiträge
    323 Aufrufe
    FrankMF
    Mein vorhandenes Projekt war doch etwas größer als ich gedacht hatte. Also musste ich mehr Zeit aufwenden um es nach Flask zu transferieren. Nach einiger Zeit hatte sich eine ganz ansehnliche Zahl von Dateien angesammelt und es kam wie es kommen musste, ich wusste manchmal nicht mehr, welches File ich anfassen musste. Chaos kam auf So fing ich an ein wenig zu recherchieren und kam auf die Funktion Blueprint von Flask. Mich ein wenig eingelesen, ChatGPT mal eben um ein Beispiel gebeten und dann angefangen die Applikation entsprechend umzubauen. Auch das hat Zeit gekostet. Aber, jetzt habe ich ein aufgeräumtes Projekt, was es mir wesentlich einfacher macht, daran zu arbeiten. [image: 1697954135081-5226e90d-aa20-4b20-93af-e50f8f841880-grafik.png] Wenn ihr also mal vorhabt, so was zu coden, halte ich es für sinnvoll das Projekt von Anfang an zu strukturieren. Und zum Schluss noch ein Screenshot zum Stand des Projektes. [image: 1697954267467-a7981ffc-0f93-41f4-93e2-c914fdba5e43-grafik.png] Und weiter geht es, ist nämlich noch nicht fertig
  • Pycharm - Umzug auf neuen Rechner

    Linux pycharm linux python
    1
    0 Stimmen
    1 Beiträge
    142 Aufrufe
    Niemand hat geantwortet
  • Python - Frameworks

    Python3 python pywebio flet
    2
    0 Stimmen
    2 Beiträge
    216 Aufrufe
    FrankMF
    Und mal hier parken https://www.youtube.com/watch?v=Tucr8Ta-kq4&t=1911s
  • PyWebIO - put_buttons

    PyWebIO pywebio python
    2
    1
    0 Stimmen
    2 Beiträge
    250 Aufrufe
    FrankMF
    Und noch eine kleine Übung, wie man den Buttton abhängig von einem Value enabled/disabled # we build header and tdata for table tab_mount = [] for count, value in enumerate(backups): if count == 0: tab_mount.append(['No.', 'Backup name of the restic data backup', 'Actions']) if backups[value].init == "0": tab_mount.append([count + 1, backups[count].name, put_buttons([ dict(label='Mount', value='Mount', color='primary', disabled=True), dict(label='UMount', value='UMount', color='primary', disabled=True), dict(label='Restore', value='Restore', color='primary', disabled=True), ] , onclick=partial(actions, count + 1)) ]) else: tab_mount.append([count + 1, backups[count].name, put_buttons([ dict(label='Mount', value='Mount', color='primary'), dict(label='UMount', value='UMount', color='primary'), dict(label='Restore', value='Restore', color='primary'), ], onclick=partial(actions, count + 1)) ])
  • PyWebIO - Footer bearbeiten

    PyWebIO pywebio python
    1
    1
    0 Stimmen
    1 Beiträge
    166 Aufrufe
    Niemand hat geantwortet
  • Restic UI - PyWebIO

    Python3 pywebio
    3
    0 Stimmen
    3 Beiträge
    416 Aufrufe
    FrankMF
    https://youtu.be/oa1BsToiU8c
  • PyQt6 - QSettings

    Python3 python
    3
    0 Stimmen
    3 Beiträge
    516 Aufrufe
    FrankMF
    Möglichkeit 1 Das hier settings = QSettings("Frank_Mankel", "Restic_UI") erzeugt unter /home/frank/.config/Frank_Mankel/Restic_UI.conf die Konfigurationsdatei. Möglichkeit 2 Das hier settings = QSettings("Restic_UI") erzeugt unter /home/frank/.config/Restic_UI.conf die Konfigurationsdatei. Damit habe ich die grundlegenden Dinge, hoffentlich , verstanden. Für den Rest mal in die Dokumentation schauen. Sehr hilfreich war auch mal ein Blick auf die Definition der Klasse. Rechtsklick auf QSettings und dann Go to Definition class QSettings(QObject): class Scope(enum.Enum): UserScope = ... # type: QSettings.Scope SystemScope = ... # type: QSettings.Scope class Format(enum.Enum): NativeFormat = ... # type: QSettings.Format IniFormat = ... # type: QSettings.Format InvalidFormat = ... # type: QSettings.Format class Status(enum.Enum): NoError = ... # type: QSettings.Status AccessError = ... # type: QSettings.Status FormatError = ... # type: QSettings.Status [..gekürzt..]