NanoPi R2S - OpenWRT VLAN
-
Ich hatte in diesem Beitrag Euch mal OpenWRT vorgestellt und kurz gestern auf die schnelle noch ein wenig mit VLan gebastelt, das ist nicht alles korrekt. Also, hier ausführlicher.
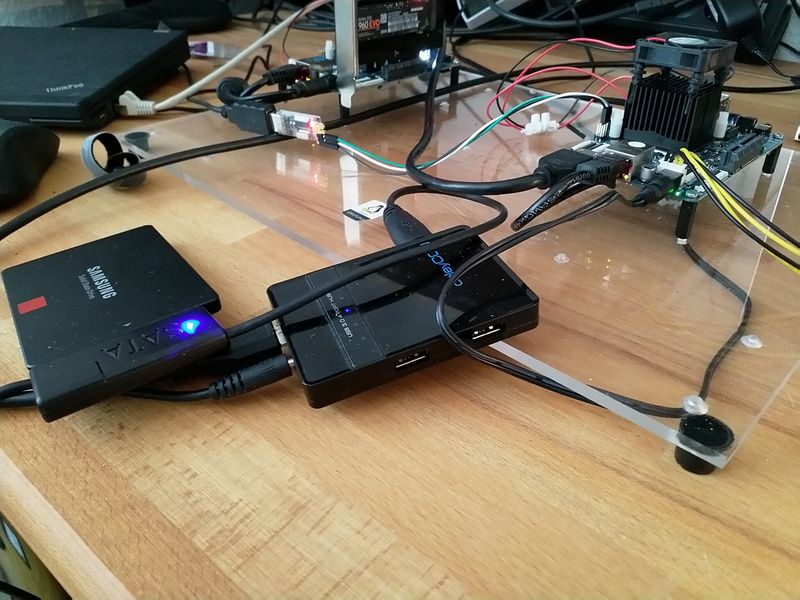
Hardware
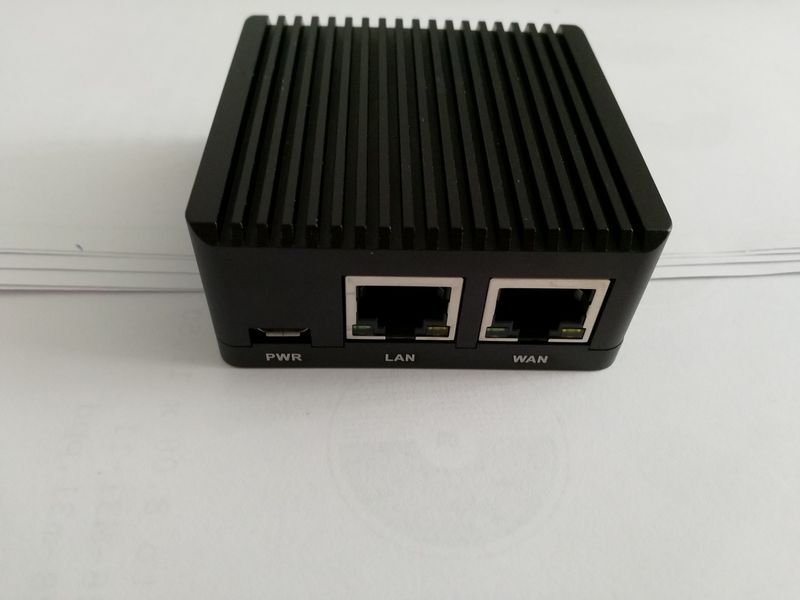
- NanoPI R2S
- Netgear GS108E
- paar Netzwerkkabel

Ich habe das schon mal auf einem ROCKPro64 gemacht -> https://forum.frank-mankel.org/topic/740/rockpro64-zwei-lan-schnittstellen-vlan-einrichten
Schnittstellen
- eth0 WAN-Schnittstelle. Holt sich per DHCP die IP-Adresse aus meinem Netzwerk
- eth1 LAN-Schnittstelle. Die Schnittstelle bekommt das VLAN verpasst.
VLAN
Wir bauen auf der eth1 zwei VLAN's. Im Switch ist das so konfiguriert.
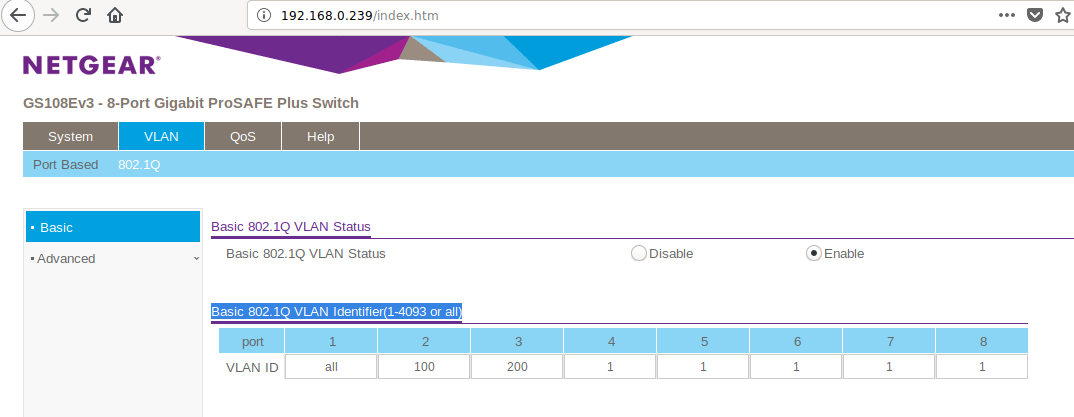
- Port 1 Uplink (kommt an LAN-Buchse vom R2S)
- Port 2 bildet das eth1.100
- Port 3 bildet das eth1.200
Software
Image des Herstellers des NanoPi R2S FriendlyELEC
/etc/config/network
config interface 'loopback'
        option ifname 'lo'
        option proto 'static'
        option ipaddr '127.0.0.1'
        option netmask '255.0.0.0'

config globals 'globals'
        option ula_prefix 'fd4c:f40c:35e2::/48'

config interface 'lan100'
        option ifname 'eth1.100'
        option proto 'static'
        option ipaddr '192.168.2.1'
        option netmask '255.255.255.0'
        option ip6hint '0'
        option ip6assign '64'

config interface 'lan200'
        option ifname 'eth1.200'
        option proto 'static'
        option ipaddr '192.168.3.1'
        option netmask '255.255.255.0'
        option ip6hint '1'
        option ip6assign '64'

config device
        option type '8021q'
        option ifname 'eth1.100'
        option vid '100'
        option name 'vlan1'

config device
        option type '8021q'
        option ifname 'eth1.200'
        option vid '200'
        option name 'vlan2'

config interface 'wan'
        option ifname 'eth0'
        option proto 'dhcp'

config interface 'wan6'
        option ifname 'eth0'
        option proto 'dhcpv6'
Ich denke, das sollte man verstehen
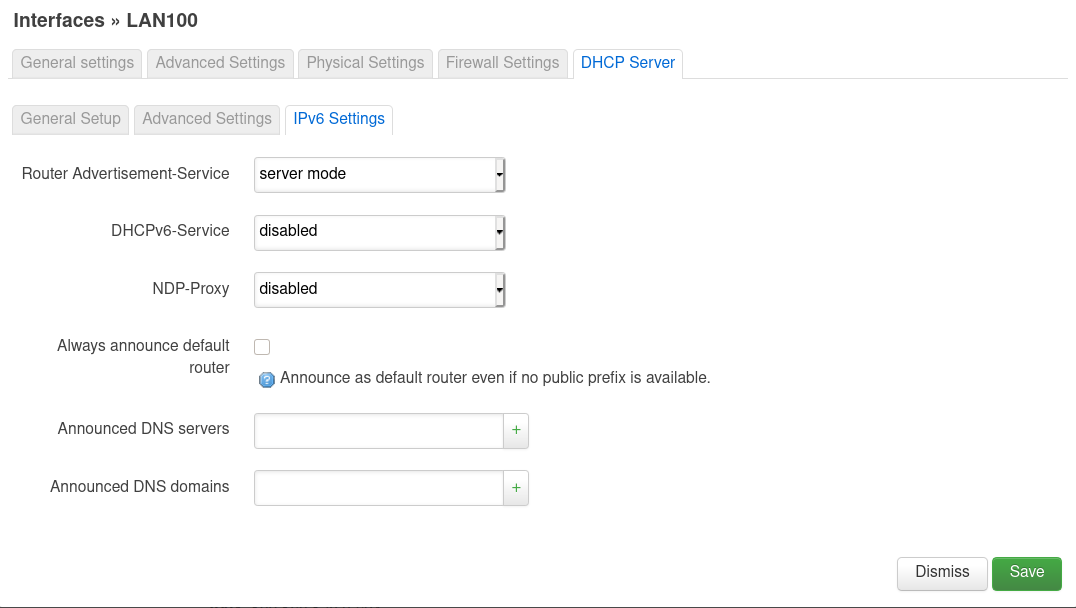
Danach Kiste mal neustarten und dann sollte das im UI vom OpenWRT so aussehen.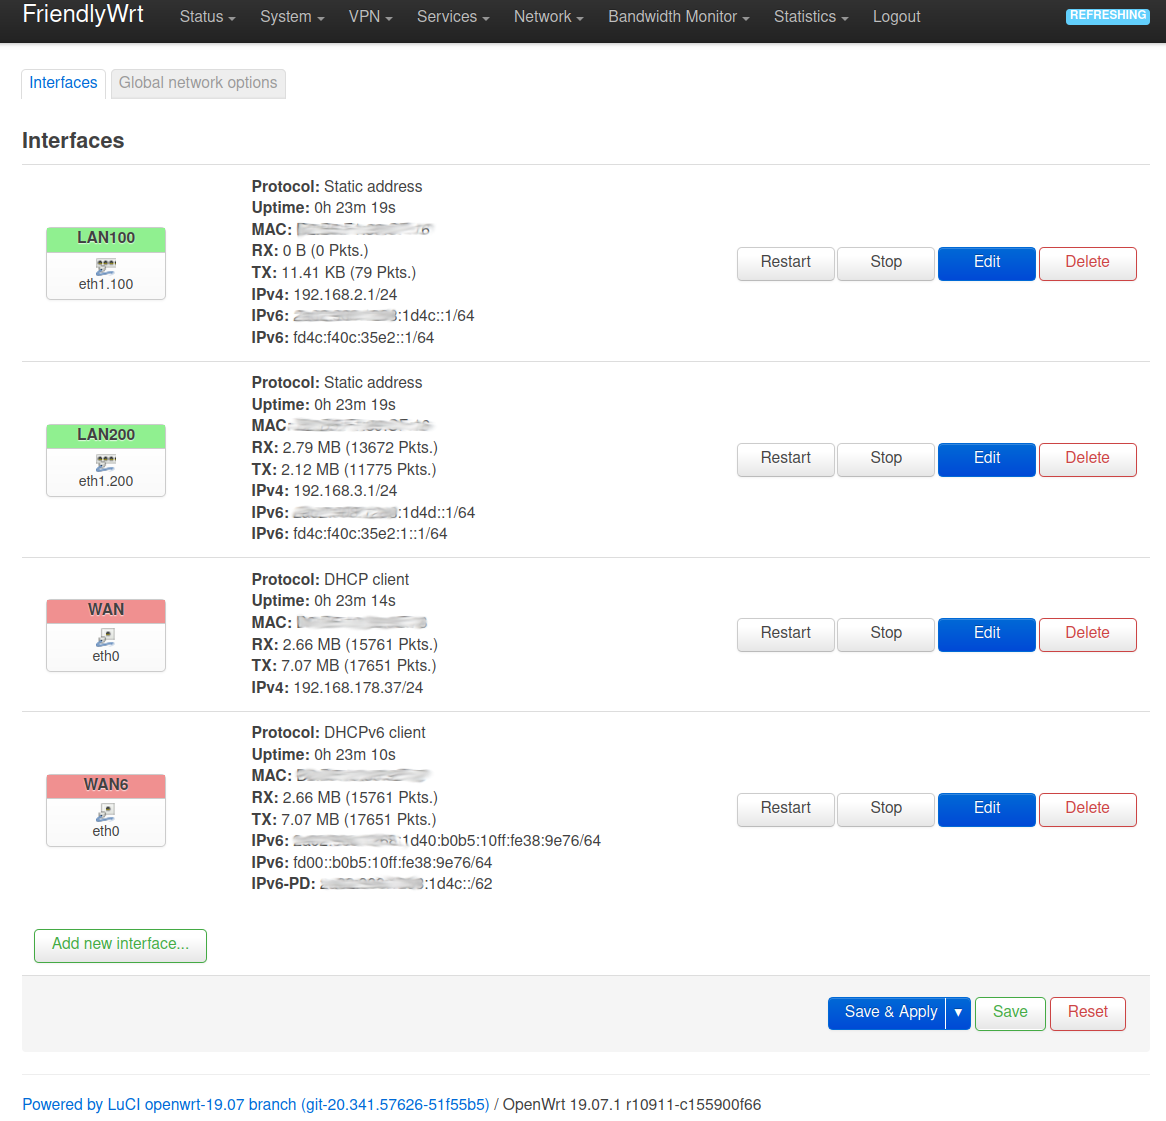
Einstellungen Interface UI
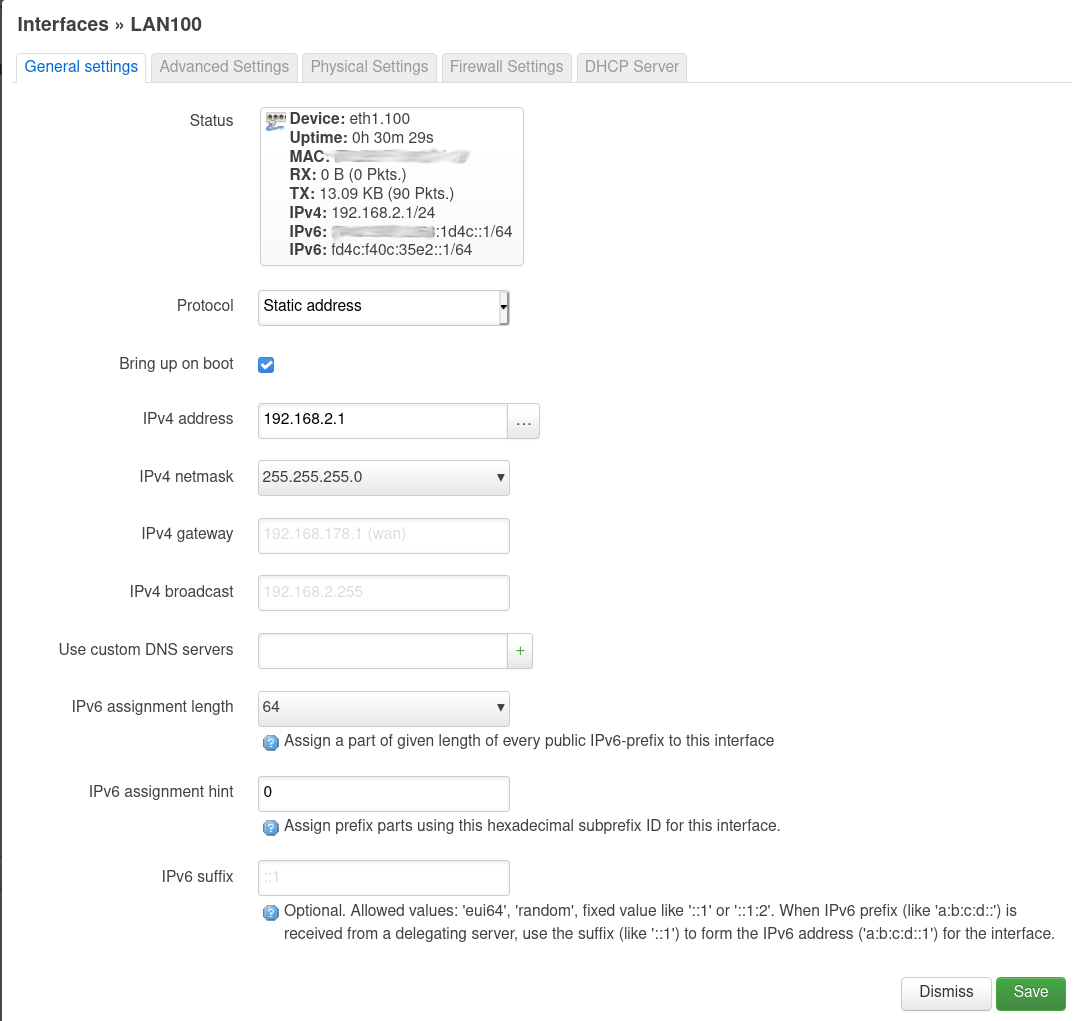
Am Anfang stand bei IPv6 assignment length eine 60, aber das war falsch.


So, das sollte dann alles an Einstellungen gewesen sein. Wenn man jetzt ein Notebook an Port 2 anschliesst und mittels DHCP eine Adresse bezieht, dann bekommt man.
2: enp0s25: <BROADCAST,MULTICAST,UP,LOWER_UP> mtu 1500 qdisc pfifo_fast state UP group default qlen 1000
     inet 192.168.2.173/24 brd 192.168.2.255 scope global dynamic noprefixroute enp0s25
       valid_lft 43179sec preferred_lft 43179sec
    inet6 fd4c:f40c:35e2:0:3845:b26f:d4db:7df6/64 scope global temporary dynamic
       valid_lft 604781sec preferred_lft 86358sec
    inet6 fd4c:f40c:35e2:0:3e97:eff:fe8b:3031/64 scope global mngtmpaddr noprefixroute
       valid_lft forever preferred_lft forever
    inet6 xxxx:xxxx:xxxx:1d4c:3845:b26f:d4db:7df6/64 scope global temporary dynamic
       valid_lft 6346sec preferred_lft 2746sec
    inet6 xxxx:xxxx:xxxx:1d4c:3e97:eff:fe8b:3031/64 scope global dynamic mngtmpaddr noprefixroute
       valid_lft 6346sec preferred_lft 2746sec
    inet6 fe80::3e97:eff:fe8b:3031/64 scope link noprefixroute
       valid_lft forever preferred_lft forever
Und an Port 3 das hier
2: enp0s25: <BROADCAST,MULTICAST,UP,LOWER_UP> mtu 1500 qdisc pfifo_fast state UP group default qlen 1000
    inet 192.168.3.173/24 brd 192.168.3.255 scope global dynamic noprefixroute enp0s25
       valid_lft 43183sec preferred_lft 43183sec
    inet6 fd4c:f40c:35e2:1::f0c/128 scope global noprefixroute
       valid_lft forever preferred_lft forever
    inet6 fd4c:f40c:35e2:1:3845:b26f:d4db:7df6/64 scope global temporary dynamic
       valid_lft 604786sec preferred_lft 86363sec
    inet6 fd4c:f40c:35e2:1:3e97:eff:fe8b:3031/64 scope global mngtmpaddr noprefixroute
       valid_lft forever preferred_lft forever
    inet6 xxxx:xxxx:xxxx:1d4d:3845:b26f:d4db:7df6/64 scope global temporary dynamic
       valid_lft 6442sec preferred_lft 2842sec
    inet6 xxxx:xxxx:xxxx:1d4d:3e97:eff:fe8b:3031/64 scope global dynamic mngtmpaddr noprefixroute
       valid_lft 6442sec preferred_lft 2842sec
    inet6 fe80::3e97:eff:fe8b:3031/64 scope link noprefixroute
       valid_lft forever preferred_lft forever
Erfolgskontrolle

Fazit
Ja, hat wieder was gedauert, aber es klappt jetzt einwandfrei. Was wir hier nicht behandelt haben, ist die entsprechende Absicherung über die Firewall! Also, wie immer, aufpassen wenn ihr das so an einem Gerät macht, was ungeschützt im Internet hängt. Bei IPv6 nicht unwichtig!!
Mir hat das wieder viel Spaß gemacht und jetzt schau ich noch, was da so an Geschwindigkeiten geht und freue mich jetzt schon drauf, wenn mein NanoPi R4S ankommt

Im Fediverse -> @FrankM@nrw.social
- NanoPi R5S
- Quartz64 Model B, 4GB RAM
- Quartz64 Model A, 4GB RAM
- RockPro64 v2.1
-
Ich hatte in diesem Beitrag Euch mal OpenWRT vorgestellt und kurz gestern auf die schnelle noch ein wenig mit VLan gebastelt, das ist nicht alles korrekt. Also, hier ausführlicher.
Hardware
- NanoPI R2S
- Netgear GS108E
- paar Netzwerkkabel
Ich habe das schon mal auf einem ROCKPro64 gemacht -> https://forum.frank-mankel.org/topic/740/rockpro64-zwei-lan-schnittstellen-vlan-einrichten
Schnittstellen
- eth0 WAN-Schnittstelle. Holt sich per DHCP die IP-Adresse aus meinem Netzwerk
- eth1 LAN-Schnittstelle. Die Schnittstelle bekommt das VLAN verpasst.
VLAN
Wir bauen auf der eth1 zwei VLAN's. Im Switch ist das so konfiguriert.
- Port 1 Uplink (kommt an LAN-Buchse vom R2S)
- Port 2 bildet das eth1.100
- Port 3 bildet das eth1.200
Software
Image des Herstellers des NanoPi R2S FriendlyELEC
/etc/config/network
config interface 'loopback'
        option ifname 'lo'
        option proto 'static'
        option ipaddr '127.0.0.1'
        option netmask '255.0.0.0'

config globals 'globals'
        option ula_prefix 'fd4c:f40c:35e2::/48'

config interface 'lan100'
        option ifname 'eth1.100'
        option proto 'static'
        option ipaddr '192.168.2.1'
        option netmask '255.255.255.0'
        option ip6hint '0'
        option ip6assign '64'

config interface 'lan200'
        option ifname 'eth1.200'
        option proto 'static'
        option ipaddr '192.168.3.1'
        option netmask '255.255.255.0'
        option ip6hint '1'
        option ip6assign '64'

config device
        option type '8021q'
        option ifname 'eth1.100'
        option vid '100'
        option name 'vlan1'

config device
        option type '8021q'
        option ifname 'eth1.200'
        option vid '200'
        option name 'vlan2'

config interface 'wan'
        option ifname 'eth0'
        option proto 'dhcp'

config interface 'wan6'
        option ifname 'eth0'
        option proto 'dhcpv6'
Ich denke, das sollte man verstehen
Danach Kiste mal neustarten und dann sollte das im UI vom OpenWRT so aussehen.Einstellungen Interface UI
Am Anfang stand bei IPv6 assignment length eine 60, aber das war falsch.
So, das sollte dann alles an Einstellungen gewesen sein. Wenn man jetzt ein Notebook an Port 2 anschliesst und mittels DHCP eine Adresse bezieht, dann bekommt man.
2: enp0s25: <BROADCAST,MULTICAST,UP,LOWER_UP> mtu 1500 qdisc pfifo_fast state UP group default qlen 1000
     inet 192.168.2.173/24 brd 192.168.2.255 scope global dynamic noprefixroute enp0s25
       valid_lft 43179sec preferred_lft 43179sec
    inet6 fd4c:f40c:35e2:0:3845:b26f:d4db:7df6/64 scope global temporary dynamic
       valid_lft 604781sec preferred_lft 86358sec
    inet6 fd4c:f40c:35e2:0:3e97:eff:fe8b:3031/64 scope global mngtmpaddr noprefixroute
       valid_lft forever preferred_lft forever
    inet6 xxxx:xxxx:xxxx:1d4c:3845:b26f:d4db:7df6/64 scope global temporary dynamic
       valid_lft 6346sec preferred_lft 2746sec
    inet6 xxxx:xxxx:xxxx:1d4c:3e97:eff:fe8b:3031/64 scope global dynamic mngtmpaddr noprefixroute
       valid_lft 6346sec preferred_lft 2746sec
    inet6 fe80::3e97:eff:fe8b:3031/64 scope link noprefixroute
       valid_lft forever preferred_lft forever
Und an Port 3 das hier
2: enp0s25: <BROADCAST,MULTICAST,UP,LOWER_UP> mtu 1500 qdisc pfifo_fast state UP group default qlen 1000
    inet 192.168.3.173/24 brd 192.168.3.255 scope global dynamic noprefixroute enp0s25
       valid_lft 43183sec preferred_lft 43183sec
    inet6 fd4c:f40c:35e2:1::f0c/128 scope global noprefixroute
       valid_lft forever preferred_lft forever
    inet6 fd4c:f40c:35e2:1:3845:b26f:d4db:7df6/64 scope global temporary dynamic
       valid_lft 604786sec preferred_lft 86363sec
    inet6 fd4c:f40c:35e2:1:3e97:eff:fe8b:3031/64 scope global mngtmpaddr noprefixroute
       valid_lft forever preferred_lft forever
    inet6 xxxx:xxxx:xxxx:1d4d:3845:b26f:d4db:7df6/64 scope global temporary dynamic
       valid_lft 6442sec preferred_lft 2842sec
    inet6 xxxx:xxxx:xxxx:1d4d:3e97:eff:fe8b:3031/64 scope global dynamic mngtmpaddr noprefixroute
       valid_lft 6442sec preferred_lft 2842sec
    inet6 fe80::3e97:eff:fe8b:3031/64 scope link noprefixroute
       valid_lft forever preferred_lft forever
Erfolgskontrolle
Fazit
Ja, hat wieder was gedauert, aber es klappt jetzt einwandfrei. Was wir hier nicht behandelt haben, ist die entsprechende Absicherung über die Firewall! Also, wie immer, aufpassen wenn ihr das so an einem Gerät macht, was ungeschützt im Internet hängt. Bei IPv6 nicht unwichtig!!
Mir hat das wieder viel Spaß gemacht und jetzt schau ich noch, was da so an Geschwindigkeiten geht und freue mich jetzt schon drauf, wenn mein NanoPi R4S ankommt
Ich hatte mich doch über den Namen FriendlyWRT gewundert und das mal nachgelesen. Das Image von FriendlyWRT ist ein OpenWRT, was die Firma FriendlyELEC für ihre SOCs anpasst.
Im Image von FriendlyWRT sind noch ein paar Services vorinstalliert, die man aber unter OpenWRT alle nachinstallieren kann. So weit mein Verständnis.
Da OpenWRT, den NanoPi R2S von Hause aus unterstützt, wollen wir dieses Image mal ausprobieren. Das Image findet man hier. Position 560 ist unser NanoPi R2S.
Wir wählen das Firmware OpenWrt snapshot Install URL Image.
Wie gewohnt auf eine SD-Karte bügeln und den R2S starten. Wichtig, wir brauchen ab hier, jetzt erst mal eine UART Konsole um einige Dinge zu erledigen. Dieses Image ist ein wenig nackt, wir füllen das jetzt mit Leben.
Das User Interface(UI) Luci ist nicht vorinstalliert, das installieren wir jetzt nach. Vorher setzen wir noch ein Root Passwort!
passwd
opkg update
opkg install luci
Danach können wir das UI aufrufen. Dazu klemmen wir ein Notebook an die LAN-Schnittstelle und loggen uns ein.
http://192.168.1.1Jetzt brauch ich etwas Komfort, ich arbeite gerne von meinem Haupt-PC aus. Der R2S hängt mit dem WAN an meiner Fritzbox. Der Zugriff ist standardmäßig geblockt. Das ist auch gut so, aber ich brauche das jetzt so
")
Wir bearbeiten die Firewall.
/etc/config/firewall
config rule
        option src              wan
        option dest_port        22
        option target           ACCEPT
        option proto            tcp

config rule
        option src              wan
        option dest_port        80
        option target           ACCEPT
        option proto            tcp
Wir öffnen den SSH und HTTP Port auf der WAN-Schnittstelle.
Im produktiven Einsatz unbedingt wieder löschen!!
Nun können wir den R2S bequem vom Haupt-PC erreichen und uns weiter damit beschäftigen
Danach habe ich die Config für /etc/config/network wie oben beschrieben angepasst. Reboot. Danach noch die Firewall Zonen zugewiesen und den DHCP-Server eingestellt. Fertig ist der Kleine
Macht ordentlich VLAN und ordentliches IPv6 und IPv4.
Womit man sich jetzt noch beschäftigen muss, sind die Firewall Settings. Ich gehe davon aus (gelesen), das die Standardeinstellungen ausreichend sicher sind. Ja, nicht die zwei Anpassungen von mir
Fazit
Wir haben jetzt ein Aktuelles OpenWRT auf dem NanoPi R2S und kein Image unbekannter Herkunft. (Sorry FriendlyELEC). Beachten sollte man dabei das es sich hier um eine Entwicklungsversion handelt.
Da es aber sonst keinen Release für den R2S gibt (außer FreindlyWRT) müssen wir diesen benutzen, wenn wir ein aktuelles OpenWRT auf dem R2S haben möchten.
Im Fediverse -> @FrankM@nrw.social
- NanoPi R5S
- Quartz64 Model B, 4GB RAM
- Quartz64 Model A, 4GB RAM
- RockPro64 v2.1
-
Ich hatte mich doch über den Namen FriendlyWRT gewundert und das mal nachgelesen. Das Image von FriendlyWRT ist ein OpenWRT, was die Firma FriendlyELEC für ihre SOCs anpasst.
Im Image von FriendlyWRT sind noch ein paar Services vorinstalliert, die man aber unter OpenWRT alle nachinstallieren kann. So weit mein Verständnis.
Da OpenWRT, den NanoPi R2S von Hause aus unterstützt, wollen wir dieses Image mal ausprobieren. Das Image findet man hier. Position 560 ist unser NanoPi R2S.
Wir wählen das Firmware OpenWrt snapshot Install URL Image.
Wie gewohnt auf eine SD-Karte bügeln und den R2S starten. Wichtig, wir brauchen ab hier, jetzt erst mal eine UART Konsole um einige Dinge zu erledigen. Dieses Image ist ein wenig nackt, wir füllen das jetzt mit Leben.
Das User Interface(UI) Luci ist nicht vorinstalliert, das installieren wir jetzt nach. Vorher setzen wir noch ein Root Passwort!
passwd
opkg update
opkg install luci
Danach können wir das UI aufrufen. Dazu klemmen wir ein Notebook an die LAN-Schnittstelle und loggen uns ein.
http://192.168.1.1Jetzt brauch ich etwas Komfort, ich arbeite gerne von meinem Haupt-PC aus. Der R2S hängt mit dem WAN an meiner Fritzbox. Der Zugriff ist standardmäßig geblockt. Das ist auch gut so, aber ich brauche das jetzt so
Wir bearbeiten die Firewall.
/etc/config/firewall
config rule
        option src              wan
        option dest_port        22
        option target           ACCEPT
        option proto            tcp

config rule
        option src              wan
        option dest_port        80
        option target           ACCEPT
        option proto            tcp
Wir öffnen den SSH und HTTP Port auf der WAN-Schnittstelle.
Im produktiven Einsatz unbedingt wieder löschen!!
Nun können wir den R2S bequem vom Haupt-PC erreichen und uns weiter damit beschäftigen
Danach habe ich die Config für /etc/config/network wie oben beschrieben angepasst. Reboot. Danach noch die Firewall Zonen zugewiesen und den DHCP-Server eingestellt. Fertig ist der Kleine
Macht ordentlich VLAN und ordentliches IPv6 und IPv4.
Womit man sich jetzt noch beschäftigen muss, sind die Firewall Settings. Ich gehe davon aus (gelesen), das die Standardeinstellungen ausreichend sicher sind. Ja, nicht die zwei Anpassungen von mir
Fazit
Wir haben jetzt ein Aktuelles OpenWRT auf dem NanoPi R2S und kein Image unbekannter Herkunft. (Sorry FriendlyELEC). Beachten sollte man dabei das es sich hier um eine Entwicklungsversion handelt.
Da es aber sonst keinen Release für den R2S gibt (außer FreindlyWRT) müssen wir diesen benutzen, wenn wir ein aktuelles OpenWRT auf dem R2S haben möchten.
Mit der FriendlyWRT Version habe ich den Zugriff per IPv6 von extern gestern niccht hinbekommen, mit der OpenWRT Version von heute kein Problem
:~# ping6 2a02:908:1260:13a8:xxxx
PING 2a02:908:1260:13a8:xxxx(2a02:908:1260:13a8:xxxx) 56 data bytes
64 bytes from 2a02:908:1260:13a8:xxxx: icmp_seq=1 ttl=49 time=24.8 ms
64 bytes from 2a02:908:1260:13a8:xxxx: icmp_seq=2 ttl=49 time=16.8 ms
64 bytes from 2a02:908:1260:13a8:xxxx: icmp_seq=3 ttl=49 time=17.7 ms
64 bytes from 2a02:908:1260:13a8:xxxx: icmp_seq=4 ttl=49 time=20.9 ms
64 bytes from 2a02:908:1260:13a8:xxxx: icmp_seq=5 ttl=49 time=16.7 ms
^C
--- 2a02:908:1260:13a8:xxxx ping statistics ---
5 packets transmitted, 5 received, 0% packet loss, time 10ms
Im Fediverse -> @FrankM@nrw.social
- NanoPi R5S
- Quartz64 Model B, 4GB RAM
- Quartz64 Model A, 4GB RAM
- RockPro64 v2.1
-
Mit der FriendlyWRT Version habe ich den Zugriff per IPv6 von extern gestern niccht hinbekommen, mit der OpenWRT Version von heute kein Problem
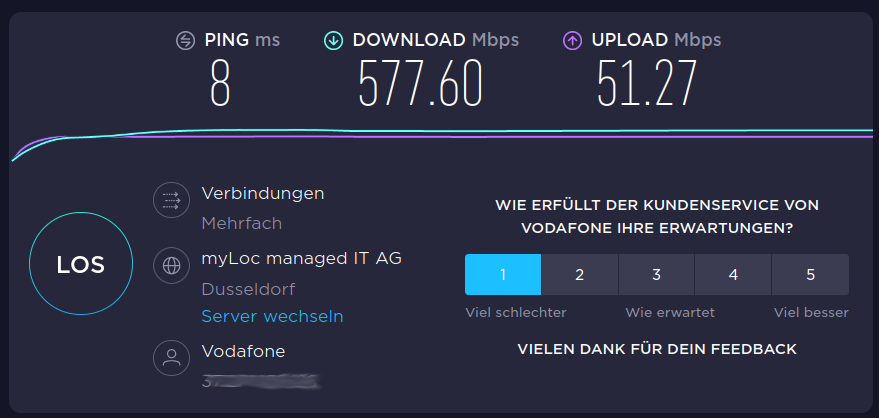
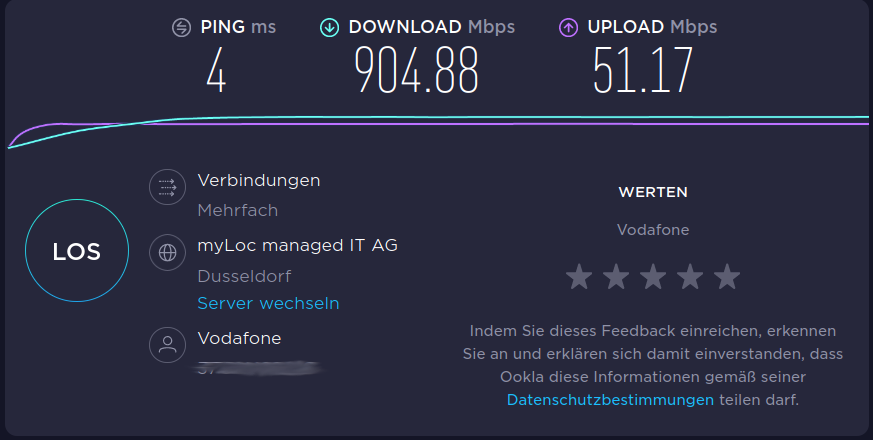
:~# ping6 2a02:908:1260:13a8:xxxx PING 2a02:908:1260:13a8:xxxx(2a02:908:1260:13a8:xxxx) 56 data bytes 64 bytes from 2a02:908:1260:13a8:xxxx: icmp_seq=1 ttl=49 time=24.8 ms 64 bytes from 2a02:908:1260:13a8:xxxx: icmp_seq=2 ttl=49 time=16.8 ms 64 bytes from 2a02:908:1260:13a8:xxxx: icmp_seq=3 ttl=49 time=17.7 ms 64 bytes from 2a02:908:1260:13a8:xxxx: icmp_seq=4 ttl=49 time=20.9 ms 64 bytes from 2a02:908:1260:13a8:xxxx: icmp_seq=5 ttl=49 time=16.7 ms ^C --- 2a02:908:1260:13a8:xxxx ping statistics --- 5 packets transmitted, 5 received, 0% packet loss, time 10msUnd kurz mal ein iperf3 Test
:~$ iperf3 -s
-----------------------------------------------------------
Server listening on 5201
-----------------------------------------------------------
Accepted connection from 192.168.178.33, port 60400
[  5] local 192.168.178.27 port 5201 connected to 192.168.178.33 port 60402
[ ID] Interval           Transfer     Bitrate
[  5]   0.00-1.00   sec  9.82 MBytes  82.4 Mbits/sec
[  5]   1.00-2.00   sec  10.6 MBytes  89.3 Mbits/sec
[  5]   2.00-3.00   sec  9.91 MBytes  83.1 Mbits/sec
[  5]   3.00-4.00   sec  9.94 MBytes  83.3 Mbits/sec
[  5]   4.00-5.00   sec  11.3 MBytes  94.4 Mbits/sec
[  5]   5.00-6.00   sec  11.3 MBytes  95.1 Mbits/sec
[  5]   6.00-7.00   sec  10.5 MBytes  87.7 Mbits/sec
[  5]   7.00-8.00   sec  11.1 MBytes  92.9 Mbits/sec
[  5]   8.00-9.00   sec  11.0 MBytes  92.6 Mbits/sec
[  5]   9.00-10.00  sec  11.1 MBytes  93.1 Mbits/sec
[  5]  10.00-10.17  sec  1.88 MBytes  92.8 Mbits/sec
- - - - - - - - - - - - - - - - - - - - - - - - -
[ ID] Interval           Transfer     Bitrate
[  5]   0.00-10.17  sec   108 MBytes  89.4 Mbits/sec                  receiver
-----------------------------------------------------------
Server listening on 5201
-----------------------------------------------------------
Accepted connection from 192.168.178.33, port 60404
[  5] local 192.168.178.27 port 5201 connected to 192.168.178.33 port 60406
[ ID] Interval           Transfer     Bitrate         Retr  Cwnd
[  5]   0.00-1.00   sec  15.7 MBytes   131 Mbits/sec    0    755 KBytes
[  5]   1.00-2.00   sec  12.5 MBytes   105 Mbits/sec    0    796 KBytes
[  5]   2.00-3.00   sec  12.5 MBytes   105 Mbits/sec    0    837 KBytes
[  5]   3.00-4.00   sec  13.8 MBytes   115 Mbits/sec    0    837 KBytes
[  5]   4.00-5.00   sec  12.5 MBytes   105 Mbits/sec    0    888 KBytes
[  5]   5.00-6.00   sec  12.5 MBytes   105 Mbits/sec    0    888 KBytes
[  5]   6.00-7.00   sec  12.5 MBytes   105 Mbits/sec    0    939 KBytes
[  5]   7.00-8.00   sec  13.8 MBytes   115 Mbits/sec    0    939 KBytes
[  5]   8.00-9.00   sec  12.5 MBytes   105 Mbits/sec    0    939 KBytes
[  5]   9.00-10.00  sec  12.5 MBytes   105 Mbits/sec    0   1.13 MBytes
[  5]  10.00-10.04  sec  1.25 MBytes   250 Mbits/sec    0   1.13 MBytes
- - - - - - - - - - - - - - - - - - - - - - - - -
[ ID] Interval           Transfer     Bitrate         Retr
[  5]   0.00-10.04  sec   132 MBytes   110 Mbits/sec    0             sender
-----------------------------------------------------------
Server listening on 5201
-----------------------------------------------------------
Route
Notebook <-> R2S <-> FB <-> WLan <-> Haupt-PC
Im Fediverse -> @FrankM@nrw.social
- NanoPi R5S
- Quartz64 Model B, 4GB RAM
- Quartz64 Model A, 4GB RAM
- RockPro64 v2.1
-
Und kurz mal ein iperf3 Test
:~$ iperf3 -s
-----------------------------------------------------------
Server listening on 5201
-----------------------------------------------------------
Accepted connection from 192.168.178.33, port 60400
[  5] local 192.168.178.27 port 5201 connected to 192.168.178.33 port 60402
[ ID] Interval           Transfer     Bitrate
[  5]   0.00-1.00   sec  9.82 MBytes  82.4 Mbits/sec
[  5]   1.00-2.00   sec  10.6 MBytes  89.3 Mbits/sec
[  5]   2.00-3.00   sec  9.91 MBytes  83.1 Mbits/sec
[  5]   3.00-4.00   sec  9.94 MBytes  83.3 Mbits/sec
[  5]   4.00-5.00   sec  11.3 MBytes  94.4 Mbits/sec
[  5]   5.00-6.00   sec  11.3 MBytes  95.1 Mbits/sec
[  5]   6.00-7.00   sec  10.5 MBytes  87.7 Mbits/sec
[  5]   7.00-8.00   sec  11.1 MBytes  92.9 Mbits/sec
[  5]   8.00-9.00   sec  11.0 MBytes  92.6 Mbits/sec
[  5]   9.00-10.00  sec  11.1 MBytes  93.1 Mbits/sec
[  5]  10.00-10.17  sec  1.88 MBytes  92.8 Mbits/sec
- - - - - - - - - - - - - - - - - - - - - - - - -
[ ID] Interval           Transfer     Bitrate
[  5]   0.00-10.17  sec   108 MBytes  89.4 Mbits/sec                  receiver
-----------------------------------------------------------
Server listening on 5201
-----------------------------------------------------------
Accepted connection from 192.168.178.33, port 60404
[  5] local 192.168.178.27 port 5201 connected to 192.168.178.33 port 60406
[ ID] Interval           Transfer     Bitrate         Retr  Cwnd
[  5]   0.00-1.00   sec  15.7 MBytes   131 Mbits/sec    0    755 KBytes
[  5]   1.00-2.00   sec  12.5 MBytes   105 Mbits/sec    0    796 KBytes
[  5]   2.00-3.00   sec  12.5 MBytes   105 Mbits/sec    0    837 KBytes
[  5]   3.00-4.00   sec  13.8 MBytes   115 Mbits/sec    0    837 KBytes
[  5]   4.00-5.00   sec  12.5 MBytes   105 Mbits/sec    0    888 KBytes
[  5]   5.00-6.00   sec  12.5 MBytes   105 Mbits/sec    0    888 KBytes
[  5]   6.00-7.00   sec  12.5 MBytes   105 Mbits/sec    0    939 KBytes
[  5]   7.00-8.00   sec  13.8 MBytes   115 Mbits/sec    0    939 KBytes
[  5]   8.00-9.00   sec  12.5 MBytes   105 Mbits/sec    0    939 KBytes
[  5]   9.00-10.00  sec  12.5 MBytes   105 Mbits/sec    0   1.13 MBytes
[  5]  10.00-10.04  sec  1.25 MBytes   250 Mbits/sec    0   1.13 MBytes
- - - - - - - - - - - - - - - - - - - - - - - - -
[ ID] Interval           Transfer     Bitrate         Retr
[  5]   0.00-10.04  sec   132 MBytes   110 Mbits/sec    0             sender
-----------------------------------------------------------
Server listening on 5201
-----------------------------------------------------------
Route
Notebook <-> R2S <-> FB <-> WLan <-> Haupt-PC
-
Mittlerweile hängt der R2S in meinem internen Netz mit der WAN Schnittstelle - zum Testen....
Merksatz

Auf der WAN-Seite und der LAN-Seite müssen andere Netze sein, sonst klemmt es
Hintergrund
Ich habe den R2S in meinem LAN (192.168.3.0/24) mit der Schnittstelle WAN hängen. Eines meiner Netzwerke, LAN200, macht auch ein Netz 192.168.3.0/24 auf.
Problem
Nachdem ich den R2S auf der WAN-Seite nur über die IPv6 Adresse erreichen konnte, musste ich etwas nachdenken. Dann fiel der Groschen.
Lösung
Das Netz auf der LAN-Seite auf 192.168.5.0/24 geändert, Problem gelöst
-
Ich hatte mich doch über den Namen FriendlyWRT gewundert und das mal nachgelesen. Das Image von FriendlyWRT ist ein OpenWRT, was die Firma FriendlyELEC für ihre SOCs anpasst.
Im Image von FriendlyWRT sind noch ein paar Services vorinstalliert, die man aber unter OpenWRT alle nachinstallieren kann. So weit mein Verständnis.
Da OpenWRT, den NanoPi R2S von Hause aus unterstützt, wollen wir dieses Image mal ausprobieren. Das Image findet man hier. Position 560 ist unser NanoPi R2S.
Wir wählen das Firmware OpenWrt snapshot Install URL Image.
Wie gewohnt auf eine SD-Karte bügeln und den R2S starten. Wichtig, wir brauchen ab hier, jetzt erst mal eine UART Konsole um einige Dinge zu erledigen. Dieses Image ist ein wenig nackt, wir füllen das jetzt mit Leben.
Das User Interface(UI) Luci ist nicht vorinstalliert, das installieren wir jetzt nach. Vorher setzen wir noch ein Root Passwort!
passwd
opkg update
opkg install luci
Danach können wir das UI aufrufen. Dazu klemmen wir ein Notebook an die LAN-Schnittstelle und loggen uns ein.
http://192.168.1.1Jetzt brauch ich etwas Komfort, ich arbeite gerne von meinem Haupt-PC aus. Der R2S hängt mit dem WAN an meiner Fritzbox. Der Zugriff ist standardmäßig geblockt. Das ist auch gut so, aber ich brauche das jetzt so
Wir bearbeiten die Firewall.
/etc/config/firewall
config rule
        option src              wan
        option dest_port        22
        option target           ACCEPT
        option proto            tcp

config rule
        option src              wan
        option dest_port        80
        option target           ACCEPT
        option proto            tcp
Wir öffnen den SSH und HTTP Port auf der WAN-Schnittstelle.
Im produktiven Einsatz unbedingt wieder löschen!!
Nun können wir den R2S bequem vom Haupt-PC erreichen und uns weiter damit beschäftigen
Danach habe ich die Config für /etc/config/network wie oben beschrieben angepasst. Reboot. Danach noch die Firewall Zonen zugewiesen und den DHCP-Server eingestellt. Fertig ist der Kleine
Macht ordentlich VLAN und ordentliches IPv6 und IPv4.
Womit man sich jetzt noch beschäftigen muss, sind die Firewall Settings. Ich gehe davon aus (gelesen), das die Standardeinstellungen ausreichend sicher sind. Ja, nicht die zwei Anpassungen von mir
Fazit
Wir haben jetzt ein Aktuelles OpenWRT auf dem NanoPi R2S und kein Image unbekannter Herkunft. (Sorry FriendlyELEC). Beachten sollte man dabei das es sich hier um eine Entwicklungsversion handelt.
Da es aber sonst keinen Release für den R2S gibt (außer FreindlyWRT) müssen wir diesen benutzen, wenn wir ein aktuelles OpenWRT auf dem R2S haben möchten.
@frankm Hallo Frank, es gibt jetzt wohl eine neue FriendlyWRT Version für den R2S basierend auf dem neuesten OpenWRT. Hast Du die zufällig schon ausprobiert bzw. ne Idee wie ich das bestehende Update ohne nochmal alles neu machen zu müssen?
-
@frankm Hallo Frank, es gibt jetzt wohl eine neue FriendlyWRT Version für den R2S basierend auf dem neuesten OpenWRT. Hast Du die zufällig schon ausprobiert bzw. ne Idee wie ich das bestehende Update ohne nochmal alles neu machen zu müssen?
Welche Version meinst Du? Ich finde nur Snapshots -> https://openwrt.org/toh/views/toh_fwdownload?dataflt[Model*~]=R2S
Und zum Updaten hatte ich hier was geschrieben. Bei nicht so komplexen Settings ist das ja relativ schnell gemacht. Alle Configs liegen als Textfiles vor. Eben sichern, nach dem Upgrade alles wieder eintragen, einmal durchstarten - fertig! Sollte in 5 Minuten erledigt sein.
Für komplexere Settings soll es wohl irgendwo Scripte geben, damit habe ich aber keine Erfahrungen.
-
@thrakath1980 Ok, du meinst die FriendlyArm Variante von OpenWRT. Ich denke, da sollte man besser alles neu machen. Leider ist das bei OpenWRT nicht so einfach zu updaten/upgraden wie z.B. bei einem Linux Kernel. Ich habe es mal runtergeladen, wenn ich mal Zeit habe, schau ich mal rein.
-
 F FrankM hat am auf dieses Thema verwiesen