Skip to content

ClusterSSH

Angeheftet Linux
  • Beim Lesen der Beiträge im Debian Forum, bin ich doch über einen tollen Tipp gestolpert.

    ClusterSSH

    The command opens an administration console and an xterm to all
    specified hosts. Any text typed into the administration console is
    replicated to all windows. All windows may also be typed into directly.

    Installation

    sudo apt install clusterssh
    

    Aufruf

    cssh root@<IPv4> root@<IPv4>
    

    Das öffnet zwei Terminals.

    Wenn ich nun alle meine Server auf einen Schlag öffnen möchte, um z.B. Updates zu installieren? Wechseln in das folgende Verzeichnis.

    cd ~/.clusterssh
    

    Datei clusters anlegen.

    cluster root@<IPv4> root@<IPv4> root@<IPv4> root@<IPv4> root@<IPv4>
    

    Nun würde der Aufruf

    cssh cluster

    alle fünf Terminals auf einen Schlag öffnen. Und über das Kontrollfenster kann man z.B. ein

    apt update && apt upgrade
    

    an alle 5 Server gleichzeitig eingeben. Man kann auf jedem Server eingreifen. Super praktisch!

    In der config habe ich noch folgendes eingestellt.

    rows=2
    terminal_size=160x48
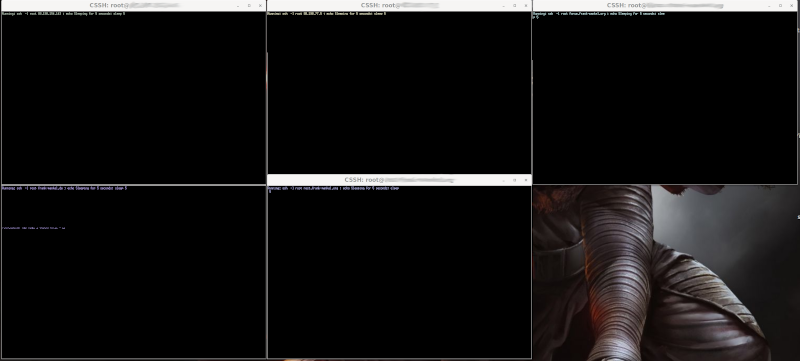
    

    clusterssh.png

  • Mal angeheftet, weil mittlerweile eines meiner Lieblingstools.

  • Ich hatte irgendwo geschrieben, das ClusterSSH nicht auf Wayland funktioniert!? Das ist Quatsch.
    Auf Ubuntu 21.04 mit Wayland lüuft ClusterSSH einwandfrei. Ich habe lediglich die Fenstergröße etwas angepasst, man sieht ja nicht mehr so gut 😉

    terminal_size=160x48
    
  • FrankMF FrankM hat am auf dieses Thema verwiesen
  • FrankMF FrankM hat am auf dieses Thema verwiesen
  • Mal wieder lange dran rumgefummelt, bis es passte.

    I have figured out how to use any font in xterm. So for the case of the mentioned Inconsolata font size 14, the following works:

    1. Add these 2 lines into ~/.Xresources (create it if it does not exist)

    XTermfaceName: Inconsolata
    XTerm
    faceSize: 14

    1. Then, tell xterm to use this file:

    export XENVIRONMENT="${HOME}/.Xresources"

    Preferably add this export into .bashrc, so that it is persistent.

    1. comment out the font settings in ~/.clusterssh/config, if it exists:

    # terminal_font=6x13

    Quelle: https://unix.stackexchange.com/questions/230106/cluster-ssh-specify-terminal-font

  • FrankMF FrankM hat am auf dieses Thema verwiesen
  • 0 Stimmen
    1 Beiträge
    116 Aufrufe
    Niemand hat geantwortet
  • Rest-Server v0.12.0 released

    Restic
    1
    0 Stimmen
    1 Beiträge
    63 Aufrufe
    Niemand hat geantwortet
  • GoAccess - Visual Web Log Analyzer

    Verschoben Linux
    1
    0 Stimmen
    1 Beiträge
    93 Aufrufe
    Niemand hat geantwortet
  • Debian Buster 10.8 released

    Linux
    1
    0 Stimmen
    1 Beiträge
    196 Aufrufe
    Niemand hat geantwortet
  • Nextcloud Talk

    Nextcloud
    5
    0 Stimmen
    5 Beiträge
    758 Aufrufe
    FrankMF

    All I needed to do was setting the permissions to 744 for the archive directory and the symlinks resolved correctly after a reboot of coturn

    My turnserver installation on Debian runs as the user turnserver and not as root, nor is the user turnserver in any group owning the letsencrypt directory.
    If your turnserver does run as root, it should be fine just adding execute permissions.

    I hope this helps some of you.
    Quelle: https://help.nextcloud.com/t/lets-encrypt-symlink-breaks-coturn-configuration/70166

    Was zum Testen die Tage....

  • Twitter-Beiträge in NodeBB anzeigen

    Verschoben NodeBB
    3
    0 Stimmen
    3 Beiträge
    315 Aufrufe
    FrankMF

    Endlich was gefunden um Twitter-Beiträge hier anzuzeigen. Beispiele siehe oben... YEAH

    Wie man das in NodeBB und dem Plugin nodebb-plugin-ns-embed einbaut, steht hier.
    https://community.nodebb.org/topic/7135/nodebb-plugin-ns-embed-ns-embed/39

  • 0 Stimmen
    2 Beiträge
    786 Aufrufe
    FrankMF

    So, dann mal das Ganze testen wenn man seinen Haupt-PC neu installiert hat und ein paar Daten braucht.

    0_1534692578537_IMG_20180819_090116_ergebnis.jpg

    Also, mal Restic installiert.

    sudo apt-get install restic

    Nach erfolgter Installation ein Test

    frank@frank-MS-7A34:~/restic$ restic version restic 0.8.3 compiled with go1.10 on linux/amd64

    Geht so weit.

    Snapshots auflisten. restic -r sftp:rock64@IP:/home/rock64/backup snapshots

    Sieht dann so aus.

    frank@frank-MS-7A34:~$ sudo restic -r sftp:rock64@192.168.3.207:/home/rock64/backup snapshots [sudo] Passwort für frank: rock64@192.168.3.207's password: enter password for repository: password is correct ID Date Host Tags Directory ---------------------------------------------------------------------- 7e2eddcb 2018-08-18 10:10:40 frank-MS-7A34 /home/frank/Bilder 073b7cb4 2018-08-18 14:21:17 frank-MS-7A34 /home/frank 6bc9b21b 2018-08-18 16:11:19 frank-MS-7A34 /home/frank ---------------------------------------------------------------------- 3 snapshots Snapshot wiederherstellen sudo restic -r sftp:rock64@IP:/home/rock64/backup restore latest --target /tmp/backup

    Hiermit stellen wir das Backup im temporären Ordner /tmp/backup wieder her. Hat ewig gedauert, aber ging !?!?!?

  • 0 Stimmen
    1 Beiträge
    766 Aufrufe
    Niemand hat geantwortet