Skip to content

ClusterSSH

Angeheftet Linux
4 1 1.2k
  • Beim Lesen der Beiträge im Debian Forum, bin ich doch über einen tollen Tipp gestolpert.

    ClusterSSH

    The command opens an administration console and an xterm to all
    specified hosts. Any text typed into the administration console is
    replicated to all windows. All windows may also be typed into directly.

    Installation

    sudo apt install clusterssh
    

    Aufruf

    cssh root@<IPv4> root@<IPv4>
    

    Das öffnet zwei Terminals.

    Wenn ich nun alle meine Server auf einen Schlag öffnen möchte, um z.B. Updates zu installieren? Wechseln in das folgende Verzeichnis.

    cd ~/.clusterssh
    

    Datei clusters anlegen.

    cluster root@<IPv4> root@<IPv4> root@<IPv4> root@<IPv4> root@<IPv4>
    

    Nun würde der Aufruf

    cssh cluster

    alle fünf Terminals auf einen Schlag öffnen. Und über das Kontrollfenster kann man z.B. ein

    apt update && apt upgrade
    

    an alle 5 Server gleichzeitig eingeben. Man kann auf jedem Server eingreifen. Super praktisch!

    In der config habe ich noch folgendes eingestellt.

    rows=2
    terminal_size=160x48
    

    clusterssh.png

  • Mal angeheftet, weil mittlerweile eines meiner Lieblingstools.

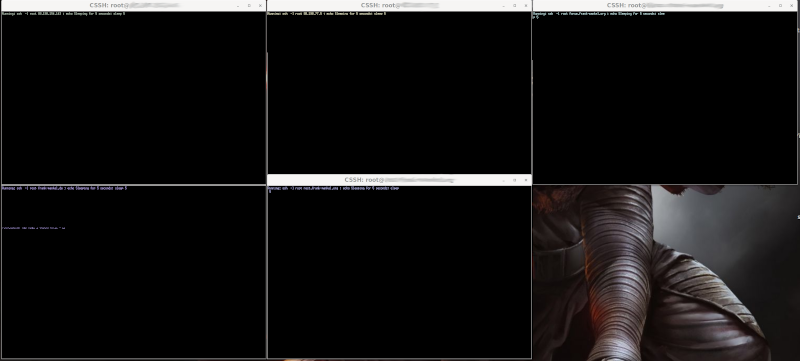
  • Ich hatte irgendwo geschrieben, das ClusterSSH nicht auf Wayland funktioniert!? Das ist Quatsch.
    Auf Ubuntu 21.04 mit Wayland lüuft ClusterSSH einwandfrei. Ich habe lediglich die Fenstergröße etwas angepasst, man sieht ja nicht mehr so gut 😉

    terminal_size=160x48
    
  • F FrankM hat am 14. Nov. 2021, 08:28 auf dieses Thema verwiesen
  • F FrankM hat am 14. Nov. 2021, 08:35 auf dieses Thema verwiesen
  • Mal wieder lange dran rumgefummelt, bis es passte.

    I have figured out how to use any font in xterm. So for the case of the mentioned Inconsolata font size 14, the following works:

    1. Add these 2 lines into ~/.Xresources (create it if it does not exist)

    XTermfaceName: Inconsolata
    XTerm
    faceSize: 14

    1. Then, tell xterm to use this file:

    export XENVIRONMENT="${HOME}/.Xresources"

    Preferably add this export into .bashrc, so that it is persistent.

    1. comment out the font settings in ~/.clusterssh/config, if it exists:

    # terminal_font=6x13

    Quelle: https://unix.stackexchange.com/questions/230106/cluster-ssh-specify-terminal-font

  • F FrankM hat am 12. Aug. 2023, 12:33 auf dieses Thema verwiesen
  • Debian Bookworm 12.9 released

    Verschoben Linux debian linux bookworm 11. Jan. 2025, 14:32
    0 Stimmen
    1 Beiträge
    346 Aufrufe
    Niemand hat geantwortet
  • Ansible - host_key_checking

    Ansible ansible linux hcloud 26. Aug. 2023, 06:40
    0 Stimmen
    1 Beiträge
    241 Aufrufe
    Niemand hat geantwortet
  • 0 Stimmen
    1 Beiträge
    202 Aufrufe
    Niemand hat geantwortet
  • 0 Stimmen
    11 Beiträge
    2k Aufrufe
    @thrakath1980 Ok, du meinst die FriendlyArm Variante von OpenWRT. Ich denke, da sollte man besser alles neu machen. Leider ist das bei OpenWRT nicht so einfach zu updaten/upgraden wie z.B. bei einem Linux Kernel. Ich habe es mal runtergeladen, wenn ich mal Zeit habe, schau ich mal rein.
  • Restic - forget --keep-last 3 --prune

    Restic linux restic 1. Jan. 2020, 21:36
    0 Stimmen
    2 Beiträge
    689 Aufrufe
    Ich habe mich damit noch ein wenig beschäftigt, die letzten drei zu behalten, ist nicht so optimal. Da es viele Optionen bei dem Befehl gibt, hier ein Ausschnitt Flags: -l, --keep-last n keep the last n snapshots -H, --keep-hourly n keep the last n hourly snapshots -d, --keep-daily n keep the last n daily snapshots -w, --keep-weekly n keep the last n weekly snapshots -m, --keep-monthly n keep the last n monthly snapshots -y, --keep-yearly n keep the last n yearly snapshots habe ich das ein wenig so angepasst, das ich denke es passt für mich. restic --password-file /root/passwd -r /media/NAS_neu/Restic/Home/ forget --keep-last 3 --keep-monthly 3 --prune Damit behalte ich auch die jeweils eines pro Monat. Und die letzten drei. Das sieht dann so aus. root@debian:~# ./backup2.sh repository 2f3f6147 opened successfully, password is correct Files: 38 new, 100 changed, 13268 unmodified Dirs: 0 new, 1 changed, 0 unmodified Added to the repo: 10.166 GiB processed 13406 files, 50.324 GiB in 3:24 snapshot 849f614c saved repository 2f3f6147 opened successfully, password is correct Applying Policy: keep the last 3 snapshots, 3 monthly snapshots snapshots for (host [debian], paths [/home/frank]): keep 5 snapshots: ID Time Host Tags Reasons Paths ------------------------------------------------------------------------------------ a7251cfd 2019-11-28 17:00:01 debian monthly snapshot /home/frank 283d4027 2019-12-31 17:00:01 debian monthly snapshot /home/frank ae2b96ec 2020-01-01 21:47:46 debian last snapshot /home/frank 079e00a6 2020-01-02 17:00:01 debian last snapshot /home/frank 849f614c 2020-01-03 21:08:45 debian last snapshot /home/frank monthly snapshot ------------------------------------------------------------------------------------ 5 snapshots remove 26 snapshots: ID Time Host Tags Paths ------------------------------------------------------------------ 896f16c2 2019-11-07 22:23:40 debian /home/frank b21bcf6d 2019-11-11 17:00:01 debian /home/frank f89248fb 2019-11-12 17:00:01 debian /home/frank 123ab546 2019-11-13 17:00:01 debian /home/frank b82d87d0 2019-11-18 17:00:01 debian /home/frank 040b0ab7 2019-11-19 17:00:01 debian /home/frank 7221d8ef 2019-11-20 17:00:01 debian /home/frank 84132a25 2019-11-21 17:00:01 debian /home/frank b558a52c 2019-11-25 17:00:01 debian /home/frank e5cc0c3e 2019-12-02 17:00:01 debian /home/frank 22423fa5 2019-12-03 17:00:01 debian /home/frank 39df1ab9 2019-12-04 17:00:01 debian /home/frank 98843457 2019-12-05 17:00:01 debian /home/frank b0cdd4b6 2019-12-09 17:00:01 debian /home/frank 828414f9 2019-12-10 17:00:01 debian /home/frank e34a27c3 2019-12-11 17:00:01 debian /home/frank 6e488c3b 2019-12-12 17:00:01 debian /home/frank 17898403 2019-12-16 17:00:01 debian /home/frank 1973305a 2019-12-17 17:00:01 debian /home/frank 9553bedd 2019-12-18 17:00:01 debian /home/frank fedf749d 2019-12-19 17:00:01 debian /home/frank 8e7cb876 2019-12-23 17:00:01 debian /home/frank 0bd0d102 2019-12-25 17:00:01 debian /home/frank 13d348b0 2019-12-26 17:00:01 debian /home/frank c7d960aa 2019-12-30 17:00:01 debian /home/frank f6ea9118 2020-01-01 17:00:01 debian /home/frank ------------------------------------------------------------------ 26 snapshots 26 snapshots have been removed, running prune counting files in repo building new index for repo [0:35] 100.00% 7806 / 7806 packs repository contains 7806 packs (46537 blobs) with 41.110 GiB processed 46537 blobs: 0 duplicate blobs, 0 B duplicate load all snapshots find data that is still in use for 5 snapshots [0:01] 100.00% 5 / 5 snapshots found 32654 of 46537 data blobs still in use, removing 13883 blobs will remove 0 invalid files will delete 715 packs and rewrite 752 packs, this frees 5.027 GiB [2:28] 100.00% 752 / 752 packs rewritten counting files in repo [0:01] 100.00% 6571 / 6571 packs finding old index files saved new indexes as [d137b425 f7caee99 a6e9711a] remove 35 old index files [1:13] 100.00% 1467 / 1467 packs deleted done using temporary cache in /tmp/restic-check-cache-916655151 repository 2f3f6147 opened successfully, password is correct created new cache in /tmp/restic-check-cache-916655151 create exclusive lock for repository load indexes check all packs check snapshots, trees and blobs read all data [7:47] 100.00% 6571 / 6571 items duration: 7:47 no errors were found root@debian:~# Am Ende seht ihr noch, wie Restic alle Files testet. Mein Script sieht jetzt so aus. #!/bin/bash # Script um mit Restic Daten automatisiert zu sichern! # Dient zum Sichern der Homepartition auf dem ROCKPro64 NAS! # Was soll gesichert werden? backup_pfad=/home/frank # Programm Start restic --password-file /root/passwd -r /media/NAS_neu/Restic/Home/ backup $backup_pfad --exclude-file=excludes.txt restic --password-file /root/passwd -r /media/NAS_neu/Restic/Home/ forget --keep-last 3 --keep-monthly 3 --prune # Testen restic --password-file /root/passwd -r /media/NAS_neu/Restic/Home/ check --read-data Das dann schön mit einem Cronjob laufen lassen und die Datensicherung ist erledigt
  • SSHFS

    Linux linux 28. Aug. 2019, 09:23
    0 Stimmen
    1 Beiträge
    357 Aufrufe
    Niemand hat geantwortet
  • ACER und der UEFI-Booteintrag!

    Linux linux 21. Juni 2019, 18:16
    0 Stimmen
    1 Beiträge
    248 Aufrufe
    Niemand hat geantwortet
  • pdo Abfrage funktioniert nicht

    Linux linux 26. Okt. 2018, 19:12
    0 Stimmen
    2 Beiträge
    599 Aufrufe
    Wichtig ist natürlich auch, das folgendes php Paket installiert ist! sudo apt install php7.0-mysql Je nachdem welche PHP Version installiert ist, muss der Befehl angepasst werden. Mit php -v könnt ihr nachschauen welche Version installiert ist.