Install Vaultwarden .deb package on Debian Bookworm 12 server
-
schrieb am 19. Sept. 2023, 10:03 zuletzt editiert von FrankM
Prologue
What is it about? There is a company that develops and distributes a password safe - Bitwarden . Bitwarden is a central server that stores an encrypted database of logins. This database can then be accessed with numerous clients. If the server is hacked, this data is still sufficiently secure because it is encrypted! If you trust the provider
")
The software is open source and the source code can be viewed on Github etc. This is what Bitwarden writes about itself.Bitwarden is an open source password manager. The source code for Bitwarden is hosted on GitHub and everyone is free to review, audit, and contribute to the Bitwarden codebase.
We believe that being open source is one of the most important features of Bitwarden. Source code transparency is an absolute requirement for security solutions like Bitwarden.Every company wants to earn money, so they also offer a service to create and use the password safe directly on their servers. For security reasons, no problem, as all data is stored in encrypted form. The prices are perfectly fine and for a single account you can also use it for free. But, as my trend is away from such things, it has to be a solution that you run yourself. Yes, for the cost-conscious user, not the best solution, but control costs something. As a small suggestion, what do you do if the NSA pulls the plug on Bitwarden? Very unlikely, but I can still remember a tool that no longer exists.
How do you come up with an idea like that? Well, that's what happens when you talk to professionals about all kinds of things in the computer world and they point it out to you. Thanks Nico! And since I'm always curious, I try out a lot.
And now let's put this into practice…
Plan
- Cloud server (I will use Hetzner Cloud Server as an example here, of course this also works with all others servers)
- Vaultwarden, I'll explain what that is in a moment.
1. Set up and secure the server
1.1 Installation Server
As written, we are using a cloud server from Hetzner for testing.
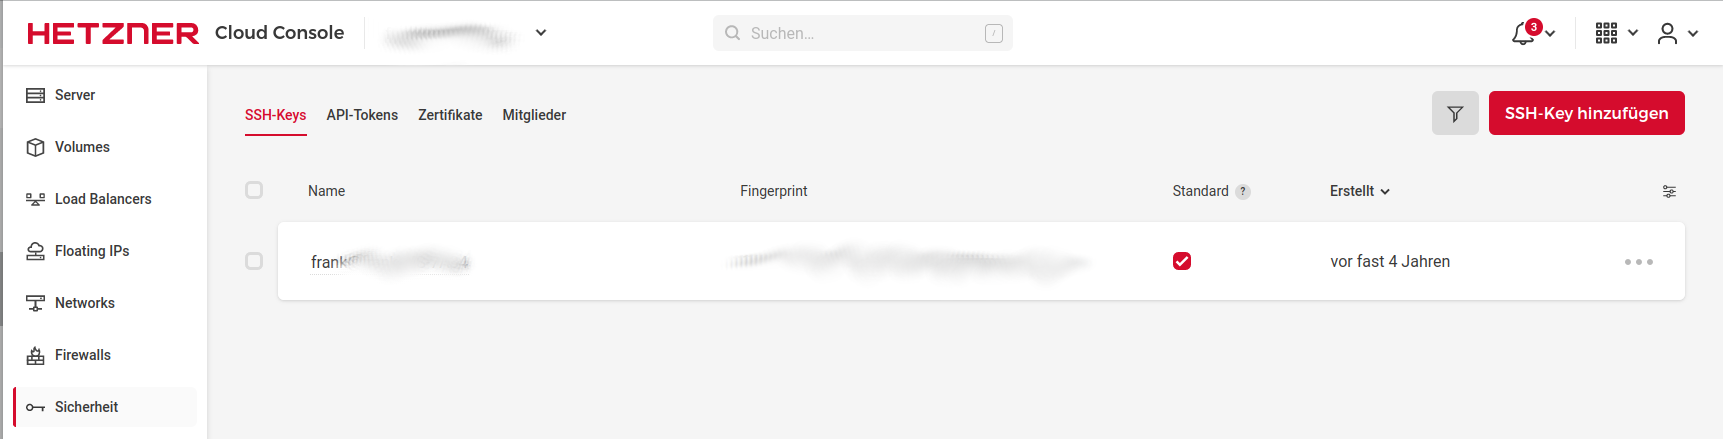
Before we start, we create a new project. Within this project we need an SSH key . Without an SSH key, root access is via a password that is sent to you by email. This password must change on first login! But we don't want that, so we create an SSH key.

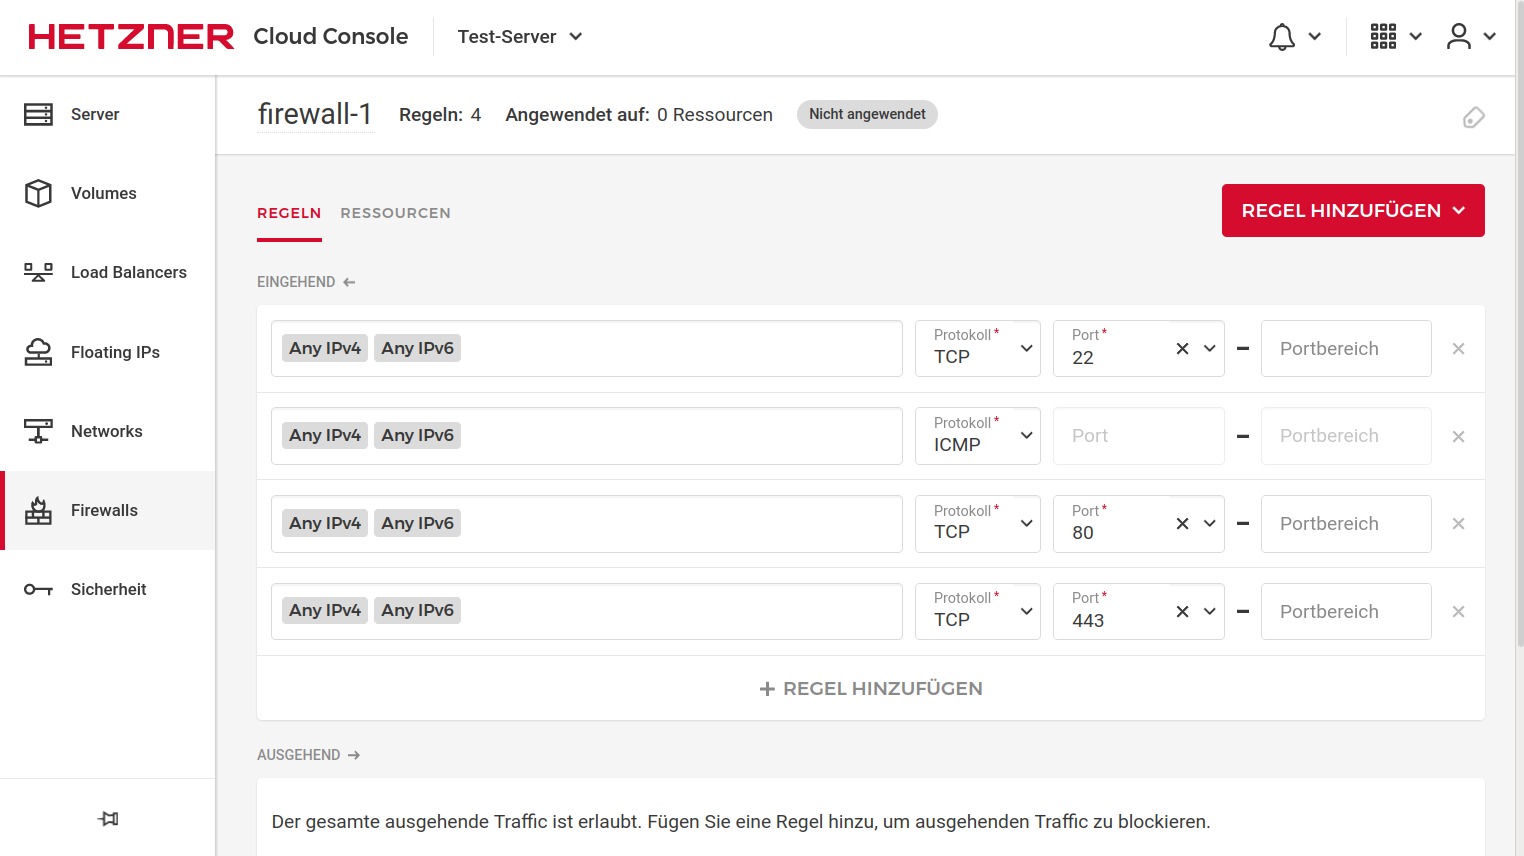
Then we set up a firewall. Recently, you can do this directly via Hetzner, it's simple and easy to set up. But I still prefer ufw and crowdsec. But not the worst for beginners. Here is an example of how it can look.
Now the preparations are complete and we are creating the server.
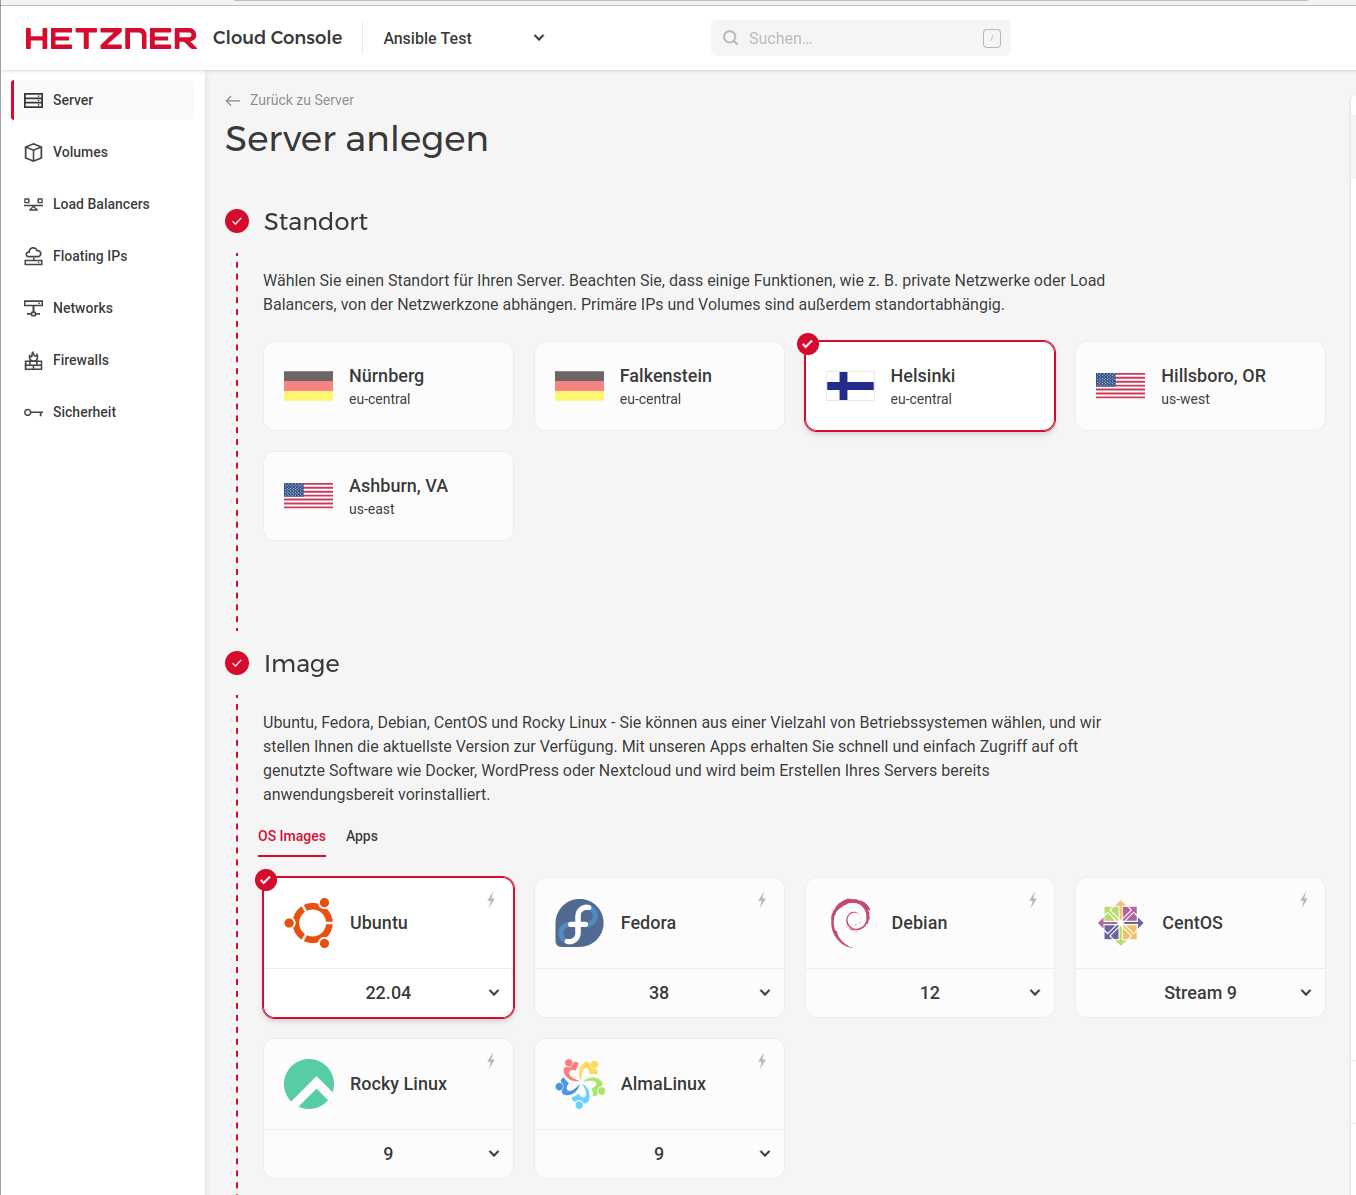
Location & Image
Here you choose a location and the image you want to install. Here I choose Nuremberg and Debian 12. You can choose the location as you like.

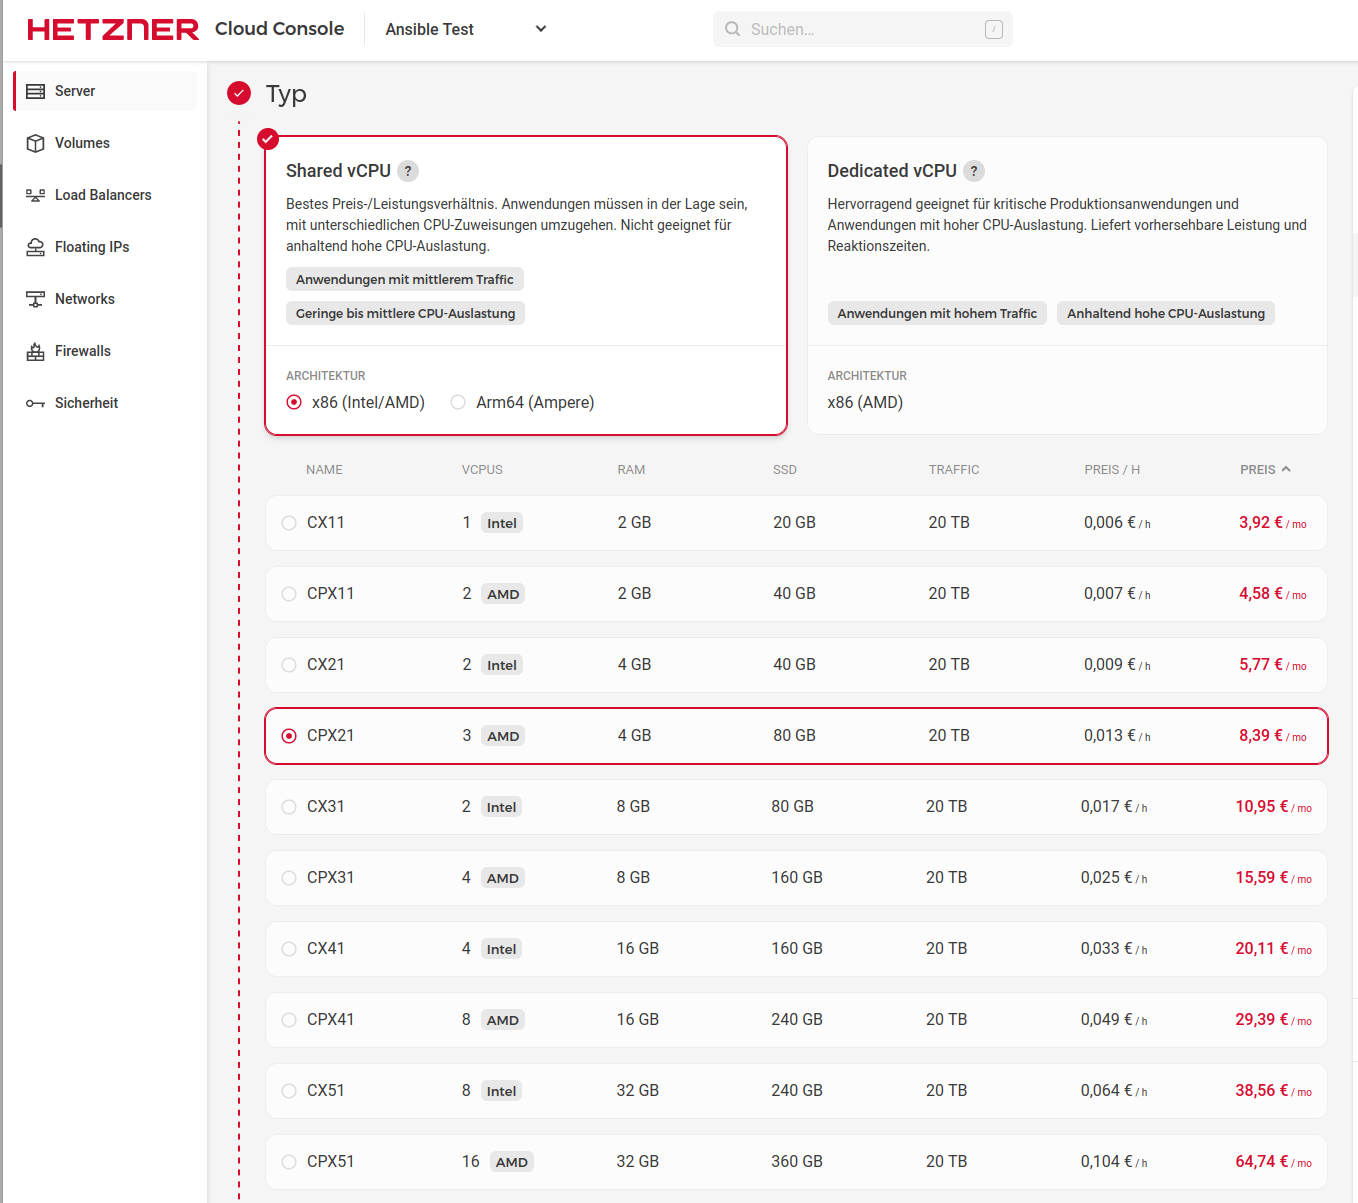
VM Selection
We choose the type of server. For what we have in mind, a CX11(Intel/AMD) with 2GB RAM and 20GB SSD is easily enough. It would then cost us 3.92€/month. Or use an CAX11 (arm64) with 4GB RAM and 40GB SSD for 3,92€/month. (Stand 09/23)
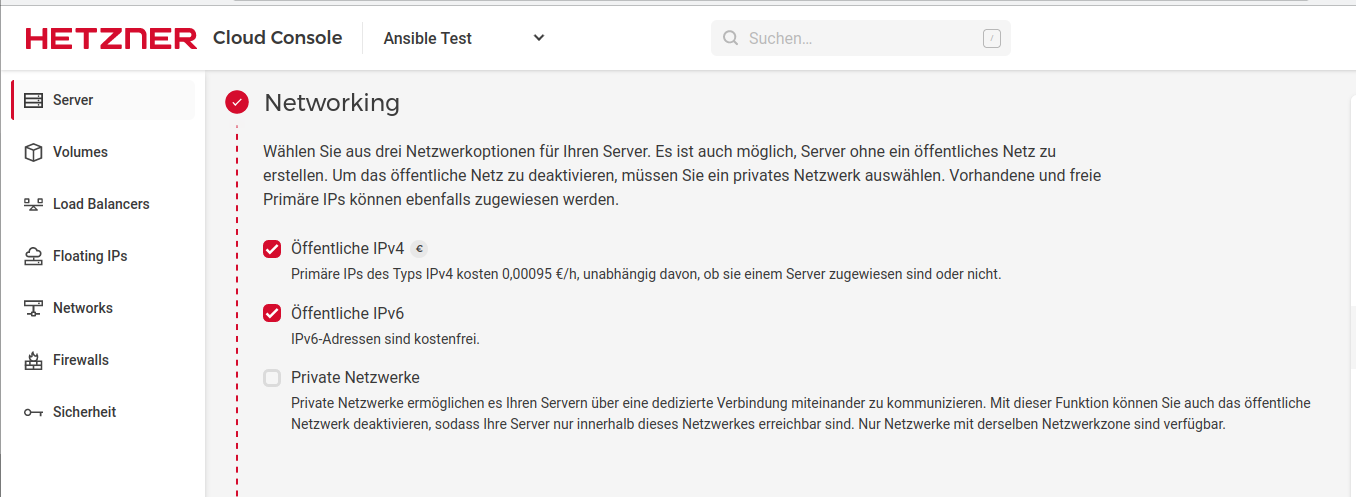
Networking
SSH-Keys
Volumes, Firewalls, Backups, Placement groups, Labels, Cloud config
These functions are optional
Name
Here you can set a servername, its later the hostname /etc/hostname
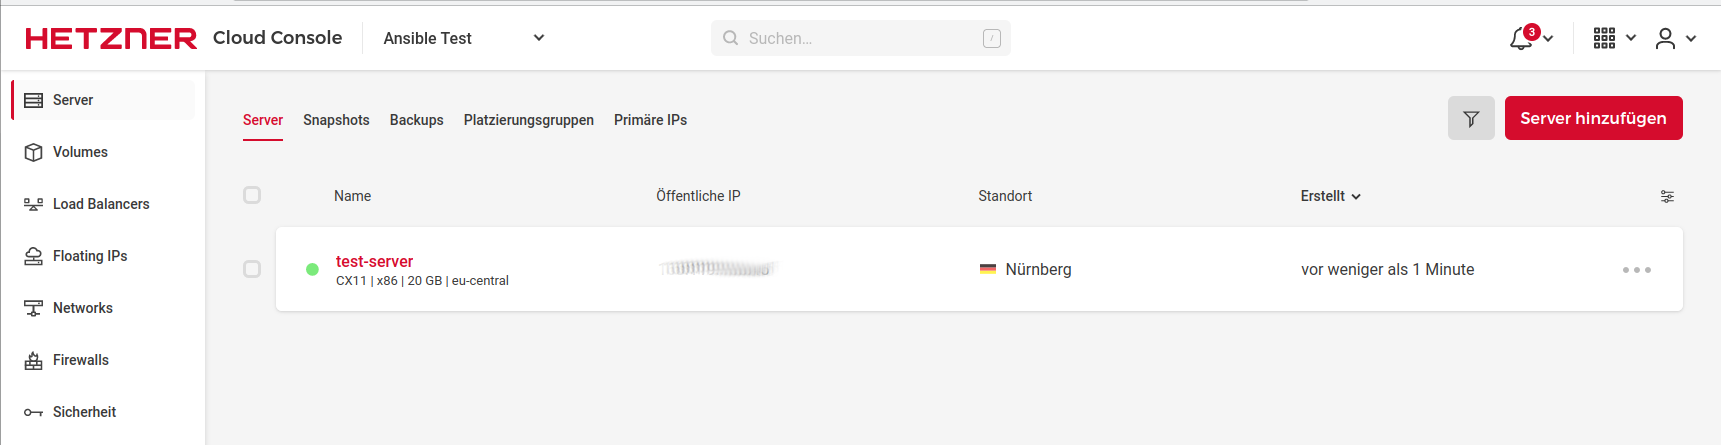
Now you can click on Create with costs and the server will be ready for use a short time later. After that, you can find the server under the Server menu.
Copy IP and connect via SSH
ssh root@<IPv4>The query
Are you sure you want to continue connecting (yes/no/[fingerprint])? yes
answer with yes and you are in
1.2 Installation ufw firewall
An alternative to the Hetzner firewall would be iptables or ufw. I now like to use ufw on my servers. Ufw is based on iptables, but it simplifies the application considerably.
Installation
apt install ufwConfigure standard policies
ufw default deny incoming
ufw default allow outgoing
Quick preliminary thought, what open ports we need?
The most important one is port 22 for SSH.
ufw allow sshFor Vaultwarden we still need Port 80 & 443
ufw allow http
ufw allow https
Finally, you have to switch on the firewall
ufw enableControl with
ufw status verboseExample Output
root@vaultwarden:~# ufw status verbose
Status: active
Logging: on (low)
Default: deny (incoming), allow (outgoing), disabled (routed)
New profiles: skip
To                         Action      From
--                         ------      ----
22/tcp                     ALLOW IN    Anywhere
80/tcp                     ALLOW IN    Anywhere
443                        ALLOW IN    Anywhere
22/tcp (v6)                ALLOW IN    Anywhere (v6)
80/tcp (v6)                ALLOW IN    Anywhere (v6)
443 (v6)                   ALLOW IN    Anywhere (v6)
1.3 Installation CrowdSec
What is CrowdSec ?
Gain real-time & crowdsourced protection against aggressive IPs.
CrowdSec is a modern replacement for the ageing fail2ban.
Installation
apt install crowdsecThen we need a firewall bouncer. The firewall bouncer then takes care of the bans.
apt install crowdsec-firewall-bouncerAnd to secure the Vaultwarden login, we need the following packages.
cscli scenarios install Dominic-Wagner/vaultwarden-bf
cscli parsers install Dominic-Wagner/vaultwarden-logs
After that, the server is protected for most scenarios. Always remember, there is no such thing as 100% security. Since Vaultwarden stores all passwords with AES 256 encryption, this is not absolutely necessary.
Bans can be viewed like this
# cscli decisions list
╭─────────┬──────────┬───────────────────┬───────────────────────────┬────────┬─────────┬────┬────────┬───────────────────┬──────────╮
│   ID    │  Source  │    Scope:Value    │          Reason           │ Action │ Country │ AS │ Events │    expiration     │ Alert ID │
├─────────┼──────────┼───────────────────┼───────────────────────────┼────────┼─────────┼────┼────────┼───────────────────┼──────────┤
│ 4140893 │ crowdsec │ Ip:187.49.174.xxx │ crowdsecurity/ssh-slow-bf │ ban    │         │    │ 11     │ 3h32m3.152793297s │ 1169     │
│ 4110891 │ crowdsec │ Ip:193.233.21.xxx │ crowdsecurity/ssh-bf      │ ban    │         │    │ 6      │ 50m26.902936892s  │ 1165     │
│ 4110890 │ crowdsec │ Ip:43.143.119.xxx │ crowdsecurity/ssh-bf      │ ban    │         │    │ 6      │ 47m44.152270516s  │ 1164     │
╰─────────┴──────────┴───────────────────┴───────────────────────────┴────────┴─────────┴────┴────────┴───────────────────┴──────────╯
1 duplicated entries skipped
2. Vaultwarden
For this project we are using Vaultwarden . Vaultwarden is a Rust implementation of the Bitwarden Server API. There is no Debian package for it. But since we are working with professionals, I have a solution for you. No, by professionals I don't mean me, I mean Nico from Hamburg.
He has built a nice Debian package that you can easily install on the Debian Bookworm 12 server. You can find it here . THANKS for that!*
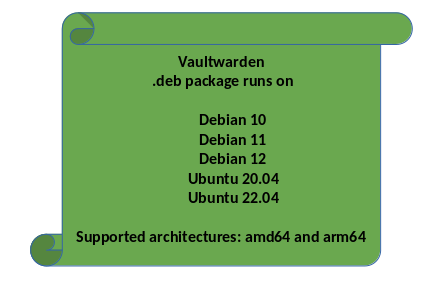
2.1 Installation Vaultwarden
Nicos instructions for installation.
Vaultwarden repository for Debian (bullseye and buster)
-------------------------------------------

Public repository. Feel free to use!

# Installation
1. wget -O /etc/apt/trusted.gpg.d/bananian-keyring.gpg https://bitwarden-deb.tech-network.de/bananian-keyring.gpg
2. echo "deb http://bitwarden-deb.tech-network.de buster main" > /etc/apt/sources.list.d/vaultwarden.list
3. apt-get update
4. apt-get install vaultwarden

# Configuration
- Vaultwarden config file is located at /etc/vaultwarden (config.env)
- Sample Apache configuration can be found here: https://bitwarden-deb.tech-network.de/Apache-VirtualHost.example.conf
- Sample Nginx configuration can be found here: https://bitwarden-deb.tech-network.de/Nginx-VirtualHost.example.conf

# Systemd service
- Enable: systemctl enable vaultwarden.service
- Start: systemctl start vaultwarden.service
- Status: systemctl status vaultwarden.service
- ...

Sources and Credits:
https://github.com/dani-garcia/vaultwarden

Eine ausführliche deutschsprachige Installationsanleitung gibt es hier:
https://linux-nerds.org/topic/977/bitwarden_rs-auf-einem-debian-buster-10-server-installieren
Addition, those looking for the service that launches vaultwarden will find it here ->
/lib/systemd/system/vaultwarden.serviceI don't think I need to write that here again, just work through the steps and you're done. Then came another challenge for me, unfortunately I don't like Apache2 very much. I usually only use NGINX . Since Nico said it's not that easy to implement this for Nginx, I saved myself the time and took Apache2. Addendum, meanwhile we have a working NGINX configuration, so I explain both here.
2.2 Apache2
Quick preliminary thought, what do we need? We need Apache2, which does the proxy for Vaultwarden and delivers the service. Since we don't want unencrypted communication, we need a certificate. For this we use Letsencrypt.
Ok, so we need
- apache2
- letsencrypt
Ok, let's install
apt install apache2
apt install letsencrypt
We'll stay with Apache2 for now. We still need a few modules. You can find them in Nico's example config.
#Required Apache modules:
#headers, proxy, proxy_http, proxy_wstunnel, ssl, rewrite

<VirtualHost *:80>
        ServerName bitwarden-rs.example.com
        ErrorLog ${APACHE_LOG_DIR}/bitwarden_rs-error.log
        CustomLog ${APACHE_LOG_DIR}/bitwarden_rs-access.log combined

        # Redirect to https
        RewriteEngine On
        RewriteCond %{HTTPS} off
        RewriteRule (.*) https://%{SERVER_NAME}/$1 [R,L]
</VirtualHost>

<VirtualHost *:443>
        ServerName bitwarden-rs.example.com
        ErrorLog ${APACHE_LOG_DIR}/bitwarden_rs-error.log
        CustomLog ${APACHE_LOG_DIR}/bitwarden_rs-access.log combined

        # Reverse Proxy
        RewriteEngine On
        RewriteCond %{HTTP:Upgrade} =websocket [NC]
        RewriteRule /notifications/hub(.*) ws://127.0.0.1:3012/$1 [P,L]
        ProxyPass / http://127.0.0.1:8000/

        ProxyPreserveHost On
        ProxyRequests Off
        RequestHeader set X-Real-IP %{REMOTE_ADDR}s

        # TLS
        SSLEngine on
        SSLCertificateFile /etc/ssl/certs/bitwarden_rs-fullchain.crt
        SSLCertificateKeyFile /etc/ssl/private/bitwarden_rs.key

        #HSTS
        Header always set Strict-Transport-Security "max-age=63072000"
</VirtualHost>
Ok, this is what we need
#Required Apache modules:#headers, proxy, proxy_http, proxy_wstunnel, ssl, rewrite
a2enmod headers
a2enmod proxy
a2enmod proxy_http
a2enmod proxy_wstunnel
a2enmod ssl
a2enmod rewrite
The configuration goes into the file
/etc/apache2/sites-enabled/000-default.confThen restart Apache2.
systemctl restart apache2If there are errors, they will come now. But there is still something missing. The certificates!
2.3 NGINX
Alternatively, here is the working configuration of NGINX . I have explained the installation and use of Letsencrypt here .
Installation
apt install nginxThe configuration file can be found -> /etc/nginx/sites-enabled
The name of the file -> defaultserver { listen 80; server_name vaultwarden.example.com; # Redirect to https location / { return 301 https://$host$request_uri; } } server { listen 443 ssl http2; listen [::]:443 ssl http2; server_name example.org; client_max_body_size 128M; # TLS # Please generate a secure TLS configuration with the Mozilla SSL Configuration Generator: https://ssl-config.mozilla.org/ ssl_certificate /etc/letsencrypt/live/example.org/fullchain.pem; ssl_certificate_key /etc/letsencrypt/live/example.org/privkey.pem; ssl_dhparam /etc/ssl/dhparam-4096.pem; ssl_protocols TLSv1.3; ssl_prefer_server_ciphers on; ssl_ciphers "ECDH+AESGCM:EDH+AESGCM:AES256+EECDH:AES256+EDH"; ssl_ecdh_curve secp384r1; ssl_session_cache shared:SSL:10m; ssl_session_tickets off; ssl_stapling on; ssl_stapling_verify on; # HSTS add_header Strict-Transport-Security "max-age=63072000; preload"; # Reverse Proxy resolver 127.0.0.1 valid=300s; resolver_timeout 5s; location / { proxy_pass http://127.0.0.1:8000; proxy_set_header Host $host; proxy_set_header X-Real-IP $remote_addr; proxy_set_header X-Forwarded-For $proxy_add_x_forwarded_for; proxy_set_header X-Forwarded-Proto $scheme; } location /notifications/hub/negotiate { proxy_set_header Host $host; proxy_set_header X-Real-IP $remote_addr; proxy_set_header X-Forwarded-For $proxy_add_x_forwarded_for; proxy_set_header X-Forwarded-Proto $scheme; proxy_pass http://127.0.0.1:8000; } }After editing we need to restart the service
service restart nginxand that's it. Has been working flawlessly here since a long time.
Source: https://pieterhollander.nl/post/bitwarden/
@hase567 Thanks for the tip!
And now for the certificates
2.4 Letsencrypt for Apache2
We have already installed it above. I'm not an expert on Apache2, but I managed to do it this way.
apt install python-certbot-apache
certbot --apache
The Certbot now asks for a few things. It is very important that the domain you would like to use now refers to the server IP. Only if this is set correctly, you will get a valid certificate from Letsencrypt. The Certbot writes the configuration commented out in the config. Adapt it accordingly and don't forget to restart Apache2. If we have now done everything correctly, we will get the following website.
Another important thing about the certificates. In the example above, you can see the following lines.Include /etc/letsencrypt/options-ssl-apache.confThis controls the configuration of the certificate. Letsencrypt is a bit cautious here, but that's not good enough for me with such services. We'll adapt it a bit.
/etc/letsencrypt/options-ssl-apache.conf
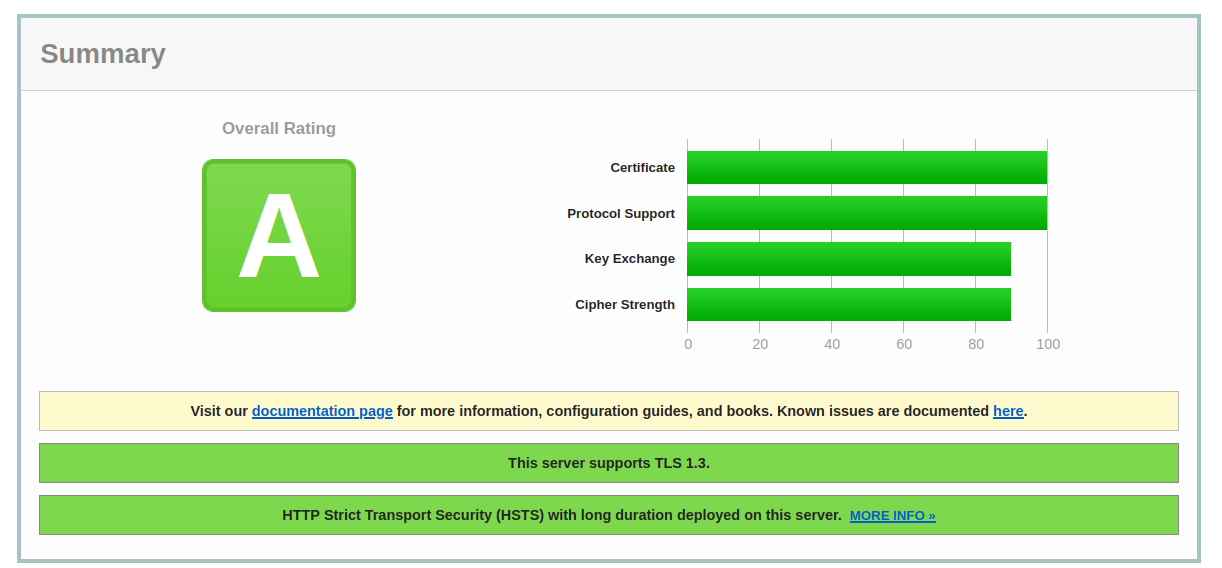
# This file contains important security parameters. If you modify this file
# manually, Certbot will be unable to automatically provide future security
# updates. Instead, Certbot will print and log an error message with a path to
# the up-to-date file that you will need to refer to when manually updating
# this file.

SSLEngine on

# Intermediate configuration, tweak to your needs
SSLProtocol all -TLSv1.1 -TLSv1.2 -TLSv1 -SSLv2 -SSLv3
SSLCipherSuite          HIGH:!aNULL:!MD5
#SSLCipherSuite          ECDHE-ECDSA-CHACHA20-POLY1305:ECDHE-RSA-CHACHA20-POLY1305:ECDHE-ECDSA-AES128-GCM-SHA256:ECDHE-RSA-AES128-GCM-SHA256:ECDHE-ECDSA-AES256-GCM-SHA384:ECDHE-RSA-AES256-GCM-SHA384:DHE-RSA-AES128-GCM-SHA25$
SSLHonorCipherOrder     on
SSLCompression          off

SSLSessionTickets       off#

SSLUseStapling          On
SSLStaplingCache        "shmcb:logs/ssl_stapling(32768)"


SSLOptions +StrictRequire

# Add vhost name to log entries:
LogFormat "%h %l %u %t \"%r\" %>s %b \"%{Referer}i\" \"%{User-agent}i\"" vhost_combined
LogFormat "%v %h %l %u %t \"%r\" %>s %b" vhost_common

#CustomLog /var/log/apache2/access.log vhost_combined
#LogLevel warn
#ErrorLog /var/log/apache2/error.log

# Always ensure Cookies have "Secure" set (JAH 2012/1)
#Header edit Set-Cookie (?i)^(.*)(;\s*secure)??((\s*;)?(.*)) "$1; Secure$3$4"
This also gives us a good rating on the https://www.ssllabs.com website.

2.5 Letsencrypt for NGINX
For the installation we install this package.
apt install letsencryptThis is how we register the domain with Letsencrypt.
letsencrypt certonly --standalone -d example.comThe certificates can be found under this folder
/etc/letsencrypt/live/example.comIn the NGINX example above, you can see how to install them.
2.6 Crontab für Letsencrypt
Something is still missing. The Letsencrypt certificate must be updated regularly, which I usually do via a crontab. We create a crontab
crontab -eThen we add the following line at the end
0 4 1 * * /usr/bin/certbot renew --pre-hook "service apache2 stop" --post-hook "service apache2 start"alternatively for NGINX
0 4 1 * * /usr/bin/certbot renew --pre-hook "service nginx stop" --post-hook "service nginx start"What does it do? Every first of the month, we start the process. First, Apache2 is stopped because Letsencrypt uses port 80. Then the certificate is updated and Apache2 is restarted.
Here is an example, the certificate was not intended to be updated.
root@debian:/etc/letsencrypt/live/DOMAIN# /usr/bin/certbot renew --pre-hook "service apache2 stop" --post-hook "service apache2 start"
Saving debug log to /var/log/letsencrypt/letsencrypt.log

- - - - - - - - - - - - - - - - - - - - - - - - - - - - - - - - - - - - - - - -
Processing /etc/letsencrypt/renewal/DOMAIN.conf
- - - - - - - - - - - - - - - - - - - - - - - - - - - - - - - - - - - - - - - -
Cert not yet due for renewal

- - - - - - - - - - - - - - - - - - - - - - - - - - - - - - - - - - - - - - - -

The following certs are not due for renewal yet:
  /etc/letsencrypt/live/DOMAIN/fullchain.pem expires on 2021-06-28 (skipped)
No renewals were attempted.
No hooks were run.
- - - - - - - - - - - - - - - - - - - - - - - - - - - - - - - - - - - - - - - -
This would make Letsencrypt complete.
3. Webapplication Vaultwarden
After logging in, it will look like this.
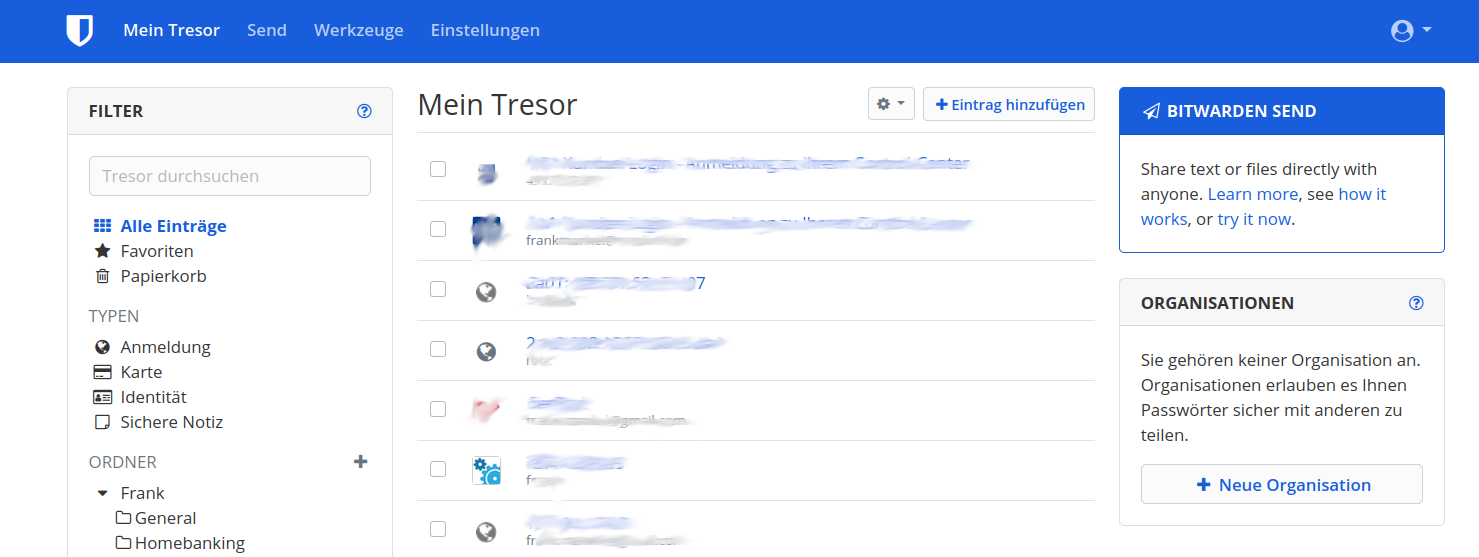
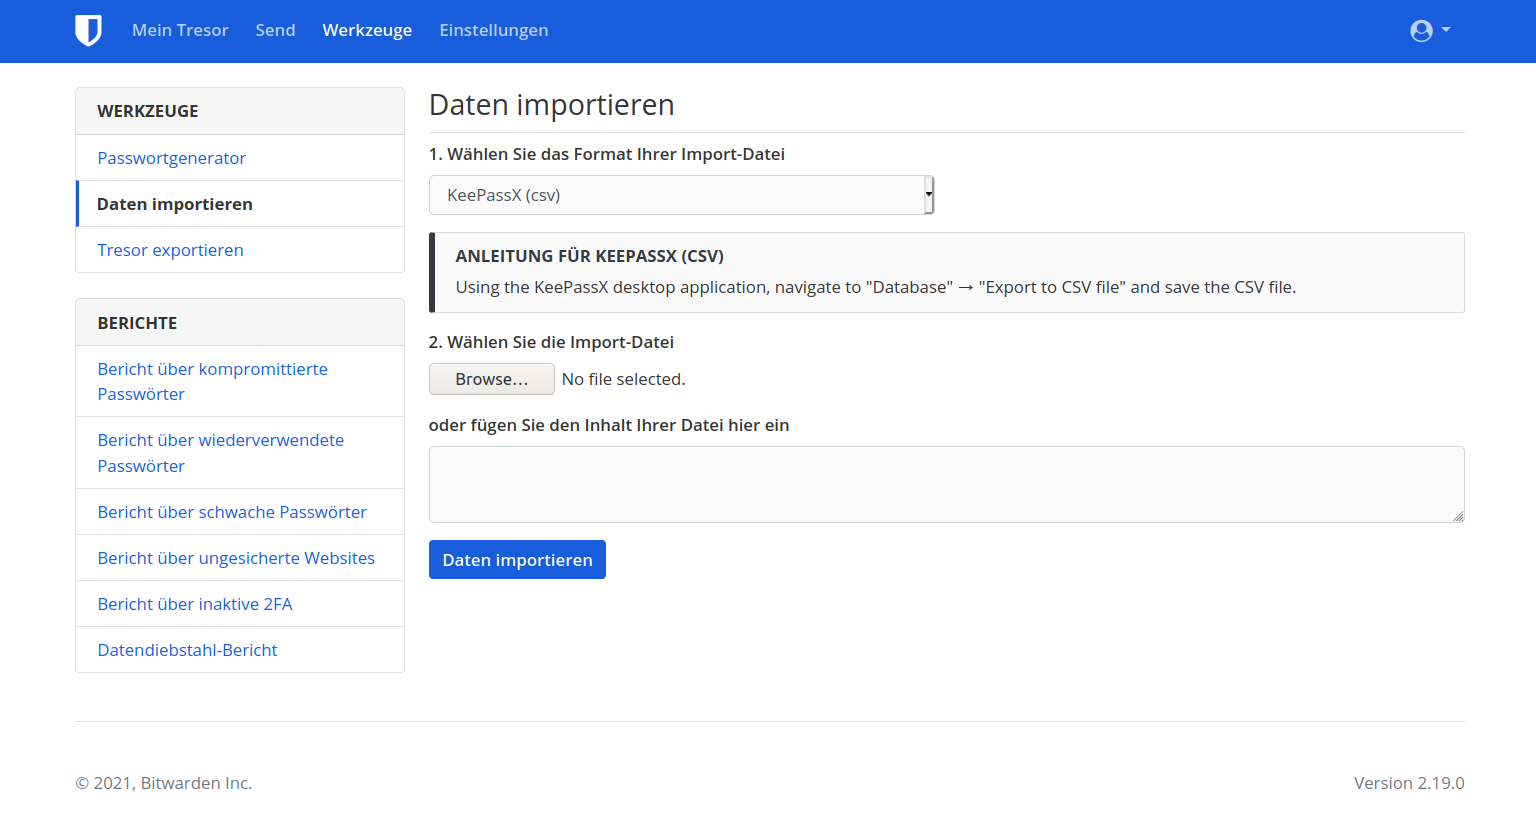
I was also able to import my KeePassXC database very easily. To do this, you export it as a .csv file and then you can simply import this export file with the KeePassX (csv) format. Be careful, attached files are not available. If you are in the crypto business - watch out!
There are a lot of tools for that. You can find them here. I tried the Firefox integration and the app for my Android phone. Both work very well.
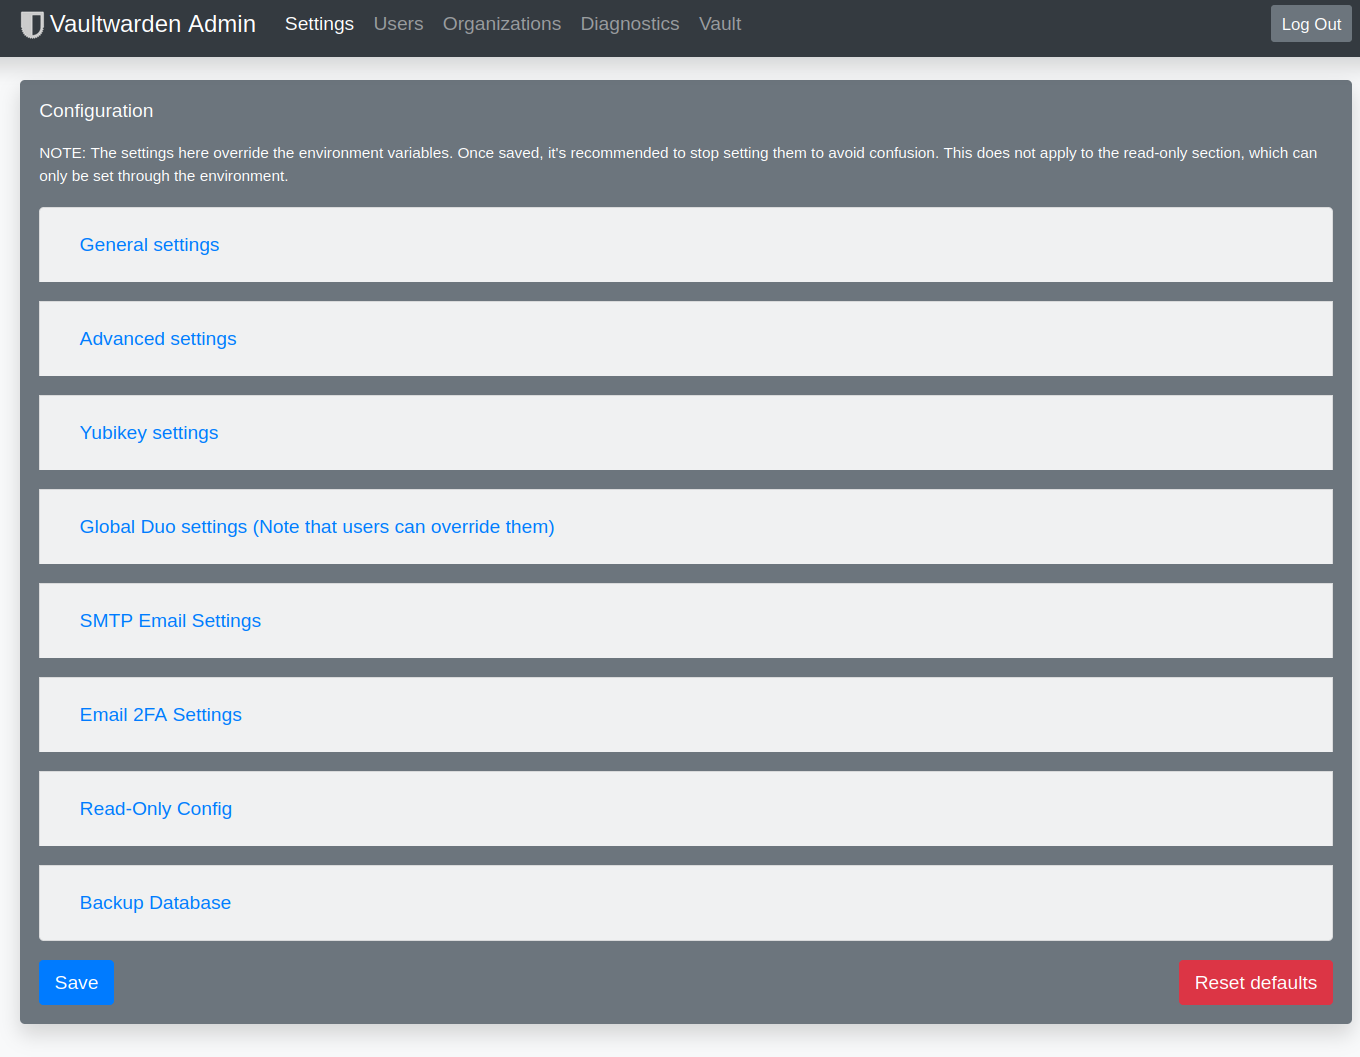
3.1 Admin area
There is also an admin area for Vaultwarden where you can set a few important parameters. Alternatively, you can also do this very well via the configuration file. But a few things can be set very comfortably only via the admin area, e.g. the user administration. Before this can be reached at all, a token must be set in the configuration file!
## Token for the admin interface, preferably use a long random string
## One option is to use 'openssl rand -base64 48'
## If not set, the admin panel is disabled
ADMIN_TOKEN=xxxxxxxxxxxxxxxxxxxxxxxxxxxxxxxxxxxxxxxxxxxxxxxxxxxxxx
After restarting the service, the admin area can then be accessed via
https://DOMAIN/admin/accessible. You must then enter the token here.

After that you see the UI
3.2 Firefox Addon
This is available here
At the first start, you have to set the server URL by clicking on the cogwheel.
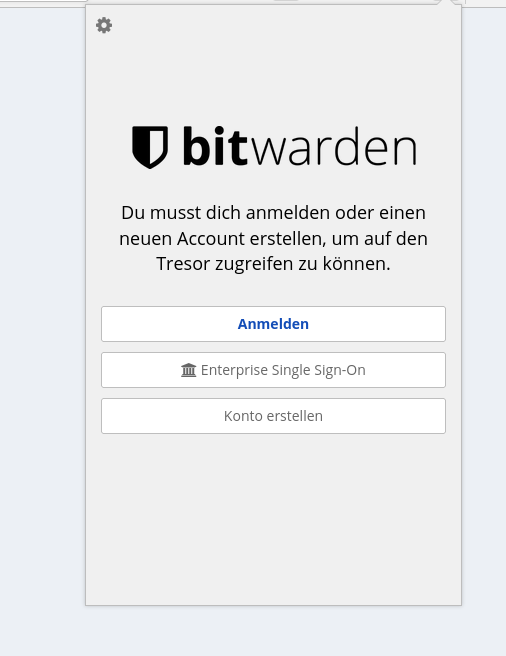
After that, you can log in with your data and use the password safe. Yeah!
4. Tips
- Make sure to switch on 2FA. With an authentication app, it's no big deal.
- In the Vaultwarden config, switch off the registration of new users if you do not want this!
- Switch off password hints in the Config!
- Don't forget to make a backup! The database can be found under /var/lib/vaultwarden/ Without the database i would have a hell of a lot of Work...Here is a link on how to do it -> https://github.com/dani-garcia/bitwarden_rs/wiki/Backing-up-your-vault
- Please give sufficient thought to the security of your servers in the network! As a suggestion for reading, here is the documentary by Thomas Krenn (in german).
5. Support
Free and voluntary support is available in my forum. If you have questions or problems we will try to solve them. But I would also like to point to the github of Dani Garcia (Coder Vaultwarden).
- https://github.com/dani-garcia/vaultwarden/discussions
- https://github.com/dani-garcia/vaultwarden/issues
6. Notes
I pay for my Hetzner Cloud Server myself! This text is partially translated with deepl.com
7. Sources
Manufacturer -> https://bitwarden.com/
Github of the manufacturer -> https://github.com/bitwarden
Vaultwarden Server API in Rust -> https://github.com/dani-garcia/vaultwarden
Vaultwarden .deb package -> https://bitwarden-deb.tech-network.de/
Excellent blog post -> https://pieterhollander.nl/post/bitwarden/ -
 F FrankM hat am 10. Juli 2024, 15:41 auf dieses Thema verwiesen
-
F FrankM hat dieses Thema am 21. Aug. 2024, 14:01 angepinnt
-
F FrankM hat dieses Thema am 21. Aug. 2024, 14:02 abgepinnt
-
F FrankM hat dieses Thema am 21. Aug. 2024, 14:02 angepinnt
-
F FrankM hat am 26. Jan. 2025, 08:17 auf dieses Thema verwiesen