Skip to content

ResticUI with PyWebIO - Repo

PyWebIO
1 1 137
  • Python - Interessante Packages

    Python3 python linux
    1
    0 Stimmen
    1 Beiträge
    160 Aufrufe
    Niemand hat geantwortet
  • Portfolio - mein kleines Flask Projekt

    Python3 python flask bootstrap ki-generiert
    5
    0 Stimmen
    5 Beiträge
    407 Aufrufe
    FrankMF
    Hab ChatGPT nochmal nach der Installation auf einem Production Server befragt. ChatGPT Certainly! Here's a short example of the steps you can follow to deploy a Flask application on a production server using Nginx and Gunicorn: Prepare your server: Set up a server (e.g., using a cloud provider like AWS, DigitalOcean, or a dedicated server) and ensure it has a clean, up-to-date installation of a Linux distribution (e.g., Ubuntu or CentOS). Install required software: Install necessary software packages on your server. You'll need Python, pip (Python package manager), Nginx, and Gunicorn. You can use your distribution's package manager (e.g., apt for Ubuntu or yum for CentOS) to install these dependencies. Deploy your Flask application: Copy your Flask application code and any required dependencies to your server. Set up a virtual environment (optional but recommended): Create a virtual environment for your Flask application to isolate its dependencies. You can use venv or virtualenv for this purpose. Install Flask and any required Python packages within your virtual environment: pip install flask Test your Flask application: Ensure your Flask application runs correctly within your server's virtual environment. Configure Gunicorn: Create a Gunicorn configuration file (e.g., gunicorn_config.py) to specify the settings for running your Flask application. Here's a simple example: workers = 4 # Number of Gunicorn worker processes bind = '0.0.0.0:8000' # The address and port Gunicorn should listen on Start Gunicorn: Start Gunicorn with your Flask application: gunicorn -c gunicorn_config.py your_app:app Configure Nginx: Create an Nginx server block (often located in /etc/nginx/sites-available) to define how Nginx should handle incoming requests. Here's a simplified example: server { listen 80; server_name your_domain.com www.your_domain.com; location / { proxy_pass http://127.0.0.1:8000; # Pass requests to Gunicorn proxy_set_header Host $host; proxy_set_header X-Real-IP $remote_addr; } } Enable the Nginx server block and restart Nginx: sudo ln -s /etc/nginx/sites-available/your_config /etc/nginx/sites-enabled/ sudo nginx -t # Test Nginx configuration sudo systemctl restart nginx Configure your DNS: Point your domain name to your server's IP address. Secure your server (optional but recommended): Set up SSL/TLS certificates for your domain to enable HTTPS. You can use Let's Encrypt for free SSL certificates. Monitor your application: Set up monitoring tools and logs to keep track of your application's performance and troubleshoot any issues. These are the basic steps to deploy a Flask application on a production server with Nginx and Gunicorn. Please note that this is a simplified example, and there are many additional considerations, such as database configuration, security, and optimization, depending on your specific application and requirements. It's also important to keep your server and software up to date and follow security best practices to ensure the stability and security of your production environment. Das werde ich doch mal ausprobieren
  • PyPi - Pakete ein Sicherheitsproblem?

    Python3 python pypi docker
    1
    0 Stimmen
    1 Beiträge
    152 Aufrufe
    Niemand hat geantwortet
  • Restic UI - Stand Januar 2023

    PyWebIO restic-ui pywebio python
    1
    0 Stimmen
    1 Beiträge
    171 Aufrufe
    Niemand hat geantwortet
  • PyWebIO - put_buttons

    PyWebIO pywebio python
    2
    1
    0 Stimmen
    2 Beiträge
    254 Aufrufe
    FrankMF
    Und noch eine kleine Übung, wie man den Buttton abhängig von einem Value enabled/disabled # we build header and tdata for table tab_mount = [] for count, value in enumerate(backups): if count == 0: 
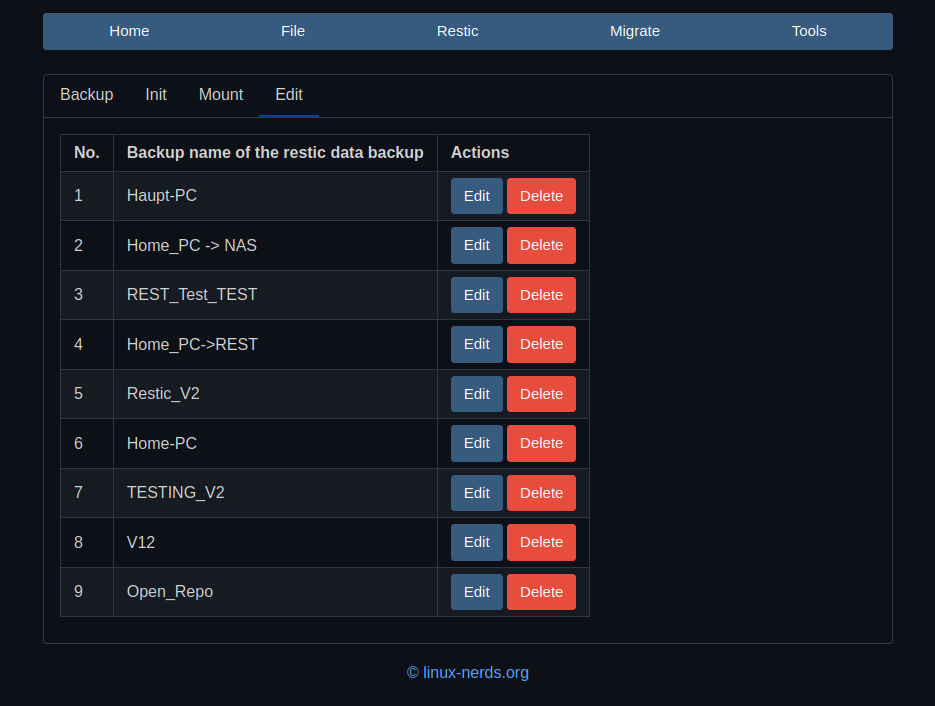
tab_mount.append(['No.', 'Backup name of the restic data backup', 'Actions']) if backups[value].init == "0": tab_mount.append([count + 1, backups[count].name, put_buttons([ dict(label='Mount', value='Mount', color='primary', disabled=True), dict(label='UMount', value='UMount', color='primary', disabled=True), dict(label='Restore', value='Restore', color='primary', disabled=True), ] , onclick=partial(actions, count + 1)) ]) else: tab_mount.append([count + 1, backups[count].name, put_buttons([ dict(label='Mount', value='Mount', color='primary'), dict(label='UMount', value='UMount', color='primary'), dict(label='Restore', value='Restore', color='primary'), ], onclick=partial(actions, count + 1)) ])
  • Restic UI - auf PyQt6 umbauen

    Restic UI restic-ui pyqt6
    5
    1
    0 Stimmen
    5 Beiträge
    368 Aufrufe
    FrankMF
    Ich hatte im Python Forum mal um Hilfe gebeten und man hat mir einen Hinweis gegeben, dem ich hier mal nachgehe. Der Forenuser meinte, das es ihn wundern würde, wenn ich von QtCore importieren müsste, also self.addDockWidget(QtCore.Qt.DockWidgetArea.RightDockWidgetArea, self.items) Das habe ich mal ausprobiert. Wenn ich von QtCore Qt importiere, kann ich das QtCore weglassen. from PyQt6.QtCore import QSettings, Qt dann geht auch self.addDockWidget(Qt.DockWidgetArea.RightDockWidgetArea, self.items) Es sieht so aus, das ich mich in dieses Thema noch ein wenig einarbeiten muss
  • PyQt6 - QSettings

    Python3 python
    3
    0 Stimmen
    3 Beiträge
    527 Aufrufe
    FrankMF
    Möglichkeit 1 Das hier settings = QSettings("Frank_Mankel", "Restic_UI") erzeugt unter /home/frank/.config/Frank_Mankel/Restic_UI.conf die Konfigurationsdatei. Möglichkeit 2 Das hier settings = QSettings("Restic_UI") erzeugt unter /home/frank/.config/Restic_UI.conf die Konfigurationsdatei. Damit habe ich die grundlegenden Dinge, hoffentlich , verstanden. Für den Rest mal in die Dokumentation schauen. Sehr hilfreich war auch mal ein Blick auf die Definition der Klasse. Rechtsklick auf QSettings und dann Go to Definition class QSettings(QObject): class Scope(enum.Enum): UserScope = ... # type: QSettings.Scope SystemScope = ... # type: QSettings.Scope class Format(enum.Enum): NativeFormat = ... # type: QSettings.Format IniFormat = ... # type: QSettings.Format InvalidFormat = ... # type: QSettings.Format class Status(enum.Enum): NoError = ... # type: QSettings.Status AccessError = ... # type: QSettings.Status FormatError = ... # type: QSettings.Status [..gekürzt..]
  • Restic UI - REST Server Unterstützung

    Restic UI restic-ui restic rest-server python
    2
    0 Stimmen
    2 Beiträge
    328 Aufrufe
    FrankMF
    Die REST Unterstützung ist komplett https://gitlab.com/Bullet64/restic-ui-public/-/releases/1.1.0 Ich denke, ein wenig Dokumentation wäre noch gut