Skip to content

OMV Images

ROCKPro64
  • OMV (https://www.openmediavault.org/) ist ein Betriebssystem mit Oberfläche, das es erlaubt einen PC als NAS zu konfigurieren. Ein entsprechendes Image hat Kamil im Angebot.

    Unser @tkaiser bietet auch selbst zusammen gestellte Images an, die wohl zu einem großen Teil auf Armbian basieren. Hier kündigt er ein solches an.

    Außerdem, geht er davon aus das wir in naher Zukunft auch ein Armbian für den ROCKPro64 bekommen.

    Vielfalt belebt das Geschäft 😉

  • Ich habe mal testweise das OMV Image vom Kamil installiert.

    OMV Version 4.1.8.2-1 (Arrakis)
    Linux 4.4.132-1072-rockchip-ayufan
    

    0_1532258855812_ssh.png

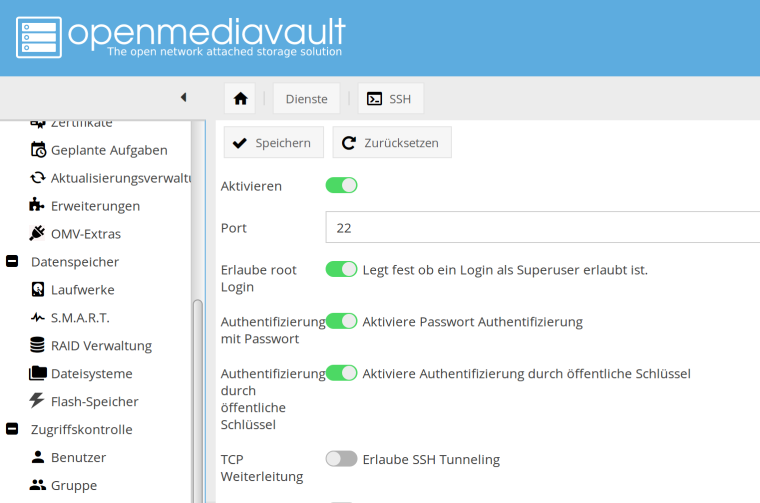
    Für den SSH Zugriff als Root ist die Option "Erlaube root Login" einzuschalten.

    Nein, das ist keine gute Idee. Aber ist hier nur ein Testsystem!

    Gut, OMV zu erklären würde wohl den Rahmen hier sprengen. Ich zeige einfach ein paar Screenshots.

    0_1532259367743_laufwerke.png

    NVMe Laufwerk am PCIe Adapter einwandfrei erkannt.

    0_1532259482815_nvme.png

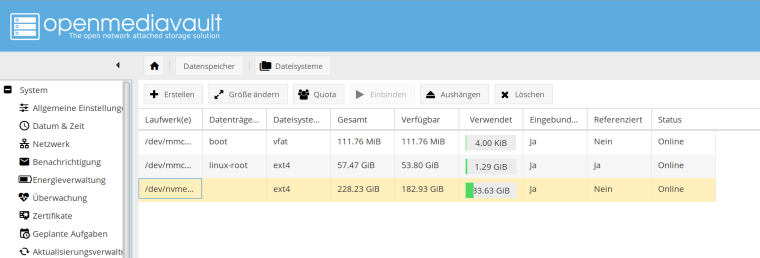
    Zum Mounten muss man einmal auf Einbinden klicken. Bleibt das auch nach einem Reboot erhalten? Ja, bleibt es natürlich 😉

    Eine NFS-Freigabe anlegen ging problemlos. Nur das Einbinden in meinem Sys wollte nicht so richtig, irgendwas mit Benutzerrechten. Ist jetzt aber mal gar kein ROCKPro64 Problem..

    Wer ein kleines NAS aufsetzen will, ist mit dem OMV gar nicht schlecht dran. Dürfte für die meisten alleine schon wegen der grafischen Benutzeroberfläche interessant sein. Ich liebe es ja mittlerweile alles auf der Konsole zu machen, aber es gibt eine Menge Leute die sich damit nicht auseinandersetzen wollen. Ok, für die gibt es OMV 🙂

  • [V] RockPro64 V2.1

    Frank's Resterampe rockpro64 verkauf
    1
    1
    0 Stimmen
    1 Beiträge
    139 Aufrufe
    Niemand hat geantwortet
  • ROCKPro64 - RTL8111/8168/8411 Netzwerkkarte

    Hardware rockpro64
    4
    1
    0 Stimmen
    4 Beiträge
    463 Aufrufe
    K
    na denn, tippe ich mal so auf default konfiguriert per dhcp
  • ROCKPro64 - PCIe NVMe SSD installieren

    Hardware linux rockpro64
    1
    0 Stimmen
    1 Beiträge
    348 Aufrufe
    Niemand hat geantwortet
  • Neues Script "change-default-kernel.sh "

    ROCKPro64 rockpro64
    1
    0 Stimmen
    1 Beiträge
    622 Aufrufe
    Niemand hat geantwortet
  • ROCKPro64 - Samsung 970 NVMe M.2 500GB

    Hardware hardware rockpro64
    1
    1
    0 Stimmen
    1 Beiträge
    1k Aufrufe
    Niemand hat geantwortet
  • ROCKPro64 - RP64.GPIO

    Angeheftet Verschoben Hardware hardware rockpro64
    6
    1
    0 Stimmen
    6 Beiträge
    6k Aufrufe
    FrankMF
    Hallo zusammen, da ich weiß das dieser Artikel recht beliebt ist, wollen wir den heute mal aktualisieren. Vieles aus den vorherigen Beiträgen passt noch. Es gibt aber kleine Anpassungen. Hardware ROCKPro64v21. 2GB RAM Software Kamils Release 0.10.9 Linux rockpro64 5.6.0-1132-ayufan-g81043e6e109a #ayufan SMP Tue Apr 7 10:07:35 UTC 2020 aarch64 GNU/Linux Installation apt install python Danach laden wir das Projekt git clone https://github.com/Leapo/Rock64-R64.GPIO PIN Nummern anpassen cd Rock64-R64.GPIO/R64 nano _GPIO.py Datei ergänzen # Define GPIO arrays #ROCK_valid_channels = [27, 32, 33, 34, 35, 36, 37, 38, 64, 65, 67, 68, 69, 76, 79, 80, 81, 82, 83, 84, 85, 86, 87, 88, 89, 96, 97, 98, 100, 101, 102, 103, 104] #BOARD_to_ROCK = [0, 0, 0, 89, 0, 88, 0, 0, 64, 0, 65, 0, 67, 0, 0, 100, 101, 0, 102, 97, 0, 98, 103, 96, 104, 0, 76, 68, 69, 0, 0, 0, 38, 32, 0, 33, 37, 34, 36, 0, 35, 0, 0, 81, 82, 87, 83, 0, 0, 80, 79, 85, 84, 27, 86, 0, 0, 0, 0, 0, 0, 89, 88] #BCM_to_ROCK = [68, 69, 89, 88, 81, 87, 83, 76, 104, 98, 97, 96, 38, 32, 64, 65, 37, 80, 67, 33, 36, 35, 100, 101, 102, 103, 34, 82] ROCK_valid_channels = [52,53,152,54,50,33,48,39,41,43,155,156,125,122,121,148,147,120,36,149,153,42,45,44,124,126,123,127] BOARD_to_ROCK = [0,0,0,52,0,53,0,152,148,0,147,54,120,50,0,33,36,0,149,48,0,39,153,41,42,0,45,43,44,155,0,156,124,125,0,122,126,121,123,0,127] BCM_to_ROCK = [43,44,52,53,152,155,156,45,42,39,48,41,124,125,148,147,124,54,120,122,123,127,33,36,149,153,121,50] Abspeichern. Datei test.py anlegen nano test.py Inhalt #!/usr/bin/env python # Frank Mankel, 2018, LGPLv3 License # Rock 64 GPIO Library for Python # Thanks Allison! Thanks smartdave! import R64.GPIO as GPIO from time import sleep print("Output Test R64.GPIO Module...") # Set Variables var_gpio_out = 156 var_gpio_in = 155 # GPIO Setup GPIO.setwarnings(True) GPIO.setmode(GPIO.ROCK) GPIO.setup(var_gpio_out, GPIO.OUT, initial=GPIO.HIGH) # Set up GPIO as an output, with an initial state of HIGH GPIO.setup(var_gpio_in, GPIO.IN, pull_up_down=GPIO.PUD_UP) # Set up GPIO as an input, pullup enabled # Test Output print("") print("Testing GPIO Input/Output:") while True: var_gpio_state_in = GPIO.input(var_gpio_in) var_gpio_state = GPIO.input(var_gpio_out) # Return State of GPIO if var_gpio_state == 0 and var_gpio_state_in == 1: GPIO.output(var_gpio_out,GPIO.HIGH) # Set GPIO to HIGH print("Input State: " + str(var_gpio_state_in)) # Print results print("Output State IF : " + str(var_gpio_state)) # Print results else: GPIO.output(var_gpio_out,GPIO.LOW) # Set GPIO to LOW print("Input State: " + str(var_gpio_state_in)) # Print results print("Output State ELSE: " + str(var_gpio_state)) # Print results sleep(0.5) exit() Beispiel [image: 1537522070243-input_ergebnis.jpg] Wenn der Taster im Bild betätigt wird, soll die LED blinken. Wir benutzen folgende Ein- Augänge des ROCKPro64. # Set Variables var_gpio_out = 156 var_gpio_in = 155 Das heißt: an Pin 1 (3,3V) kommt eine Strippe des Tasters an Pin 29 (Input) kommt eine Strippe des Tasters an Pin 31 (Output) kommt der Plus-Pol der LED an Pin 39 (GND) kommt der Minus-Pol der LED Somit wird auf den Eingang (Pin 29) bei Betätigung des Tasters 3,3 Volt angelegt. Damit wird dann der Eingang als High (1) erkannt. Die LED wird über den Ausgang (Pin 31) gesteuert. Starten kann man das Script mit python test.py https://www.youtube.com/watch?v=aPSC0Q0xInw
  • 960 EVO M.2 vs. 970 PRO M.2

    ROCKPro64 rockpro64
    2
    0 Stimmen
    2 Beiträge
    2k Aufrufe
    FrankMF
    Die 970 steckt jetzt in meinem Haupt-PC. Dort werkelt ein aktuelles Linux Mint Cinnamon 19. Zum Vergleich. 100M frank@frank-MS-7A34:~$ sudo iozone -e -I -a -s 100M -r 4k -r 16k -r 512k -r 1024k -r 16384k -i 0 -i 1 -i 2 [sudo] Passwort für frank: Iozone: Performance Test of File I/O Version $Revision: 3.429 $ Compiled for 64 bit mode. Build: linux-AMD64 Contributors:William Norcott, Don Capps, Isom Crawford, Kirby Collins Al Slater, Scott Rhine, Mike Wisner, Ken Goss Steve Landherr, Brad Smith, Mark Kelly, Dr. Alain CYR, Randy Dunlap, Mark Montague, Dan Million, Gavin Brebner, Jean-Marc Zucconi, Jeff Blomberg, Benny Halevy, Dave Boone, Erik Habbinga, Kris Strecker, Walter Wong, Joshua Root, Fabrice Bacchella, Zhenghua Xue, Qin Li, Darren Sawyer, Vangel Bojaxhi, Ben England, Vikentsi Lapa. Run began: Sun Aug 19 16:52:19 2018 Include fsync in write timing O_DIRECT feature enabled Auto Mode File size set to 102400 kB Record Size 4 kB Record Size 16 kB Record Size 512 kB Record Size 1024 kB Record Size 16384 kB Command line used: iozone -e -I -a -s 100M -r 4k -r 16k -r 512k -r 1024k -r 16384k -i 0 -i 1 -i 2 Output is in kBytes/sec Time Resolution = 0.000001 seconds. Processor cache size set to 1024 kBytes. Processor cache line size set to 32 bytes. File stride size set to 17 * record size. random random bkwd record stride kB reclen write rewrite read reread read write read rewrite read fwrite frewrite fread freread 102400 4 92640 121912 131074 139525 45719 116653 102400 16 254286 285267 285539 320370 108049 314486 102400 512 537947 581765 606103 598137 537701 588214 102400 1024 566892 547921 567369 597286 518014 558686 102400 16384 1407884 1642148 1941120 2115608 2006947 1668118 iozone test complete. 1000M frank@frank-MS-7A34:~$ sudo iozone -e -I -a -s 1000M -r 4k -r 16k -r 512k -r 1024k -r 16384k -i 0 -i 1 -i 2 Iozone: Performance Test of File I/O Version $Revision: 3.429 $ Compiled for 64 bit mode. Build: linux-AMD64 Contributors:William Norcott, Don Capps, Isom Crawford, Kirby Collins Al Slater, Scott Rhine, Mike Wisner, Ken Goss Steve Landherr, Brad Smith, Mark Kelly, Dr. Alain CYR, Randy Dunlap, Mark Montague, Dan Million, Gavin Brebner, Jean-Marc Zucconi, Jeff Blomberg, Benny Halevy, Dave Boone, Erik Habbinga, Kris Strecker, Walter Wong, Joshua Root, Fabrice Bacchella, Zhenghua Xue, Qin Li, Darren Sawyer, Vangel Bojaxhi, Ben England, Vikentsi Lapa. Run began: Sun Aug 19 15:28:38 2018 Include fsync in write timing O_DIRECT feature enabled Auto Mode File size set to 1024000 kB Record Size 4 kB Record Size 16 kB Record Size 512 kB Record Size 1024 kB Record Size 16384 kB Command line used: iozone -e -I -a -s 1000M -r 4k -r 16k -r 512k -r 1024k -r 16384k -i 0 -i 1 -i 2 Output is in kBytes/sec Time Resolution = 0.000001 seconds. Processor cache size set to 1024 kBytes. Processor cache line size set to 32 bytes. File stride size set to 17 * record size. random random bkwd record stride kB reclen write rewrite read reread read write read rewrite read fwrite frewrite fread freread 1024000 4 95635 121379 108328 108265 45369 123356 1024000 16 239238 314359 245937 241877 105865 297193 1024000 512 596812 620661 442100 382367 351948 613525 1024000 1024 608903 611898 434687 417192 412018 646465 1024000 16384 1898738 2004622 2143647 2188062 2099674 1983240 iozone test complete. Da scheint auf dem ROCKPro64 noch ein wenig Luft nach oben.
  • ROCKPro64 - kein WLan-Modul möglich?

    ROCKPro64 rockpro64
    4
    2
    0 Stimmen
    4 Beiträge
    2k Aufrufe
    FrankMF
    Heute, 5 Monate später, kann ich bestätigen das WLan möglich ist Getestet auf einem ROCKPro64 v2.1 mit 2GB RAM. Eine Vorabversion von Recalbox machte es das erste Mal für mich möglich das WLan zu benutzen. Bericht Und PCIe ist abgeschaltet im dts File. pcie-phy { compatible = "rockchip,rk3399-pcie-phy"; #phy-cells = <0x0>; rockchip,grf = <0x15>; clocks = <0x8 0x8a>; clock-names = "refclk"; resets = <0x8 0x87>; reset-names = "phy"; status = "disabled"; phandle = <0x8b>; }; pcie@f8000000 { compatible = "rockchip,rk3399-pcie"; #address-cells = <0x3>; #size-cells = <0x2>; aspm-no-l0s; clocks = <0x8 0xc5 0x8 0xc4 0x8 0x147 0x8 0xa0>; clock-names = "aclk", "aclk-perf", "hclk", "pm"; bus-range = <0x0 0x1f>; max-link-speed = <0x2>; linux,pci-domain = <0x0>; msi-map = <0x0 0x89 0x0 0x1000>; interrupts = <0x0 0x31 0x4 0x0 0x0 0x32 0x4 0x0 0x0 0x33 0x4 0x0>; interrupt-names = "sys", "legacy", "client"; #interrupt-cells = <0x1>; interrupt-map-mask = <0x0 0x0 0x0 0x7>; interrupt-map = <0x0 0x0 0x0 0x1 0x8a 0x0 0x0 0x0 0x0 0x2 0x8a 0x1 0x0 0x0 0x0 0x3 0x8a 0x2 0x0 0x0 0x0 0x4 0x8a 0x3>; phys = <0x8b>; phy-names = "pcie-phy"; ranges = <0x83000000 0x0 0xfa000000 0x0 0xfa000000 0x0 0x1e00000 0x81000000 0x0 0xfbe00000 0x0 0xfbe00000 0x0 0x100000>; reg = <0x0 0xf8000000 0x0 0x2000000 0x0 0xfd000000 0x0 0x1000000>; reg-names = "axi-base", "apb-base"; resets = <0x8 0x82 0x8 0x83 0x8 0x84 0x8 0x85 0x8 0x86 0x8 0x81 0x8 0x80>; reset-names = "core", "mgmt", "mgmt-sticky", "pipe", "pm", "pclk", "aclk"; status = "disabled"; Also bleibt weiterhin ungeklärt, ob auch beides zusammen möglich ist. Also gleichzeitig das WLan-Modul und eine PCIe Karte.