Skip to content

ClusterSSH

Angeheftet Linux
  • Beim Lesen der Beiträge im Debian Forum, bin ich doch über einen tollen Tipp gestolpert.

    ClusterSSH

    The command opens an administration console and an xterm to all
    specified hosts. Any text typed into the administration console is
    replicated to all windows. All windows may also be typed into directly.

    Installation

    sudo apt install clusterssh
    

    Aufruf

    cssh root@<IPv4> root@<IPv4>
    

    Das öffnet zwei Terminals.

    Wenn ich nun alle meine Server auf einen Schlag öffnen möchte, um z.B. Updates zu installieren? Wechseln in das folgende Verzeichnis.

    cd ~/.clusterssh
    

    Datei clusters anlegen.

    cluster root@<IPv4> root@<IPv4> root@<IPv4> root@<IPv4> root@<IPv4>
    

    Nun würde der Aufruf

    cssh cluster

    alle fünf Terminals auf einen Schlag öffnen. Und über das Kontrollfenster kann man z.B. ein

    apt update && apt upgrade
    

    an alle 5 Server gleichzeitig eingeben. Man kann auf jedem Server eingreifen. Super praktisch!

    In der config habe ich noch folgendes eingestellt.

    rows=2
    terminal_size=160x48
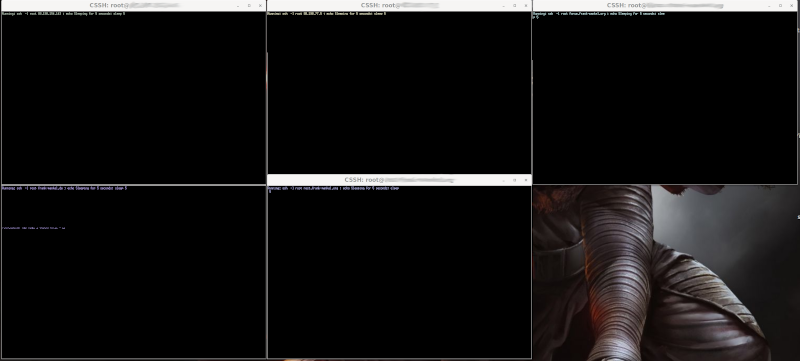
    

    clusterssh.png

  • Mal angeheftet, weil mittlerweile eines meiner Lieblingstools.

  • Ich hatte irgendwo geschrieben, das ClusterSSH nicht auf Wayland funktioniert!? Das ist Quatsch.
    Auf Ubuntu 21.04 mit Wayland lüuft ClusterSSH einwandfrei. Ich habe lediglich die Fenstergröße etwas angepasst, man sieht ja nicht mehr so gut 😉

    terminal_size=160x48
    
  • FrankMF FrankM hat am auf dieses Thema verwiesen
  • FrankMF FrankM hat am auf dieses Thema verwiesen
  • Mal wieder lange dran rumgefummelt, bis es passte.

    I have figured out how to use any font in xterm. So for the case of the mentioned Inconsolata font size 14, the following works:

    1. Add these 2 lines into ~/.Xresources (create it if it does not exist)

    XTermfaceName: Inconsolata
    XTerm
    faceSize: 14

    1. Then, tell xterm to use this file:

    export XENVIRONMENT="${HOME}/.Xresources"

    Preferably add this export into .bashrc, so that it is persistent.

    1. comment out the font settings in ~/.clusterssh/config, if it exists:

    # terminal_font=6x13

    Quelle: https://unix.stackexchange.com/questions/230106/cluster-ssh-specify-terminal-font

  • FrankMF FrankM hat am auf dieses Thema verwiesen
  • NodeBB - v3.9.0

    NodeBB
    1
    0 Stimmen
    1 Beiträge
    81 Aufrufe
    Niemand hat geantwortet
  • Rest-Server v0.13.0 released

    Restic
    2
    0 Stimmen
    2 Beiträge
    274 Aufrufe
    FrankMF
    Download Rest-Server und installieren

    Im Github Repository den aktuellen Release suchen. Hier am Beispiel der aktuellen Version 0.13.0 (27.07.2024) Datei herunterladen

    wget https://github.com/restic/rest-server/releases/download/v0.13.0/rest-server_0.13.0_linux_amd64.tar.gz

    Die Datei entpacken

    tar -xf rest-server_0.13.0_linux_amd64.tar.gz

    Ins Verzeichnis wechseln

    cd rest-server_0.13.0_linux_amd64

    Wenn der Rest-Server läuft, dann muss man diesen erst mal stoppen.

    systemctl stop rest-server

    Danach kopiert man das File nach bin. Wer mag sichert vorher das alte File.

    cp rest-server /usr/local/bin

    Danach kann man den Rest-Server wieder starten.

    systemctl start rest-server

    Versionskontrolle

    root@rest-server:~# rest-server -v rest-server version rest-server 0.13.0 compiled with go1.22.5 on linux/amd64

    Die Hilfe vom Rest-Server

    root@rest-server:~# rest-server -h Run a REST server for use with restic Usage: rest-server [flags] Flags: --append-only enable append only mode --cpu-profile string write CPU profile to file --debug output debug messages -h, --help help for rest-server --htpasswd-file string location of .htpasswd file (default: "<data directory>/.htpasswd)" --listen string listen address (default ":8000") --log filename write HTTP requests in the combined log format to the specified filename (use "-" for logging to stdout) --max-size int the maximum size of the repository in bytes --no-auth disable .htpasswd authentication --no-verify-upload do not verify the integrity of uploaded data. DO NOT enable unless the rest-server runs on a very low-power device --path string data directory (default "/tmp/restic") --private-repos users can only access their private repo --prometheus enable Prometheus metrics --prometheus-no-auth disable auth for Prometheus /metrics endpoint --tls turn on TLS support --tls-cert string TLS certificate path --tls-key string TLS key path -v, --version version for rest-server Systemd

    Wer noch ein passendes systemd File benötigt.

    [Unit] Description=Rest Server After=syslog.target After=network.target [Service] Type=simple User=rest-server Group=rest-server ExecStart=/usr/local/bin/rest-server --private-repos --tls --tls-cert /mnt/rest-server/<DOMAIN>/fullchain.pem --tls-key /mnt/rest-server/<DOMAIN>/key.pem --path /mnt/rest-server Restart=always RestartSec=5 # Optional security enhancements NoNewPrivileges=yes PrivateTmp=yes ProtectSystem=strict ProtectHome=yes ReadWritePaths=/mnt/rest-server [Install] WantedBy=multi-user.target
  • Links zu Vaultwarden

    Angeheftet Vaultwarden
    1
    0 Stimmen
    1 Beiträge
    117 Aufrufe
    Niemand hat geantwortet
  • Debian Bookworm 12 - Btrfs Installation

    Linux
    3
    0 Stimmen
    3 Beiträge
    2k Aufrufe
    FrankMF

    Das mit den Namen der btrfs Subvolumes ist bekannt bei Timeshift. Im Readme steht dazu folgendes.

    BTRFS volumes

    BTRFS volumes must have an Ubuntu-type layout with @ and @home subvolumes. Other layouts are not supported. Systems having the @ subvolume and having /home on a non-BTRFS partition are also supported.

    Text file busy / btrfs returned an error: 256 / Failed to create snapshot can occur if you have a Linux swapfile mounted within the @ or @home subvolumes which prevents snapshot from succeeding. Relocate the swapfile out of @ or *@home, for example into it's own subvolume like @swap.

  • checkmk - Apache2 vs. NGINX

    checkmk
    2
    0 Stimmen
    2 Beiträge
    546 Aufrufe
    FrankMF

    Ich musste am Ende wieder den Apachen installieren, da checkmk zu viele Abhängigkeiten hat. So was wie omd-apache2(?), wurde mir dann als Fehler angezeigt. Die Server waren auf einmal offline usw. Schade, aber letztendlich für den Container auch egal.

    Oben im Apachen die SSL Sicherheit erhöht.

    4ba2853c-d5a3-422d-b787-b9f66256b511-grafik.png

  • checkmk - Rest-Server überwachen

    Verschoben checkmk
    1
    0 Stimmen
    1 Beiträge
    430 Aufrufe
    Niemand hat geantwortet
  • Cockpit

    Linux
    1
    0 Stimmen
    1 Beiträge
    226 Aufrufe
    Niemand hat geantwortet
  • SSH Login ohne Passwort

    Angeheftet Linux
    4
    0 Stimmen
    4 Beiträge
    1k Aufrufe
    FrankMF

    Wie ihr ja wisst, benutze ich das Forum hier auch gerne als Notizbuch 🙂 Also mal wieder was hier notieren. Mein Windows Systemadmin sagte mir heute, das es auch folgendes gibt

    # ssh-keygen -t ed25519 Generating public/private ed25519 key pair. Enter file in which to save the key (/root/.ssh/id_ed25519): /tmp/ed Enter passphrase (empty for no passphrase): Enter same passphrase again: Your identification has been saved in /tmp/ed Your public key has been saved in /tmp/ed.pub The key fingerprint is: SHA256:D33HCTW7Dy0p5kQdFTkPudx1PQh0EHFgkBvxy8KwhGM root@frank-ms7c92 The key's randomart image is: +--[ED25519 256]--+ | o=O*o=+=| | . oo o+oB+| | E o o.o.o+*| | . o +o...oo=o| | .So.o= O .| | o.= o + | | . . .| | | | | +----[SHA256]-----+

    Der Key liegt nur in /tmp kopieren lohnt also nicht 🙂

    Ob das jetzt die Zukunft ist, kann ich nicht beantworten. Ich wollte es aber hier mal festhalten, weil es wohl mittlerweile auch von vielen Projekten benutzt wird.

    Link Preview Image ssh-keygen - Wikipedia

    favicon

    (en.wikipedia.org)