Skip to content

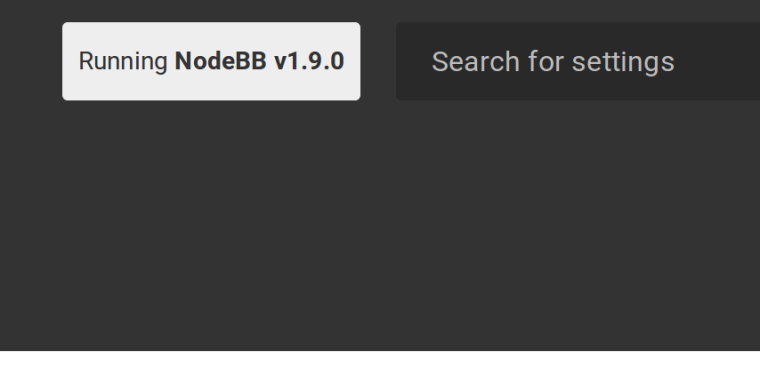
NodeBB - Upgrade auf v1.9.0

NodeBB
2 1 921
  • Datensicherung nicht vergessen!

    Praxistipp: Es hat sich jetzt bei meiner mittlerweilen sehr langen Nutzung von NodeBB herausgestellt, das es sinnvoll sein kann, den Installationsordner vorher zu kopieren, damit man problemlos zum alten Stand zurück kann! (Update: 01.11.2021)

    In das Installationsverzeichnis wechseln. Dran denken, mit dem richtigen User! (Ich habe da mal was durcheinander gewürfelt)

    ./nodebb stop
    Stopping NodeBB. Goodbye!
    

    Jetzt ist ein guter Zeitpunkt um alle seine Daten zu sichern. Ich gehe hier jetzt nicht drauf ein!

    Dann

    git fetch
    

    Danach dann folgendes

    git checkout v1.8.x 
    Already on 'v1.8.x'
    Your branch is up-to-date with 'origin/v1.8.x'.
    

    Ok, auf dieser Version sind wir. Das bringt so nichts. Also ...

    git checkout v1.9.x 
    Branch v1.9.x set up to track remote branch v1.9.x from origin.
    Switched to a new branch 'v1.9.x'
    

    Damit sind wir jetzt auf dem Zweig 1.9.x

    ./nodebb upgrade
    
    Updating NodeBB...
    
    1. Updating package.json file with defaults...  OK
    
    2. Bringing base dependencies up to date...  started
    added 20 packages and updated 4 packages in 6.407s
    
    3. Checking installed plugins for updates...  OK
    4. Updating NodeBB data store schema...
    Parsing upgrade scripts... 
    OK | 2 script(s) found, 51 skipped
      → [2018/2/28] Give registered users signature privilege... OK
      → [2018/4/16] Refresh post-upload associations... OK
    Schema update complete!
    
    
    5. Rebuilding assets...  started
    2018-05-03T14:55:01.217Z [1638] - info: [build] Building in parallel mode
    2018-05-03T14:55:01.219Z [1638] - info: [build]         plugin static dirs  build started
    .
    .
    . (gekürzt)
    
    
                            NodeBB Upgrade Complete!
    

    Danach ein

    ./nodebb start
    

    und ich bin auf v1.9.0

    Update

    Nach dem Update ist bei mir immer noch ein Rebuild & Restart im Backend nötig, sonst fehlen mir immer die Karten (Recent Cards). Danach läuft dann alles 🙂

    P.S.: Ich bin nicht so der git König, falls jemand mit Ahnung hier Fehler oder Unsinn sieht, bitte ich um einen kurzen Hinweis. Vielen Dank!

    0_1525360190866_NodeBB_v_1_9_0.png

  • Da oben fehlt ein Schritt.

    cd nodebb (or path to where nodebb is installed)
    ./nodebb stop
    git fetch
    git checkout v1.12.x
    git merge origin/v1.12.x
    ./nodebb upgrade
    

    Beim nächsten Upgrade testen.

  • FrankMF FrankM hat am auf dieses Thema verwiesen
  • FrankMF FrankM hat am auf dieses Thema verwiesen
  • FrankMF FrankM hat am auf dieses Thema verwiesen
  • FrankMF FrankM hat am auf dieses Thema verwiesen
  • FrankMF FrankM hat dieses Thema am abgepinnt
  • OpenCloud - Docker Compose local

    Verschoben OpenCloud opencloud linux
    3
    1
    0 Stimmen
    3 Beiträge
    430 Aufrufe
    FrankMF
    Noch was Wichtiges. Die Docker Installation nutzt folgende config. In meinem Beispiel findet man sie unter /home/frank/opencloud/deployments/examples/opencloud_full Darin liegt ein .env ## Basic Settings ## # Define the docker compose log driver used. # Defaults to local LOG_DRIVER= # If you're on an internet facing server, comment out following line. # It skips certificate validation for various parts of OpenCloud and is # needed when self signed certificates are used. INSECURE=true ## Traefik Settings ## # Note: Traefik is always enabled and can't be disabled. # Serve Traefik dashboard. # Defaults to "false". TRAEFIK_DASHBOARD= # Domain of Traefik, where you can find the dashboard. # Defaults to "traefik.opencloud.test" TRAEFIK_DOMAIN= # Basic authentication for the traefik dashboard. # Defaults to user "admin" and password "admin" (written as: "admin:$2y$05$KDHu3xq92SPaO3G8Ybkc7edd51pPLJcG1nWk3lmlrIdANQ/B6r5pq"). # To create user:password pair, it's possible to use this command: # echo $(htpasswd -nB user) | sed -e s/\\$/\\$\\$/g TRAEFIK_BASIC_AUTH_USERS= # Email address for obtaining LetsEncrypt certificates. # Needs only be changed if this is a public facing server. TRAEFIK_ACME_MAIL= # Set to the following for testing to check the certificate process: # "https://acme-staging-v02.api.letsencrypt.org/directory" # With staging configured, there will be an SSL error in the browser. # When certificates are displayed and are emitted by # "Fake LE Intermediate X1", # the process went well and the envvar can be reset to empty to get valid certificates. TRAEFIK_ACME_CASERVER= [....gekürzt....] Man kann dort etwas ändern und mittels docker compose up -d alles aktualisieren. Radicale OpenCloud nutzt im Moment folgendes https://radicale.org/v3.html als Backend Server für Kalender & Kontakte. Jemand hat mir dann erklärt, wie das so funktioniert. Danach hatte es dann klick gemacht. https://fosstodon.org/@h4kamp/114562514701351170 In der config findet man zum Beispiel die Konfiguration für radicale (Kalender- und Kontakte-App) Das ist nur eine rudimentäre Ablage, wird gesteuert über Clienten, z.B. die Thunderbird Kalender Funktion. ### Radicale Setting ### # Radicale is a small open-source CalDAV (calendars, to-do lists) and CardDAV (contacts) server. # When enabled OpenCloud is configured as a reverse proxy for Radicale, providing all authenticated # OpenCloud users access to a Personal Calendar and Addressbook RADICALE=:radicale.yml # Docker image to use for the Radicale Container #RADICALE_DOCKER_IMAGE=opencloudeu/radicale # Docker tag to pull for the Radicale Container #RADICALE_DOCKER_TAG=latest # Define the storage location for the Radicale data. Set the path to a local path. # Ensure that the configuration and data directories are owned by the user and group with ID 1000:1000. # This matches the default user inside the container and avoids permission issues when accessing files. # Leaving it default stores data in docker internal volumes. #RADICALE_DATA_DIR=/your/local/radicale/data In einer Standard Installation ist das auskommentiert. RADICALE=:radicale.yml Danach ein docker compose up -d und Eure Kalendereinträge (extern auf einem Clienten verwaltet) werden in der OpenCloud gesichert.
  • 0 Stimmen
    17 Beiträge
    307 Aufrufe
    julian@community.nodebb.orgJ
    @esoteric_programmer@social.stealthy.club that's likely because GtS handles summary as a content warning for everything. The whole summary and content warning business is in flux right now, so hopefully a standard will be set soon.
  • Wix Forums being sunset, what's next?

    ActivityPub Test Kategorie wix nodebb migration
    1
    0 Stimmen
    1 Beiträge
    54 Aufrufe
    Niemand hat geantwortet
  • Debian Bullseye - ZFS installieren und Pool erstellen

    Linux linux zfs proxmox
    1
    1
    0 Stimmen
    1 Beiträge
    2k Aufrufe
    Niemand hat geantwortet
  • Linux Mint 20 & Scannen mit HP LaserJet Pro MFP M28a

    Linux linuxmint linux
    2
    1
    0 Stimmen
    2 Beiträge
    1k Aufrufe
    FrankMF
    Nachdem ich jetzt ja wieder auf Linux Mint Cinnamon in Version 20.2 unterwegs bin, hatte ich wieder das Problem das der Drucker ohne Probleme druckt aber nicht scannt. Ich habe dann mal dieses Tool installiert apt install hplip-gui [image: 1625908296630-0918fea1-0edf-43c1-aa29-9d79efda177c-grafik.png] Dann auf Scan geklickt, dann meckerte er über ein fehlendes Plugin. Ok, installiert, danach kamen Verbindungsfehler beim Scannen. Einmal den USB-Stecker entfernt, danach ging alles. Bitte nicht fragen warum, hplip hasse ich noch mehr als WLAN Ok, nicht mehr anfassen.... [image: 1625908444519-79d636b7-2b49-4152-b158-e65cebabf148-grafik.png] In der Linux Mint Hilfe findet man dazu folgendes -> Klick
  • FAN control OMV Auyfan 0.10.12: gitlab-ci-linux-build-184, Kernel 5.6

    Linux linux
    12
    1 Stimmen
    12 Beiträge
    1k Aufrufe
    M
    Hi, since I'm currently change my rockpro64 setup I came across this. With the kernel from ayufan you need to set PWM_CTL to /sys/devices/platform/pwm-fan/hwmon/hwmon3/pwm1 for my self compiled one I need /sys/devices/platform/pwm-fan/hwmon/hwmon0/pwm1 But I got it only working with one entry for PWM_CTL e.g. PWM_CTL = "/sys/devices/platform/pwm-fan/hwmon/hwmon0/pwm1", after that you need to start ats again sudo systemctl stop ats sudo systemctl start ats initially the fan should start immediately for a short period of time. In case it is even a different one on your kernel you can find the right one using this command. sudo find /sys -name pwm1 | grep hwmon So far I'm not sure which kernel parameter or modul changes this. Martin
  • Nextcloud Talk

    Nextcloud nextcloud coturn linux talk
    5
    2
    0 Stimmen
    5 Beiträge
    959 Aufrufe
    FrankMF
    All I needed to do was setting the permissions to 744 for the archive directory and the symlinks resolved correctly after a reboot of coturn My turnserver installation on Debian runs as the user turnserver and not as root, nor is the user turnserver in any group owning the letsencrypt directory. If your turnserver does run as root, it should be fine just adding execute permissions. I hope this helps some of you. Quelle: https://help.nextcloud.com/t/lets-encrypt-symlink-breaks-coturn-configuration/70166 Was zum Testen die Tage....
  • IPv6 und Subnetze

    Linux linux ipv6
    1
    0 Stimmen
    1 Beiträge
    252 Aufrufe
    Niemand hat geantwortet