Skip to content

Semaphore - Die API

Verschoben Ansible
2 1 322
  • Nehmen wir mal an, wir haben bei Gitlab oder auch Github, oder was auch immer, ein Repo das wir gelegentlich bearbeiten und das danach automatisch auf einen Server soll. So was ist ja in der Entwicklung von Software normal. Dafür gibt es ganz viele Möglichkeiten, ich habe mir gedacht das kann man sicherlich auch mit einem Playbook realisieren. Mittlerweile, nach vielen Kopfschmerzen, funktioniert es.

    PyCharm (commit & push) -> Gitlab -> Semaphore (Playbook) -> Server mit Applikation

    Wir müssen also mit Gitlab das Playbook auf dem Semaphore Server triggern. Meine ersten Versuche zielten darauf ab, meinen lokalen Semaphore Server zu triggern. Dazu wollte ich die IPv6 Adresse benutzen. Dies scheiterte aber die ganze Zeit.

    Die Docker Container, die Gitlab startet, scheinen keine IPv6 Funktionalität zu besitzen!?? Da ich aber schauen wollte, ob das so klappt wie ich mir das vorstellte, habe ich einen Semaphore Server im Netz aufgesetzt. Und da funktionierte es (IPv4 & IPv6) einwandfrei.

    Ok, die Doku zur API (Application Programming Interface) findet man -> https://docs.ansible-semaphore.com/administration-guide/api

    Ganz wichtig ist das Thema Authentifizierung. Damit ein User auf die API zugreifen kann, benötigt dieser meistens einen s.g. Token. Den kann man mit der API auch erzeugen, aber zuerst muss man sich mal anmelden, an der API.

    LOGIN

    curl -v -c /tmp/semaphore-cookie -XPOST \
    -H 'Content-Type: application/json' \
    -H 'Accept: application/json' \
    -d '{"auth": "YOUR_LOGIN", "password": "YOUR_PASSWORD"}' \
    http://localhost:3000/api/auth/login
    

    Login & Passowort sind die Login Daten Eures Semaphores Users. Danach ist man angemeldet und kann weiter arbeiten.

    TOKEN erzeugen

    curl -v -b /tmp/semaphore-cookie -XPOST \
    -H 'Content-Type: application/json' \
    -H 'Accept: application/json' \
    http://localhost:3000/api/user/tokens
    
    
    curl -v -b /tmp/semaphore-cookie \
    -H 'Content-Type: application/json' \
    -H 'Accept: application/json' \
    http://localhost:3000/api/user/tokens
    

    Danach erscheint in der Konsole die Ausgabe und man kann sich den Token kopieren. Damit kann man dann weiter arbeiten. Beispiel aus der Doku.

    [{"id":"YOUR_ACCESS_TOKEN","created":"2017-03-11T13:13:13Z","expired":false,"user_id":1}]
    

    Um jetzt mit Gitlab einen Task anzustoßen, braucht man diesen curl-String.

    curl -v -XPOST \
    -H 'Content-Type: application/json' \
    -H 'Accept: application/json' \
    -H 'Authorization: Bearer YOUR_ACCESS_TOKEN' \
    -d '{"template_id": 1}' \
    http://localhost:3000/api/project/1/tasks
    

    Ok, das bekommt man hin, oder? War für mich leider doch ein sehr lange Sessions des Ausprobierens usw. Das Problem war die Formatierung des curl-Strings bei gitlab. Ok, weiter geht es.

    Gitlab

    Wir legen im Gitlab Projekt eine Datei mit dem Namen

    gitlab-ci.yml
    

    an. Die Testdatei hat folgenden Inhalt.

    # Here we test to trigger a semaphore task from gitlab runner.
    stages:
      - deploy
    
    deploy:
      stage: deploy
    
      script:
        # $SEMAPHORE_API_TOKEN is stored in gitlab Settings/ CI/CD / Variables
        >
        curl -v -XPOST -H 'Content-Type: application/json' -H 'Accept: application/json' -H "Authorization: Bearer $SEMAPHORE_API_TOKEN " -d '{"template_id": 2}' https://<DOMAIN>/api/project/2/tasks
      only:
        - master  # Specify the branch to trigger the pipeline (adjust as needed)
    

    Ich wollte den Code eigentlich lesbar reinschreiben, also mit \ mehrere Zeilen. Aber alle meine Versuche sind gescheitert, egal was ich im Internet gefunden habe oder auch bei ChatGPT, es ging erst als ich alles in eine Zeile geklatscht habe. Naja, dann halt nicht.

    Wie ihr seht, habe ich zu dem Token was kommentiert.

    # $SEMAPHORE_API_TOKEN is stored in gitlab Settings/ CI/CD / Variables
    

    Unter dem Pfad kann man Token usw. ablegen und ihnen einen Namen geben. Damit kann man die sensiblen Informationen aus dem Code raushalten. Wenn man dann noch in den Einstellungen, den Token auf masked setzt, wird er auch in den Logs usw. nicht angezeigt, sondern maskiert.

    > authorization: Bearer [MASKED]
    

    Das sieht ja schon gut aus 🙂 Wenn man nun was in Pycharm editiert und das per commit & push nach gitlab befördert, führt gitlab nach der Ausführung der Befehle das File gitlab-ci.yml aus.
    Und das sorgt dafür, das der entsprechende Task auf dem Semaphore Server ausgeführt wird.

    Ein wunderbares Spielzeug 🙂 Viel Spaß beim Spielen!

    Wer Fehler findet, bitte kommentieren. Ich mag es nicht, wenn unnützes Zeug im Internet steht.

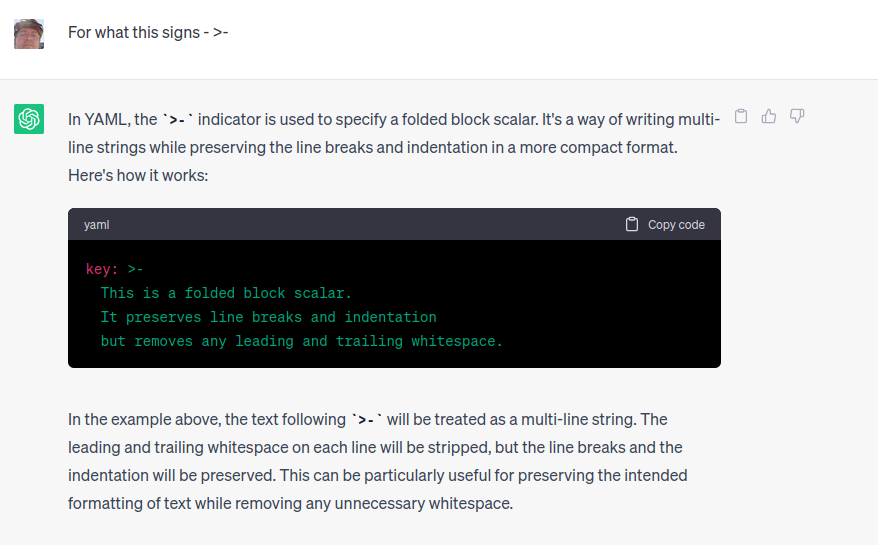
  • Ich hasse schlecht lesbaren Code, scheint man sich bei Python so anzugewöhnen. Habe da nochmal was mit der langen Zeile getestet.

    stages:
      - deploy
    
    deploy:
      stage: deploy
    
      script:
        # $SEMAPHORE_API_TOKEN is stored in gitlab Settings/ CI/CD / Variables
        - >-
         curl -v XPOST
         -H 'Content-Type: application/json'
         -H 'Accept: application/json'
         -H "Authorization: Bearer $SEMAPHORE_API_TOKEN "
         -d '{"template_id": 2}'
         https://<DOMAIN>/api/project/2/tasks
      only:
        - master  # Specify the branch to trigger the pipeline (adjust as needed)
    

    Hier noch was Dr. ChatGPT dazu schreibt

    631de9d4-b04d-4043-bfff-c5f2d1b6eea7-grafik.png

    Erledigt - läuft 🙂 Und verstanden habe ich es auch.

  • FrankMF FrankM verschob dieses Thema von Linux am
  • AI Bots aussperren

    Linux linux block-ai nginx
    2
    0 Stimmen
    2 Beiträge
    191 Aufrufe
    FrankMF
    Wir können das noch für eine sanfte Methode erweitern, das ist die Datei robots.txt, wo man sich in alten Zeiten mal dran hielt. Einige Bots machen das, andere nicht. Praktisch, das o.g. Projekt bietet diese Datei auch an. Dann werden wir das kurz mal mit einbauen. ai-block.sh #!/bin/bash # Script um AI-Bots zu blocken # https://github.com/ai-robots-txt/ai.robots.txt/tree/main mkdir /root/AI-test cd /root/AI-test ## Daten holen curl -O https://raw.githubusercontent.com/ai-robots-txt/ai.robots.txt/master/nginx-block-ai-bots.conf curl -O https://raw.githubusercontent.com/ai-robots-txt/ai.robots.txt/master/robots.txt ## Daten in nginx einbauen mv nginx-block-ai-bots.conf /etc/nginx/blocklists/ mv robots.txt /var/www/html ## NGINX neustarten systemctl restart nginx.service Damit das in nginx funktioniert. Den Server Block um folgendes erweitern. # Serve robots.txt directly from Nginx location = /robots.txt { root /var/www/html; try_files $uri =404; } Kurzer Test https://<DOMAIN>/robots.txt Ergebnis User-agent: AI2Bot User-agent: Ai2Bot-Dolma User-agent: Amazonbot User-agent: anthropic-ai User-agent: Applebot User-agent: Applebot-Extended User-agent: Brightbot 1.0 User-agent: Bytespider User-agent: CCBot User-agent: ChatGPT-User User-agent: Claude-Web User-agent: ClaudeBot User-agent: cohere-ai User-agent: cohere-training-data-crawler User-agent: Crawlspace User-agent: Diffbot User-agent: DuckAssistBot User-agent: FacebookBot User-agent: FriendlyCrawler User-agent: Google-Extended User-agent: GoogleOther User-agent: GoogleOther-Image User-agent: GoogleOther-Video User-agent: GPTBot User-agent: iaskspider/2.0 User-agent: ICC-Crawler User-agent: ImagesiftBot User-agent: img2dataset User-agent: imgproxy User-agent: ISSCyberRiskCrawler User-agent: Kangaroo Bot User-agent: Meta-ExternalAgent User-agent: Meta-ExternalFetcher User-agent: OAI-SearchBot User-agent: omgili User-agent: omgilibot User-agent: PanguBot User-agent: Perplexity-User User-agent: PerplexityBot User-agent: PetalBot User-agent: Scrapy User-agent: SemrushBot-OCOB User-agent: SemrushBot-SWA User-agent: Sidetrade indexer bot User-agent: Timpibot User-agent: VelenPublicWebCrawler User-agent: Webzio-Extended User-agent: YouBot Disallow: /
  • Update 1.32.6

    Vaultwarden vaultwarden linux
    1
    0 Stimmen
    1 Beiträge
    150 Aufrufe
    Niemand hat geantwortet
  • Update 1.30.2 released

    Vaultwarden vaultwarden linux
    1
    0 Stimmen
    1 Beiträge
    136 Aufrufe
    Niemand hat geantwortet
  • Debian 12 Bookworm - Release 12.1

    Linux debian linux
    1
    0 Stimmen
    1 Beiträge
    159 Aufrufe
    Niemand hat geantwortet
  • Konsolentext in Englisch

    Linux linux
    1
    0 Stimmen
    1 Beiträge
    78 Aufrufe
    Niemand hat geantwortet
  • ZFS - Wichtige Befehle

    Linux zfs linux
    3
    0 Stimmen
    3 Beiträge
    963 Aufrufe
    FrankMF
    Heute mal drüber gestolpert, das es auch so was geben kann. root@pve2:~# zpool status pool: pool_NAS state: ONLINE status: Some supported and requested features are not enabled on the pool. The pool can still be used, but some features are unavailable. action: Enable all features using 'zpool upgrade'. Once this is done, the pool may no longer be accessible by software that does not support the features. See zpool-features(7) for details. scan: scrub repaired 0B in 00:20:50 with 0 errors on Sun Apr 13 00:44:51 2025 config: NAME STATE READ WRITE CKSUM pool_NAS ONLINE 0 0 0 mirror-0 ONLINE 0 0 0 ata-WDC_WDS100T1R0A-68A4W0_230520800733 ONLINE 0 0 0 ata-WDC_WDS100T1R0A-68A4W0_230520801376 ONLINE 0 0 0 errors: No known data errors Was machen? Als erstes mal ein Backup angestoßen. Danach root@pve2:~# zpool get all pool_NAS | grep feature pool_NAS feature@async_destroy enabled local pool_NAS feature@empty_bpobj active local pool_NAS feature@lz4_compress active local pool_NAS feature@multi_vdev_crash_dump enabled local pool_NAS feature@spacemap_histogram active local pool_NAS feature@enabled_txg active local pool_NAS feature@hole_birth active local pool_NAS feature@extensible_dataset active local pool_NAS feature@embedded_data active local pool_NAS feature@bookmarks enabled local pool_NAS feature@filesystem_limits enabled local pool_NAS feature@large_blocks enabled local pool_NAS feature@large_dnode enabled local pool_NAS feature@sha512 enabled local pool_NAS feature@skein enabled local pool_NAS feature@edonr enabled local pool_NAS feature@userobj_accounting active local pool_NAS feature@encryption enabled local pool_NAS feature@project_quota active local pool_NAS feature@device_removal enabled local pool_NAS feature@obsolete_counts enabled local pool_NAS feature@zpool_checkpoint enabled local pool_NAS feature@spacemap_v2 active local pool_NAS feature@allocation_classes enabled local pool_NAS feature@resilver_defer enabled local pool_NAS feature@bookmark_v2 enabled local pool_NAS feature@redaction_bookmarks enabled local pool_NAS feature@redacted_datasets enabled local pool_NAS feature@bookmark_written enabled local pool_NAS feature@log_spacemap active local pool_NAS feature@livelist enabled local pool_NAS feature@device_rebuild enabled local pool_NAS feature@zstd_compress enabled local pool_NAS feature@draid enabled local pool_NAS feature@zilsaxattr disabled local pool_NAS feature@head_errlog disabled local pool_NAS feature@blake3 disabled local pool_NAS feature@block_cloning disabled local pool_NAS feature@vdev_zaps_v2 disabled local Das kommt von neuen Funktionen, die zu ZFS hinzugefügt wurden und bei Erstellung des Pools nicht vorhanden waren. Dann upgraden wir mal root@pve2:~# zpool upgrade pool_NAS This system supports ZFS pool feature flags. Enabled the following features on 'pool_NAS': zilsaxattr head_errlog blake3 block_cloning vdev_zaps_v2 Kontrolle root@pve2:~# zpool status pool: pool_NAS state: ONLINE scan: scrub repaired 0B in 00:20:50 with 0 errors on Sun Apr 13 00:44:51 2025 config: NAME STATE READ WRITE CKSUM pool_NAS ONLINE 0 0 0 mirror-0 ONLINE 0 0 0 ata-WDC_WDS100T1R0A-68A4W0_230520800733 ONLINE 0 0 0 ata-WDC_WDS100T1R0A-68A4W0_230520801376 ONLINE 0 0 0 errors: No known data errors Features kontrollieren root@pve2:~# zpool get all pool_NAS | grep feature pool_NAS feature@async_destroy enabled local pool_NAS feature@empty_bpobj active local pool_NAS feature@lz4_compress active local pool_NAS feature@multi_vdev_crash_dump enabled local pool_NAS feature@spacemap_histogram active local pool_NAS feature@enabled_txg active local pool_NAS feature@hole_birth active local pool_NAS feature@extensible_dataset active local pool_NAS feature@embedded_data active local pool_NAS feature@bookmarks enabled local pool_NAS feature@filesystem_limits enabled local pool_NAS feature@large_blocks enabled local pool_NAS feature@large_dnode enabled local pool_NAS feature@sha512 enabled local pool_NAS feature@skein enabled local pool_NAS feature@edonr enabled local pool_NAS feature@userobj_accounting active local pool_NAS feature@encryption enabled local pool_NAS feature@project_quota active local pool_NAS feature@device_removal enabled local pool_NAS feature@obsolete_counts enabled local pool_NAS feature@zpool_checkpoint enabled local pool_NAS feature@spacemap_v2 active local pool_NAS feature@allocation_classes enabled local pool_NAS feature@resilver_defer enabled local pool_NAS feature@bookmark_v2 enabled local pool_NAS feature@redaction_bookmarks enabled local pool_NAS feature@redacted_datasets enabled local pool_NAS feature@bookmark_written enabled local pool_NAS feature@log_spacemap active local pool_NAS feature@livelist enabled local pool_NAS feature@device_rebuild enabled local pool_NAS feature@zstd_compress enabled local pool_NAS feature@draid enabled local pool_NAS feature@zilsaxattr enabled local pool_NAS feature@head_errlog active local pool_NAS feature@blake3 enabled local pool_NAS feature@block_cloning enabled local pool_NAS feature@vdev_zaps_v2 enabled local So, alle neuen Features aktiviert. Jetzt kann der Pool weiterhin seine Arbeit machen.
  • OpenWrt - Sysupgrade

    OpenWRT & Ubiquiti ER-X openwrt linux er-x
    1
    0 Stimmen
    1 Beiträge
    285 Aufrufe
    Niemand hat geantwortet
  • Kopia 0.7.x released

    Kopia kopia linux
    1
    0 Stimmen
    1 Beiträge
    246 Aufrufe
    Niemand hat geantwortet