Skip to content

Python und GUI

Verschoben Python3
1 1 205
  • Dank des netten Tipps meines Systemadministrator mal folgendes ausprobiert.

    Maschine

    Ubuntu20.04 in Virtual Box

    Software Installation

    python3 ist drauf. Also folgendes

    rank@frank-VirtualBox:~/python$ python3 -m pip install pysimplegui
    /usr/bin/python3: No module named pip
    

    Ok, ist einfach

    frank@frank-VirtualBox:~/python$ sudo apt install python3-pip
    

    Danach geht es

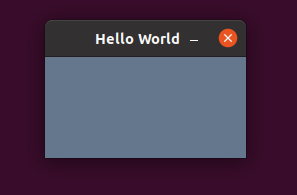
    frank@frank-VirtualBox:~/python$ python3 -m pip install pysimplegui
    Collecting pysimplegui
      Downloading PySimpleGUI-4.29.0-py3-none-any.whl (357 kB)
         |████████████████████████████████| 357 kB 2.0 MB/s 
    Installing collected packages: pysimplegui
    Successfully installed pysimplegui-4.29.0
    

    Beispiel hello_world.py

    # hello_world.py
    
    import PySimpleGUI as sg
    
    sg.Window(title="Hello World", layout=[[]], margins=(100, 50)).read()
    

    Bei der Ausführung kommt folgender Fehler

    frank@frank-VirtualBox:~/python$ python3 hello_world.py 
    Traceback (most recent call last):
      File "hello_world.py", line 3, in <module>
        import PySimpleGUI as sg
      File "/home/frank/.local/lib/python3.8/site-packages/PySimpleGUI/__init__.py", line 2, in <module>
        from .PySimpleGUI import *
      File "/home/frank/.local/lib/python3.8/site-packages/PySimpleGUI/PySimpleGUI.py", line 101, in <module>
        import tkinter as tk
    ModuleNotFoundError: No module named 'tkinter'
    

    Ok, fehlt noch was.

    frank@frank-VirtualBox:~/python$ sudo apt install python3-tk
    

    Danach funktioniert es.

    91b54d59-24ce-44d6-965c-749ae041c41c-grafik.png

  • Python3 - pyqtSignal

    Python3 python3 restic-ui
    1
    0 Stimmen
    1 Beiträge
    135 Aufrufe
    Niemand hat geantwortet
  • Python3 - enumerate()

    Python3 python3
    2
    1
    0 Stimmen
    2 Beiträge
    191 Aufrufe
    FrankMF
    Ich habe noch was Code gefunden, den ich mal dringend aufräumen musste Wenn ich mit dem Restic UI die Snapshots anzeige, dann sieht das so aus. reading repository password from stdin ID Time Host Tags Paths ---------------------------------------------------------------------------- 4e769748 2021-12-31 21:48:34 frank-MS-7C37 /home/frank/Bilder 34298934 2022-01-26 20:15:53 frank-MS-7C37 /home/frank/Bilder 0d5d88f2 2022-01-27 21:05:07 frank-MS-7C37 /home/frank/Bilder f0e7d5a7 2022-01-29 13:46:12 frank-MS-7C37 /home/frank/Bilder 79918d70 2022-01-29 13:52:56 frank-MS-7C37 /home/frank/Bilder d74272a3 2022-01-30 11:54:20 frank-MS-7C37 /home/frank/Bilder 11b0b5ad 2022-01-30 11:57:44 frank-MS-7C37 /home/frank/Bilder 4a7450d2 2022-02-20 09:35:56 frank-MS-7C37 /home/frank/Bilder c1a4a51d 2022-02-20 09:36:43 frank-MS-7C37 /home/frank/Bilder d178ded5 2022-02-20 09:38:53 frank-MS-7C37 /home/frank/Bilder 997e2259 2022-02-20 16:35:57 frank-MS-7C37 /home/frank/Bilder 3320ad5c 2022-02-20 16:49:19 frank-MS-7C37 /home/frank/Bilder ---------------------------------------------------------------------------- 12 snapshots Mich interessieren die IDs, weil ich bei der Eingabe der IDs überprüfen möchte, ob die eingegebene ID existiert. Also muss ich das irgendwie auslesen und speichern. Das habe ich bis jetzt so gemacht. def id_append(self, result): # We split the result into individual lines. # Result was passed. And create an list. result_list = result.split('\n') # We count the number of repositories and search for 'source'. count = result.count(backup_data[row].source) # Offset added, first interesting line is line 3! count = count + 3 # We loop through the list and output the ID's and store in snapshot_id x = 3 while x < count: a = result_list[x] y = a[0:8] snapshot_id.append(y) x = x + 1 Das erschien mir heute, beim erneuten Betrachten, Spaghetticode zu sein. Machen wir das mal etwas ordentlicher. Ich nehme die Ausgabe (stdout) und erzeuge eine Liste, jede Zeile ein Element. result_list = result.split('\n') Sieht so aus ['reading repository password from stdin', 'ID Time Host Tags Paths', '----------------------------------------------------------------------------', '4e769748 2021-12-31 21:48:34 frank-MS-7C37 /home/frank/Bilder', '34298934 2022-01-26 20:15:53 frank-MS-7C37 /home/frank/Bilder', '0d5d88f2 2022-01-27 21:05:07 frank-MS-7C37 /home/frank/Bilder', 'f0e7d5a7 2022-01-29 13:46:12 frank-MS-7C37 /home/frank/Bilder', '79918d70 2022-01-29 13:52:56 frank-MS-7C37 /home/frank/Bilder', 'd74272a3 2022-01-30 11:54:20 frank-MS-7C37 /home/frank/Bilder', '11b0b5ad 2022-01-30 11:57:44 frank-MS-7C37 /home/frank/Bilder', '4a7450d2 2022-02-20 09:35:56 frank-MS-7C37 /home/frank/Bilder', 'c1a4a51d 2022-02-20 09:36:43 frank-MS-7C37 /home/frank/Bilder', 'd178ded5 2022-02-20 09:38:53 frank-MS-7C37 /home/frank/Bilder', '997e2259 2022-02-20 16:35:57 frank-MS-7C37 /home/frank/Bilder', '3320ad5c 2022-02-20 16:49:19 frank-MS-7C37 /home/frank/Bilder', '----------------------------------------------------------------------------', '12 snapshots', ''] Diesmal benutzen wir die enumerate() Funktion for count, value in enumerate(result_list): print(count, value) Das was raus kommt, sieht so aus 0 reading repository password from stdin 1 ID Time Host Tags Paths 2 ---------------------------------------------------------------------------- 3 4e769748 2021-12-31 21:48:34 frank-MS-7C37 /home/frank/Bilder 4 34298934 2022-01-26 20:15:53 frank-MS-7C37 /home/frank/Bilder 5 0d5d88f2 2022-01-27 21:05:07 frank-MS-7C37 /home/frank/Bilder 6 f0e7d5a7 2022-01-29 13:46:12 frank-MS-7C37 /home/frank/Bilder 7 79918d70 2022-01-29 13:52:56 frank-MS-7C37 /home/frank/Bilder 8 d74272a3 2022-01-30 11:54:20 frank-MS-7C37 /home/frank/Bilder 9 11b0b5ad 2022-01-30 11:57:44 frank-MS-7C37 /home/frank/Bilder 10 4a7450d2 2022-02-20 09:35:56 frank-MS-7C37 /home/frank/Bilder 11 c1a4a51d 2022-02-20 09:36:43 frank-MS-7C37 /home/frank/Bilder 12 d178ded5 2022-02-20 09:38:53 frank-MS-7C37 /home/frank/Bilder 13 997e2259 2022-02-20 16:35:57 frank-MS-7C37 /home/frank/Bilder 14 3320ad5c 2022-02-20 16:49:19 frank-MS-7C37 /home/frank/Bilder 15 ---------------------------------------------------------------------------- 16 12 snapshots 17 Mich interessieren nur die Zeilen mit /home/frank/Bilder Das kann man so abfragen if backup_data[row].source in value: Und jetzt nur die ID entsprechend abspeichern snapshot_id.append(value[0:8]) Sieht jetzt komplett so aus result_list = result.split('\n') for count, value in enumerate(result_list): if backup_data[row].source in value: snapshot_id.append(value[0:8]) print(count, value[0:8]) Somit speichert er jetzt nur noch die IDs, der folgenden Ausgabe. 3 4e769748 4 34298934 5 0d5d88f2 6 f0e7d5a7 7 79918d70 8 d74272a3 9 11b0b5ad 10 4a7450d2 11 c1a4a51d 12 d178ded5 13 997e2259 14 3320ad5c Diese IDs, kann ich dann weiterverarbeiten.
  • Python3 - Pipenv für die virtuelle Entwicklungsumgebung

    Python3 python3 pipenv
    2
    1
    0 Stimmen
    2 Beiträge
    470 Aufrufe
    FrankMF
    Ich ko... immer, wenn ich mein VSCodium neu installieren muss. Das größte Problem dabei ist immer, das ich fast immer vergesse den Python Interpreter zu setzen. "CTRL+SHIFT+P" and choose the correct python interpreter. [image: 1656256156412-46f85075-4dbc-414c-94c2-abc5bb6009b6-grafik.png] Danach startet das Python Programm auch wieder aus der richtigen Entwicklungsumgebung
  • PyQt5 - QThread

    Python3 pyqt5 python3
    3
    0 Stimmen
    3 Beiträge
    320 Aufrufe
    FrankMF
    Und hier mal ein komplettes Beispiel. class Worker Wir legen den Worker an, das ist der Prozess der die Arbeit macht und etwas länger braucht. class Worker(QObject): """ Worker Class for Rest function stats""" stats_finished = pyqtSignal(str) stats_error = pyqtSignal(str) def __init__(self): super().__init__() def run(self): # Restic function try: # long running task except Exception: # Process don't successful, send signal self.stats_error.emit(result.stderr) else: # Process successful, send signal self.stats_finished.emit(result.stdout) finally: pass in class MainWindow class MainWindow(QMainWindow): def __init__(self): super().__init__() "First Thread with documentation" # Worker for restic_stats # Create a QThread object self.thread = QThread() # Create a worker object self.worker1 = Worker() # Move worker to the thread self.worker1.moveToThread(self.thread) # Connect signals and slots self.thread.started.connect(self.worker1.run) self.worker1.stats_finished[str].connect(self.restic_stats_finished) self.worker1.stats_error[str].connect(self.restic_stats_error) "First thread end" ############################################### # Process for restic_stats is finished ############################################### @pyqtSlot(str) def restic_stats_finished(self, i): # Signal from worker thread without an error Spinner.stop(self) self.thread.quit() ############################################### # Process for restic_stats when get an error ############################################### @pyqtSlot(str) def restic_stats_error(self, i): # Signal from worker thread with an error! Spinner.stop(self) Funktion restic_stats def restic_stats(self): # we start the worker thread self.thread.start() # we start waitingspinnerwidget Spinner.start(self) Ich wollte gerade schreiben, das folgendes sehr wichtig ist self.thread.quit() da fällt mir ein Fehler auf. Kurz ausprobiert und bingo, wenn der Prozess einen Error triggert, muss natürlich auch der Prozess beendet werden. Wenn man das nicht macht, macht das Programm nicht das was es soll. Der Grund ist, das der Prozess einfach immer weiter läuft. Er MUSS beendet werden. Ich gehe dann mal in meinem Programm alles ändern Ok, jetzt geht die Funktion auch zweimal hintereinander und gibt auch ordentlich den Fehler aus. Fazit Ich habe wieder sehr viel gelernt und hoffe das ich es auch richtig verstanden habe Hoffe das es dem ein oder anderen Anfänger hilft. Und falls hier ein Profi mitliest und hier Blödsinn steht bitte ich um einen Kommentar, damit ich das ändern kann. Es steht schon genug Blödsinn im Netz
  • Python3 - PyQt5 QIcon

    Python3 pyqt5 python3
    2
    2
    0 Stimmen
    2 Beiträge
    206 Aufrufe
    FrankMF
    Die Suchpfade findet man hiermit print(QIcon.themeSearchPaths()) Ausgabe ['/home/frank/.icons', '/usr/share/cinnamon/icons', '/var/lib/flatpak/exports/share/icons', '/usr/share/icons', ':/icons']
  • Restic UI - mein zweites Python3 Projekt

    Python3 pyqt5 restic python3
    5
    0 Stimmen
    5 Beiträge
    908 Aufrufe
    FrankMF
    @berthold Hallo Berthold. Ich bin eigentlich immer noch nicht mit meinem Code zufrieden. Ist man das jemals? Da ich auch noch ein kleines Problem habe, würde ich da ungerne jemanden reinschauen lassen. Der Code ist stellenweise in deutsch kommentiert, stellenweise in englisch. Kennt man ja, man will es irgendwann mal ordentlich machen und dann kommt das nächste Problem auf einen zu. Hast Du Python3 Vorkenntnisse? Wenn Du "brennend" dran interessiert bist, könnte ich Dir evt. Zugang zu meinem Gitlab-Projekt geben. Wenn Du interessiert bist und ich dich nicht los werde :), dann schreib mir eine PN.
  • Python3 - subprocess.Popen

    Python3 restic python3
    1
    0 Stimmen
    1 Beiträge
    350 Aufrufe
    Niemand hat geantwortet
  • Python3 - Eingabeformular

    Python3 python3
    3
    1
    0 Stimmen
    3 Beiträge
    276 Aufrufe
    FrankMF
    Meine endgültige Lösung, zu mindestens im Moment , ist ein zweites Window. Das gefällt mir am Besten, komme ich zu mindestens im Moment einfach besser mit klar. Aber, eines der größten Probleme war für mich, wie aktualisiere ich die Liste im Hauptfenster!? Da habe ich doch etliche Stunden dran rum gefummelt.... Hier nur mal das Layout ##################### # Layout ##################### self.formGroupBox = QGroupBox("Form layout") layout = QFormLayout() layout.addRow(self.label_1) layout.addRow(QLabel("Backup Name:"), self.input1) layout.addRow(QLabel("Repository:"), self.button3) layout.addRow(QLabel("Source:"), self.button4) layout.addRow(QLabel("Password:"), self.input4) layout.addRow(self.label_6) layout.addRow(self.button2) self.formGroupBox.setLayout(layout) self.setLayout(layout) Das mit dem SecondWindow ist aber was aufwändiger. Da mach ich dann mal einen eigenen Beitrag zu. Aktuell sieht das so aus. [image: 1604819923887-6c68c956-9127-438f-bc54-4dcef8e18f00-image.png]