Skip to content

LUKS verschlüsselte Platte mounten

Linux
  • Ich bin mal wieder am Spielen 🙂 Nachdem doch einiges schief gegangen ist, dazu später mehr, musste ich eine verschlüsselte NVMe SSD mal eben mounten um an ein paar Daten ran zu kommen.

    Pakete die benötigt werden

    apt install cryptsetup
    apt install lvm2
    

    Platte suchen

    root@frank-MS-7A34:~# blkid | grep crypto
    /dev/nvme0n1p3: UUID="abf46827-9c34-4ab5-a376-5e6344b4b164" TYPE="crypto_LUKS" PARTUUID="0552c66a-55cd-4153-bf01-787479575f0c"
    

    Platte entsperren

    root@frank-MS-7A34:~# cryptsetup luksOpen /dev/nvme0n1p3 crypthome
    Geben Sie die Passphrase für »/dev/nvme0n1p3« ein: 
    

    Mount Verzeichnis anlegen

    mkdir /mnt/crypthome
    

    /dev/mapper anzeigen

    root@frank-MS-7A34:~# fdisk -l
    [..gekürzt..]
    Festplatte /dev/mapper/crypthome: 476,19 GiB, 511299289088 Bytes, 998631424 Sektoren
    Einheiten: Sektoren von 1 * 512 = 512 Bytes
    Sektorgröße (logisch/physikalisch): 512 Bytes / 512 Bytes
    E/A-Größe (minimal/optimal): 512 Bytes / 512 Bytes
    
    
    Festplatte /dev/mapper/debian--vg-root: 444,24 GiB, 476988833792 Bytes, 931618816 Sektoren
    Einheiten: Sektoren von 1 * 512 = 512 Bytes
    Sektorgröße (logisch/physikalisch): 512 Bytes / 512 Bytes
    E/A-Größe (minimal/optimal): 512 Bytes / 512 Bytes
    
    
    Festplatte /dev/mapper/debian--vg-swap_1: 31,98 GiB, 34309406720 Bytes, 67010560 Sektoren
    Einheiten: Sektoren von 1 * 512 = 512 Bytes
    Sektorgröße (logisch/physikalisch): 512 Bytes / 512 Bytes
    E/A-Größe (minimal/optimal): 512 Bytes / 512 Bytes
    

    Das Root Verzeichnis möchte ich mounten.

    Mounten

    root@frank-MS-7A34:~# mount /dev/mapper/debian--vg-root /mnt/crypthome
    

    Fertig!

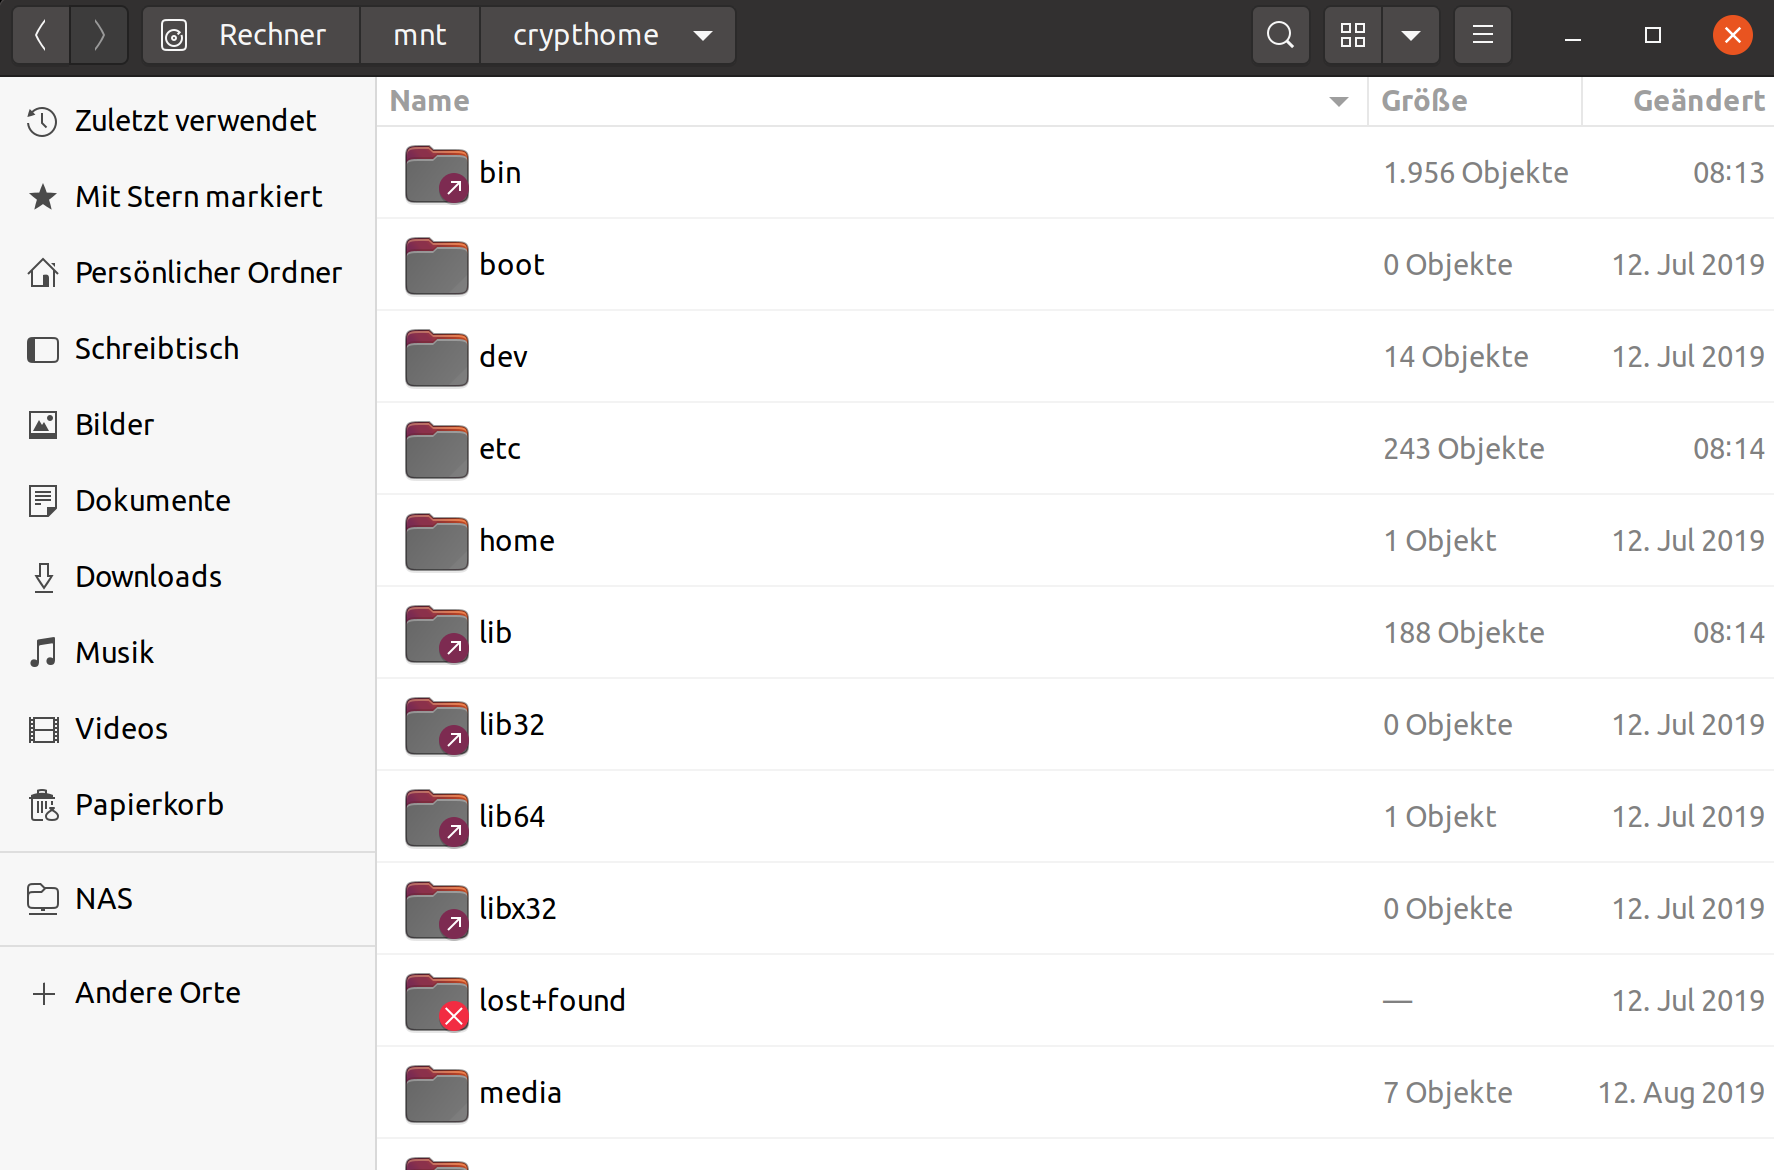
    Bildschirmfoto vom 2020-05-01 13-43-06.png

    Quelle: https://evilshit.wordpress.com/2012/10/29/how-to-mount-luks-encrypted-partitions-manually/

  • So, jetzt das ganze noch einen Ticken komplizierter 🙂

    Ich habe ja heute, für eine Neuinstallation von Ubuntu 20.04 Focal eine zweite NVMe SSD eingebaut. Meinen Bericht zu dem Thema findet ihr hier. Aber, darum soll es jetzt hier nicht gehen.

    Wir haben jetzt zwei verschlüsselte Ubuntu NVMe SSD Riegel im System. Jetzt klappt die ganze Sache da oben nicht mehr. Es kommt immer einen Fehlermeldung.

    unbekannter Dateisystemtyp „LVM2_member“.
    

    Ok, kurz googlen und dann findet man heraus, das es nicht klappen kann, weil beide LVM Gruppen, den selben Namen benutzen.

    root@frank-MS-7C37:/mnt/crypthome/root# vgdisplay
      --- Volume group ---
      VG Name               vgubuntu2
      System ID             
      Format                lvm2
      Metadata Areas        1
      Metadata Sequence No  4
      VG Access             read/write
      VG Status             resizable
      MAX LV                0
      Cur LV                2
      Open LV               1
      Max PV                0
      Cur PV                1
      Act PV                1
      VG Size               <464,53 GiB
      PE Size               4,00 MiB
      Total PE              118919
      Alloc PE / Size       118919 / <464,53 GiB
      Free  PE / Size       0 / 0   
      VG UUID               lpZxyv-cNOS-ld2L-XgvG-QILa-caHS-AaIC3A
       
      --- Volume group ---
      VG Name               vgubuntu
      System ID             
      Format                lvm2
      Metadata Areas        1
      Metadata Sequence No  3
      VG Access             read/write
      VG Status             resizable
      MAX LV                0
      Cur LV                2
      Open LV               2
      Max PV                0
      Cur PV                1
      Act PV                1
      VG Size               <475,71 GiB
      PE Size               4,00 MiB
      Total PE              121781
      Alloc PE / Size       121781 / <475,71 GiB
      Free  PE / Size       0 / 0   
      VG UUID               jRYTXL-zjpY-lYr6-KODT-u0LJ-9fYf-YVDna7
    

    Hier oben sieht man das schon mit geändertem Namen. Der VG Name muss unterschiedlich sein. Auch dafür gibt es ein Tool.

    root@frank-MS-7C37:/mnt/crypthome/root# vgrename --help
      vgrename - Rename a volume group
    
      Rename a VG.
      vgrename VG VG_new
    	[ COMMON_OPTIONS ]
    
      Rename a VG by specifying the VG UUID.
      vgrename String VG_new
    	[ COMMON_OPTIONS ]
    
      Common options for command:
    	[ -A|--autobackup y|n ]
    	[ -f|--force ]
    	[    --reportformat basic|json ]
    
      Common options for lvm:
    	[ -d|--debug ]
    	[ -h|--help ]
    	[ -q|--quiet ]
    	[ -v|--verbose ]
    	[ -y|--yes ]
    	[ -t|--test ]
    	[    --commandprofile String ]
    	[    --config String ]
    	[    --driverloaded y|n ]
    	[    --nolocking ]
    	[    --lockopt String ]
    	[    --longhelp ]
    	[    --profile String ]
    	[    --version ]
    
      Use --longhelp to show all options and advanced commands.
    

    Das muss dann so aussehen!

    vgrename lpZxyv-cNOS-ld2L-XgvG-QILa-caHS-AaIC3A vgubuntu2
    

    ACHTUNG

    Es kann zu Datenverlust kommen, also wie immer, Hirn einschalten!

    Ich weiß, das die erste eingebaute Platte mit der Nummer /dev/nvme0n1 geführt wird. Die zweite, heute verbaute, hört dann auf den Namen /dev/nvme1n1. Die darf ich nicht anpacken, weil sonst das System nicht mehr startet.

    /etc/fstab

    # /etc/fstab: static file system information.
    #
    # Use 'blkid' to print the universally unique identifier for a
    # device; this may be used with UUID= as a more robust way to name devices
    # that works even if disks are added and removed. See fstab(5).
    #
    # <file system> <mount point>   <type>  <options>       <dump>  <pass>
    /dev/mapper/vgubuntu-root /               ext4    errors=remount-ro 0       1
    # /boot was on /dev/nvme1n1p2 during installation
    UUID=178c7e51-a1d7-4ead-bbdf-a956eb7b754f /boot           ext4    defaults        0       2
    # /boot/efi was on /dev/nvme0n1p1 during installation
    UUID=7416-4553  /boot/efi       vfat    umask=0077      0       1
    /dev/mapper/vgubuntu-swap_1 none            swap    sw              0       0
    

    Jo, wenn jetzt die Partition /dev/mapper/vgubuntu2-root / anstatt /dev/mapper/vgubuntu-root / heißt läuft nichts mehr. Nur um das zu verdeutlichen, auch das könnte man problemlos reparieren. Aber, ich möchte nur warnen!!

    Nachdem die Änderung durchgeführt wurde, habe ich den Rechner neugestartet. Puuh, Glück gehabt, richtige NVMe SSD erwischt 🙂

    Festplatte /dev/mapper/vgubuntu2-root: 463,58 GiB, 497754832896 Bytes, 972177408 Sektoren
    Einheiten: Sektoren von 1 * 512 = 512 Bytes
    Sektorgröße (logisch/physikalisch): 512 Bytes / 512 Bytes
    E/A-Größe (minimal/optimal): 512 Bytes / 512 Bytes
    

    Nun können wir die Platte ganz normal, wie oben beschrieben, mounten. Nun kann ich noch ein paar Dinge kopieren 😉

  • Pycharm und Autoupload

    Linux
    1
    0 Stimmen
    1 Beiträge
    49 Aufrufe
    Niemand hat geantwortet
  • MongoDB Compass

    Linux
    1
    0 Stimmen
    1 Beiträge
    207 Aufrufe
    Niemand hat geantwortet
  • Debian Bookworm 12.2 released

    Linux
    1
    0 Stimmen
    1 Beiträge
    104 Aufrufe
    Niemand hat geantwortet
  • Proxmox - Umzug auf neue Hardware ASRock N100DC-ITX

    Angeheftet Proxmox
    25
    0 Stimmen
    25 Beiträge
    4k Aufrufe
    FrankMF

    Hallo @wooshell , erst mal sehr schade das Du so einen Stress mit dem Board hast. Ich habe das jetzt schon Monate laufen, übrigens ohne einen Kühler. Ok, wird ordentlich warm aber ich hasse Lüfter 😉

    Ich kann leider nicht so richtig erkennen, wo dein Problem liegt. Wie groß ist dein Speicher? Ist der in der Liste der unterstützen RAM Riegel?

    Das habe ich verbaut.

    RAM: Corsair Vengeance SODIMM 32GB (2x16GB) DDR4 2400MHz CL16 https://www.corsair.com/de/de/Kategorien/Produkte/Arbeitsspeicher/VENGEANCE-DDR4-SODIMM/p/CMSX32GX4M2A2400C16

    Aus dem Bauch heraus, würde ich auf RAM tippen.

  • Kopia 0.7.x released

    Kopia
    1
    0 Stimmen
    1 Beiträge
    215 Aufrufe
    Niemand hat geantwortet
  • checkmk - systemd crasht

    Verschoben checkmk
    1
    0 Stimmen
    1 Beiträge
    466 Aufrufe
    Niemand hat geantwortet
  • Restic - forget --keep-last 3 --prune

    Restic
    2
    0 Stimmen
    2 Beiträge
    600 Aufrufe
    FrankMF

    Ich habe mich damit noch ein wenig beschäftigt, die letzten drei zu behalten, ist nicht so optimal. Da es viele Optionen bei dem Befehl gibt, hier ein Ausschnitt

    Flags: -l, --keep-last n keep the last n snapshots -H, --keep-hourly n keep the last n hourly snapshots -d, --keep-daily n keep the last n daily snapshots -w, --keep-weekly n keep the last n weekly snapshots -m, --keep-monthly n keep the last n monthly snapshots -y, --keep-yearly n keep the last n yearly snapshots

    habe ich das ein wenig so angepasst, das ich denke es passt für mich.

    restic --password-file /root/passwd -r /media/NAS_neu/Restic/Home/ forget --keep-last 3 --keep-monthly 3 --prune

    Damit behalte ich auch die jeweils eines pro Monat. Und die letzten drei. Das sieht dann so aus.

    root@debian:~# ./backup2.sh repository 2f3f6147 opened successfully, password is correct Files: 38 new, 100 changed, 13268 unmodified Dirs: 0 new, 1 changed, 0 unmodified Added to the repo: 10.166 GiB processed 13406 files, 50.324 GiB in 3:24 snapshot 849f614c saved repository 2f3f6147 opened successfully, password is correct Applying Policy: keep the last 3 snapshots, 3 monthly snapshots snapshots for (host [debian], paths [/home/frank]): keep 5 snapshots: ID Time Host Tags Reasons Paths ------------------------------------------------------------------------------------ a7251cfd 2019-11-28 17:00:01 debian monthly snapshot /home/frank 283d4027 2019-12-31 17:00:01 debian monthly snapshot /home/frank ae2b96ec 2020-01-01 21:47:46 debian last snapshot /home/frank 079e00a6 2020-01-02 17:00:01 debian last snapshot /home/frank 849f614c 2020-01-03 21:08:45 debian last snapshot /home/frank monthly snapshot ------------------------------------------------------------------------------------ 5 snapshots remove 26 snapshots: ID Time Host Tags Paths ------------------------------------------------------------------ 896f16c2 2019-11-07 22:23:40 debian /home/frank b21bcf6d 2019-11-11 17:00:01 debian /home/frank f89248fb 2019-11-12 17:00:01 debian /home/frank 123ab546 2019-11-13 17:00:01 debian /home/frank b82d87d0 2019-11-18 17:00:01 debian /home/frank 040b0ab7 2019-11-19 17:00:01 debian /home/frank 7221d8ef 2019-11-20 17:00:01 debian /home/frank 84132a25 2019-11-21 17:00:01 debian /home/frank b558a52c 2019-11-25 17:00:01 debian /home/frank e5cc0c3e 2019-12-02 17:00:01 debian /home/frank 22423fa5 2019-12-03 17:00:01 debian /home/frank 39df1ab9 2019-12-04 17:00:01 debian /home/frank 98843457 2019-12-05 17:00:01 debian /home/frank b0cdd4b6 2019-12-09 17:00:01 debian /home/frank 828414f9 2019-12-10 17:00:01 debian /home/frank e34a27c3 2019-12-11 17:00:01 debian /home/frank 6e488c3b 2019-12-12 17:00:01 debian /home/frank 17898403 2019-12-16 17:00:01 debian /home/frank 1973305a 2019-12-17 17:00:01 debian /home/frank 9553bedd 2019-12-18 17:00:01 debian /home/frank fedf749d 2019-12-19 17:00:01 debian /home/frank 8e7cb876 2019-12-23 17:00:01 debian /home/frank 0bd0d102 2019-12-25 17:00:01 debian /home/frank 13d348b0 2019-12-26 17:00:01 debian /home/frank c7d960aa 2019-12-30 17:00:01 debian /home/frank f6ea9118 2020-01-01 17:00:01 debian /home/frank ------------------------------------------------------------------ 26 snapshots 26 snapshots have been removed, running prune counting files in repo building new index for repo [0:35] 100.00% 7806 / 7806 packs repository contains 7806 packs (46537 blobs) with 41.110 GiB processed 46537 blobs: 0 duplicate blobs, 0 B duplicate load all snapshots find data that is still in use for 5 snapshots [0:01] 100.00% 5 / 5 snapshots found 32654 of 46537 data blobs still in use, removing 13883 blobs will remove 0 invalid files will delete 715 packs and rewrite 752 packs, this frees 5.027 GiB [2:28] 100.00% 752 / 752 packs rewritten counting files in repo [0:01] 100.00% 6571 / 6571 packs finding old index files saved new indexes as [d137b425 f7caee99 a6e9711a] remove 35 old index files [1:13] 100.00% 1467 / 1467 packs deleted done using temporary cache in /tmp/restic-check-cache-916655151 repository 2f3f6147 opened successfully, password is correct created new cache in /tmp/restic-check-cache-916655151 create exclusive lock for repository load indexes check all packs check snapshots, trees and blobs read all data [7:47] 100.00% 6571 / 6571 items duration: 7:47 no errors were found root@debian:~#

    Am Ende seht ihr noch, wie Restic alle Files testet. Mein Script sieht jetzt so aus.

    #!/bin/bash # Script um mit Restic Daten automatisiert zu sichern! # Dient zum Sichern der Homepartition auf dem ROCKPro64 NAS! # Was soll gesichert werden? backup_pfad=/home/frank # Programm Start restic --password-file /root/passwd -r /media/NAS_neu/Restic/Home/ backup $backup_pfad --exclude-file=excludes.txt restic --password-file /root/passwd -r /media/NAS_neu/Restic/Home/ forget --keep-last 3 --keep-monthly 3 --prune # Testen restic --password-file /root/passwd -r /media/NAS_neu/Restic/Home/ check --read-data

    Das dann schön mit einem Cronjob laufen lassen und die Datensicherung ist erledigt 😉

  • Wenn dir der Redis-Server flöten geht....

    Verschoben Redis
    3
    0 Stimmen
    3 Beiträge
    546 Aufrufe
    FrankMF

    So, nach einer kleinen Pause und ein wenig nachdenken ist mir doch noch was eingefallen 😉

    Backports! Man so einfach!

    nano /etc/apt/sources.list

    Das folgende eintragen.

    # backports deb http://deb.debian.org/debian stretch-backports main

    Danach ein

    apt update

    Und dann schauen wir uns mal die Version an....

    apt -t stretch-backports search redis-server Sorting... Done Full Text Search... Done golang-github-stvp-tempredis-dev/stretch-backports 0.0~git20160122.0.83f7aae-1~bpo9+1 all Go package to start and stop temporary redis-server processes libtest-redisserver-perl/oldstable,oldstable 0.20-1 all redis-server runner for tests python-hiredis/oldstable,oldstable 0.2.0-1+b2 amd64 redis protocol reader for Python 2.X using hiredis python3-hiredis/oldstable,oldstable 0.2.0-1+b2 amd64 redis protocol reader for Python using hiredis redis/stretch-backports 5:5.0.3-3~bpo9+2 all Persistent key-value database with network interface (metapackage) redis-server/stretch-backports 5:5.0.3-3~bpo9+2 amd64 [residual-config] Persistent key-value database with network interface

    Und die habe ich gestern Abend gebaut.

    127.0.0.1:6379> INFO # Server redis_version:5.0.5

    Ok, das schmerzt jetzt 😛