Skip to content

ROCKPro64 - kein WLan-Modul möglich?

ROCKPro64
  • Als erstes muss ich mal die Überschrift erklären, es geht hier um die Version 2.0, also das "Preproduction Board".

    Ich hatte ja schon darüber berichtet, das Kamil ein Problem mit SDIO und PCIe hat.

    (23:02:15) ayufan1: OK
    (23:02:28) ayufan1: it seems that we either have sdio0 (wifi module) or pcie
    (23:02:44) ayufan1: enabling sdio0 prevents the pcie from being powered
    (23:02:59) ayufan1: so, either, either
    (23:03:04) ayufan1: annoying 🙂
    (23:03:56) fysa: that is odd
    (23:04:08) fysa: same bus but switched?
    (23:04:38) ayufan1: not sure, like removing the resistor on 2.0 board is not enough
    (23:04:42) ayufan1: it is still being pulled
    (23:10:27) ayufan1: another possibility is a mess with clocks
    (23:10:47) ayufan1: anyway, disabling sdio0 makes it work stable 🙂

    Eben dann im IRC folgendes

    (14:38:06) ayufan1: Yes. I think that PCIe problems are solved.
    (14:38:34) ayufan1: I’m slightly worried about sdio, but maybe this is problem of 2.0 design and is solved in 2.1.

    Na gut, dann schauen wir mal in die Schaltpläne.
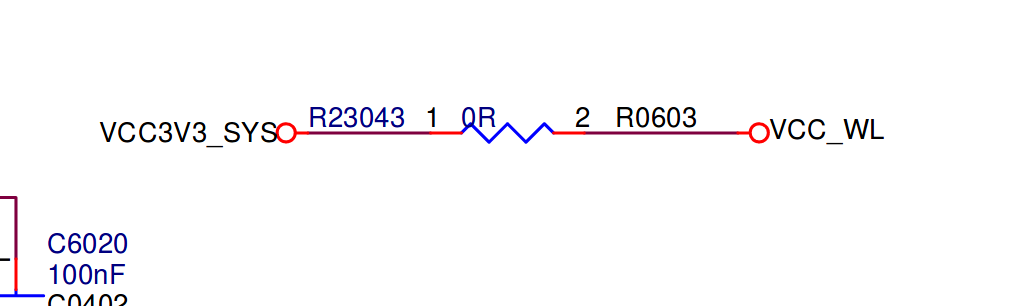
    Schaltplan v2.0
    Schaltplan v2.1

    Interessant ist Seite 23!

    Spannungsversorgung v2.0
    0_1532266159484_a552db5a-8d19-41da-a905-c50f23b23256-grafik.png

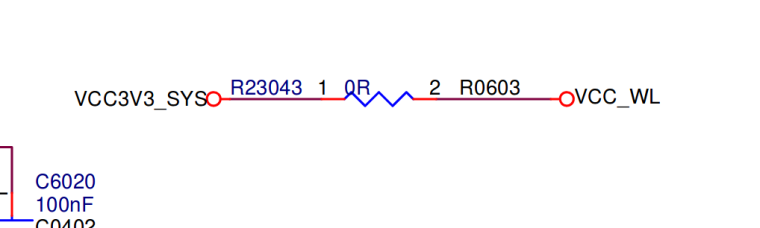
    Spannungsversorgung v2.1
    0_1532266211864_cb4d12e4-e3f4-43c3-8088-3ac043498002-grafik.png

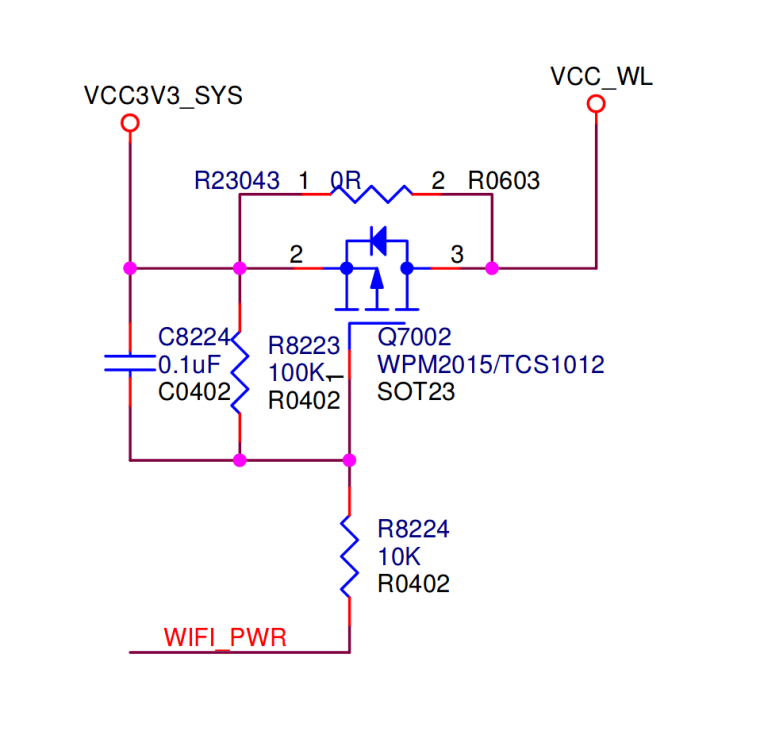
    Man sieht also einen deutlichen Unterschied. Ob das jetzt eine Ursache von Kamil's Problem ist, kann ich natürlich im Moment nicht sagen. Aber am Mittwoch kommen ja meinen Sachen aus China. Darunter ist auch ein WIFI-Modul. So mit kann man dann testen ob es Änderungen am Board gibt und ob auf v2.1 das WIFI-Modul auch funktioniert.

  • Es gibt eine erste Aussage, das WLan möglich ist.

    Aber auf welchem Board, ich frag mal nach..

    Update Sieht nach v2.1 aus.

  • Ich denke ich kann da ein klein wenig Entwarnung geben. Ich bin zwar zu blöd um es ans Laufen zu bekommen, aber man sieht das es wohl lebt.

    rock64@rockpro64:~$ sudo lshw -class network
    [sudo] password for rock64: 
      *-network:0 DISABLED      
           description: Wireless interface
           physical id: 7
           logical name: wlan0
           serial: ac:83:f3:e6:1f:b2
           capabilities: ethernet physical wireless
           configuration: broadcast=yes driver=wl driverversion=0 multicast=yes wireless=IEEE 802.11
      *-network:1
           description: Ethernet interface
           physical id: 8
           logical name: eth0
           serial: aa:41:29:23:dc:d1
           size: 1Gbit/s
           capacity: 1Gbit/s
           capabilities: ethernet physical tp aui bnc mii fibre 10bt 10bt-fd 100bt 100bt-fd 1000bt-fd autonegotiation
           configuration: autonegotiation=on broadcast=yes driver=st_gmac driverversion=March_2013 duplex=full ip=192.168.3.12 link=yes multicast=yes port=MII speed=1Gbit/s
    

    Wir werden dann mal auf ein Image mit WLan warten müssen, um das endgültig bestätigen zu können.

  • Heute, 5 Monate später, kann ich bestätigen das WLan möglich ist 🙂 Getestet auf einem ROCKPro64 v2.1 mit 2GB RAM.

    Eine Vorabversion von Recalbox machte es das erste Mal für mich möglich das WLan zu benutzen. Bericht

    Und PCIe ist abgeschaltet im dts File.

     pcie-phy {
                     compatible = "rockchip,rk3399-pcie-phy";
                     #phy-cells = <0x0>;
                     rockchip,grf = <0x15>;
                     clocks = <0x8 0x8a>;
                     clock-names = "refclk";
                     resets = <0x8 0x87>;
                     reset-names = "phy";
                     status = "disabled";
                     phandle = <0x8b>;
             };
     
             pcie@f8000000 {
                     compatible = "rockchip,rk3399-pcie";
                     #address-cells = <0x3>;
                     #size-cells = <0x2>;
                     aspm-no-l0s;
                     clocks = <0x8 0xc5 0x8 0xc4 0x8 0x147 0x8 0xa0>;
                     clock-names = "aclk", "aclk-perf", "hclk", "pm";
                     bus-range = <0x0 0x1f>;
                     max-link-speed = <0x2>;
                     linux,pci-domain = <0x0>;
                     msi-map = <0x0 0x89 0x0 0x1000>;
                     interrupts = <0x0 0x31 0x4 0x0 0x0 0x32 0x4 0x0 0x0 0x33 0x4 0x0>;
                     interrupt-names = "sys", "legacy", "client";
                     #interrupt-cells = <0x1>;
                     interrupt-map-mask = <0x0 0x0 0x0 0x7>;
                     interrupt-map = <0x0 0x0 0x0 0x1 0x8a 0x0 0x0 0x0 0x0 0x2 0x8a 0x1 0x0 0x0 0x0 0x3 0x8a 0x2 0x0 0x0 0x0 0x4 0x8a 0x3>;
                     phys = <0x8b>;
                     phy-names = "pcie-phy";
                     ranges = <0x83000000 0x0 0xfa000000 0x0 0xfa000000 0x0 0x1e00000 0x81000000 0x0 0xfbe00000 0x0 0xfbe00000 0x0 0x100000>;
                     reg = <0x0 0xf8000000 0x0 0x2000000 0x0 0xfd000000 0x0 0x1000000>;
                     reg-names = "axi-base", "apb-base";
                     resets = <0x8 0x82 0x8 0x83 0x8 0x84 0x8 0x85 0x8 0x86 0x8 0x81 0x8 0x80>;
                     reset-names = "core", "mgmt", "mgmt-sticky", "pipe", "pm", "pclk", "aclk";
                     status = "disabled";
    

    Also bleibt weiterhin ungeklärt, ob auch beides zusammen möglich ist. Also gleichzeitig das WLan-Modul und eine PCIe Karte.

  • ROCKPro64 - Samsung Portable SSD T5 500GB

    Hardware rockpro64
    1
    0 Stimmen
    1 Beiträge
    315 Aufrufe
    Niemand hat geantwortet
  • ROCKPro64 - PCIe Probleme

    Hardware rockpro64
    3
    0 Stimmen
    3 Beiträge
    406 Aufrufe
    FrankMF
    Danke für dein Feedback.
  • ROCKPro64 - PCIe NVMe SSD installieren

    Hardware linux rockpro64
    1
    0 Stimmen
    1 Beiträge
    348 Aufrufe
    Niemand hat geantwortet
  • ROCKPro64 - USB3 bootet von SSD!

    ROCKPro64 rockpro64
    4
    0 Stimmen
    4 Beiträge
    931 Aufrufe
    FrankMF
    Da oben steht viel Bullshit Ich habe mich mal mit dem mechanischen Aufbau einer USB3 Buchse beschäftigt, bzw. dazu recherchiert. Auf dieser Seite ist ein klasse Bild, was das sehr gut verdeutlicht. https://kompendium.infotip.de/usb-3-0.html Abbildung 28. Dort sieht man das die USB3 Kontakte RX/TX und GND ganz hinten sind. Wenn ich den Stecker jetzt komplett einstecke, wird wohl versucht eine USB3 Verbindung aufzubauen, die ja im Moment aus irgendeinem Grund scheitert. Wenn ich den Stecker nun ein Stück raus ziehe, trenne ich die USB3-Verbindung und es kommt eine USB2-Verbindung zustande. So mit ist mir jetzt einiges klarer, aber das Problem ist ungelöst
  • ROCKPro64 - RP64.GPIO

    Angeheftet Verschoben Hardware hardware rockpro64
    6
    1
    0 Stimmen
    6 Beiträge
    6k Aufrufe
    FrankMF
    Hallo zusammen, da ich weiß das dieser Artikel recht beliebt ist, wollen wir den heute mal aktualisieren. Vieles aus den vorherigen Beiträgen passt noch. Es gibt aber kleine Anpassungen. Hardware ROCKPro64v21. 2GB RAM Software Kamils Release 0.10.9 Linux rockpro64 5.6.0-1132-ayufan-g81043e6e109a #ayufan SMP Tue Apr 7 10:07:35 UTC 2020 aarch64 GNU/Linux Installation apt install python Danach laden wir das Projekt git clone https://github.com/Leapo/Rock64-R64.GPIO PIN Nummern anpassen cd Rock64-R64.GPIO/R64 nano _GPIO.py Datei ergänzen # Define GPIO arrays #ROCK_valid_channels = [27, 32, 33, 34, 35, 36, 37, 38, 64, 65, 67, 68, 69, 76, 79, 80, 81, 82, 83, 84, 85, 86, 87, 88, 89, 96, 97, 98, 100, 101, 102, 103, 104] #BOARD_to_ROCK = [0, 0, 0, 89, 0, 88, 0, 0, 64, 0, 65, 0, 67, 0, 0, 100, 101, 0, 102, 97, 0, 98, 103, 96, 104, 0, 76, 68, 69, 0, 0, 0, 38, 32, 0, 33, 37, 34, 36, 0, 35, 0, 0, 81, 82, 87, 83, 0, 0, 80, 79, 85, 84, 27, 86, 0, 0, 0, 0, 0, 0, 89, 88] #BCM_to_ROCK = [68, 69, 89, 88, 81, 87, 83, 76, 104, 98, 97, 96, 38, 32, 64, 65, 37, 80, 67, 33, 36, 35, 100, 101, 102, 103, 34, 82] ROCK_valid_channels = [52,53,152,54,50,33,48,39,41,43,155,156,125,122,121,148,147,120,36,149,153,42,45,44,124,126,123,127] BOARD_to_ROCK = [0,0,0,52,0,53,0,152,148,0,147,54,120,50,0,33,36,0,149,48,0,39,153,41,42,0,45,43,44,155,0,156,124,125,0,122,126,121,123,0,127] BCM_to_ROCK = [43,44,52,53,152,155,156,45,42,39,48,41,124,125,148,147,124,54,120,122,123,127,33,36,149,153,121,50] Abspeichern. Datei test.py anlegen nano test.py Inhalt #!/usr/bin/env python # Frank Mankel, 2018, LGPLv3 License # Rock 64 GPIO Library for Python # Thanks Allison! Thanks smartdave! import R64.GPIO as GPIO from time import sleep print("Output Test R64.GPIO Module...") # Set Variables var_gpio_out = 156 var_gpio_in = 155 # GPIO Setup GPIO.setwarnings(True) GPIO.setmode(GPIO.ROCK) GPIO.setup(var_gpio_out, GPIO.OUT, initial=GPIO.HIGH) # Set up GPIO as an output, with an initial state of HIGH GPIO.setup(var_gpio_in, GPIO.IN, pull_up_down=GPIO.PUD_UP) # Set up GPIO as an input, pullup enabled # Test Output print("") print("Testing GPIO Input/Output:") while True: var_gpio_state_in = GPIO.input(var_gpio_in) var_gpio_state = GPIO.input(var_gpio_out) # Return State of GPIO if var_gpio_state == 0 and var_gpio_state_in == 1: GPIO.output(var_gpio_out,GPIO.HIGH) # Set GPIO to HIGH print("Input State: " + str(var_gpio_state_in)) # Print results print("Output State IF : " + str(var_gpio_state)) # Print results else: GPIO.output(var_gpio_out,GPIO.LOW) # Set GPIO to LOW print("Input State: " + str(var_gpio_state_in)) # Print results print("Output State ELSE: " + str(var_gpio_state)) # Print results sleep(0.5) exit() Beispiel [image: 1537522070243-input_ergebnis.jpg] Wenn der Taster im Bild betätigt wird, soll die LED blinken. Wir benutzen folgende Ein- Augänge des ROCKPro64. # Set Variables var_gpio_out = 156 var_gpio_in = 155 Das heißt: an Pin 1 (3,3V) kommt eine Strippe des Tasters an Pin 29 (Input) kommt eine Strippe des Tasters an Pin 31 (Output) kommt der Plus-Pol der LED an Pin 39 (GND) kommt der Minus-Pol der LED Somit wird auf den Eingang (Pin 29) bei Betätigung des Tasters 3,3 Volt angelegt. Damit wird dann der Eingang als High (1) erkannt. Die LED wird über den Ausgang (Pin 31) gesteuert. Starten kann man das Script mit python test.py https://www.youtube.com/watch?v=aPSC0Q0xInw
  • ROCKPro64 - eMMC-Modul / SD-Karte auswählen

    Hardware hardware rockpro64
    3
    2
    0 Stimmen
    3 Beiträge
    2k Aufrufe
    FrankMF
    Echtes Problem gefunden. Wenn die eMMC-Karte verbaut ist, ich mit der SD-Karte starte (Jumper gesetzt), kann ich keinen Kernel updaten. Es ist alles ganz normal installiert, er startet aber immer den letzten vorhandenen. Jumper entfernt, eMMC-Modul entfernt! Bootvorgang mit unveränderter SD-Karte, neuer Kernel wird geladen. OK, das verstehe ich im Moment überhaupt nicht !?!?!?
  • Lokale Einstellungen

    Verschoben ROCKPro64 rockpro64
    1
    0 Stimmen
    1 Beiträge
    583 Aufrufe
    Niemand hat geantwortet
  • bionic-containers-rockpro64

    Verschoben Linux rockpro64
    2
    0 Stimmen
    2 Beiträge
    970 Aufrufe
    FrankMF
    Ich habe das jetzt mal endlich getestet https://forum.frank-mankel.org/topic/296/rockpro64-docker-image