Skip to content

Bionic Minimal 0.7.8

ROCKPro64
  • Die aktuell letzte Version vor Kamil's wohl verdienten Urlaub 😉

    rock64@rockpro64:~$ uname -a
    Linux rockpro64 4.4.132-1072-rockchip-ayufan-ga1d27dba5a2e #1 SMP Sat Jul 21 20:18:03 UTC 2018 aarch64 aarch64 aarch64 GNU/Linux
    

    Kamil hat das Problem mit der PCIe NVMe-Karte gefixt, aber zu Lasten das jetzt wohl kein WLan-Modul möglich ist.

    (23:02:15) ayufan1: OK
    (23:02:28) ayufan1: it seems that we either have sdio0 (wifi module) or pcie
    (23:02:44) ayufan1: enabling sdio0 prevents the pcie from being powered
    (23:02:59) ayufan1: so, either, either
    (23:03:04) ayufan1: annoying 🙂
    (23:03:56) fysa: that is odd
    (23:04:08) fysa: same bus but switched?
    (23:04:38) ayufan1: not sure, like removing the resistor on 2.0 board is not enough
    (23:04:42) ayufan1: it is still being pulled
    (23:10:27) ayufan1: another possibility is a mess with clocks
    (23:10:47) ayufan1: anyway, disabling sdio0 makes it work stable 🙂

    Eine etwas größere Baustelle!? Ich bin kein Experte, warten wir es ab. Ich persönlich habe zwar ein WLan-Modul bestellt - zum Testen - benötige WLan aber nicht für meine Platinen. Bin kein Freund von WLan.

    Das Rebooten des ROCKPro64 funktioniert jetzt endlich einwandfrei! Yeah! Somit kann man langsam mal an das Bauen eines Systemes denken...

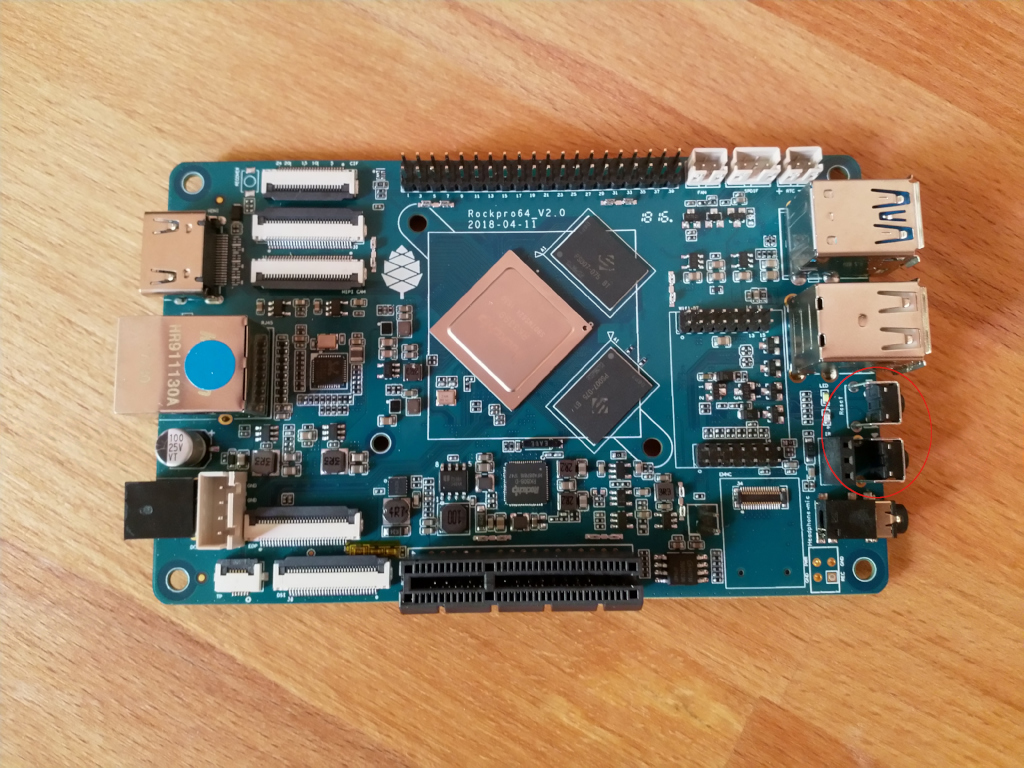
    Wir haben zwei Button auf dem Board, einmal Reset, einmal Power.
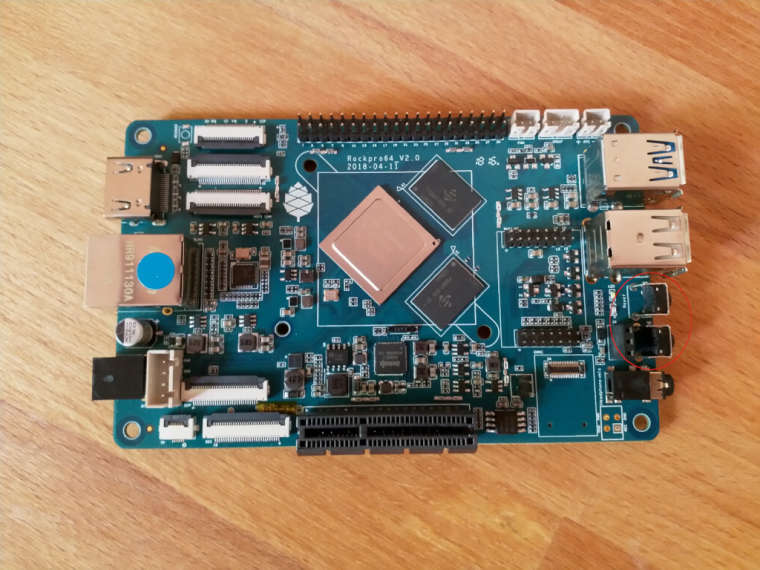
    0_1532242147306_Button.jpg

    Der obere ist der Reset Button, der da drunter der Power Button. Der Reset Button ist klar, der macht einen Reset und der ROCKPro64 startet neu. Was macht der Power Button? Denkt an Euer Smartphone, wenn man dort den Bildschirm ausmacht "schläft" das Ding ein. Suspend Mode. Genau das macht dieser Button. Bei einem Druck auf den Button geht der ROCKPro64 in den Suspend Modus.

    In diesem Modus benötigt er ca. 1,4 Watt, also ca. 1/4 vom normalen Verbrauch.

    Diesen Suspend Mode gibt es übrigens im Mainline nicht, weil dort wohl kein Suspend Modul vorhanden ist.
    https://github.com/ayufan-rock64/linux-build/issues/245

    Zum Aufwachen muss man etwas länger auf den Button drücken. Dann erwacht das System wieder.

    Eine vorhandene USB3-SSD wird auch nach dem Start automatisch erkannt, ich hatte da vorher Probleme mit. Das kann aber auch an den grottenschlechten Adaptern liegen. Ich habe hier drei Stück, die wohl alle nicht der Hit sind.

    Bei meiner nächsten Lieferung, soll am Mittwoch 25. Juli hier sein, kommt ein USB3 Adapter mit. Der soll ordentlich funktionieren, ich bin sehr gespannt.
    https://www.pine64.org/?product=usb-3-0-to-sata-iii-hard-drive-adapter-cable-converter-with-uasp

    Wer bis jetzt gezögert hat sich einen zu bestellen, das könnt ihr ohne großes Risiko machen. Die Version arbeitet, und zwar sehr stabil. Natürlich gibt es an dem Image noch jede Menge zu optimieren, aber erst mal haben wir was zum Spielen 🙂

  • Testin Testing

  • ROCKPro64 - Samsung Portable SSD T5 500GB

    Hardware
    1
    0 Stimmen
    1 Beiträge
    286 Aufrufe
    Niemand hat geantwortet
  • ROCKPro64 - PCIe SATA-Karte mit JMicron JMS585- Chip

    Angeheftet Hardware
    13
    1 Stimmen
    13 Beiträge
    2k Aufrufe
    FrankMF

    Ich möchte das dann hier zum Abschluss bringen, das NAS ist heute zusammengebaut worden. Hier zwei Fotos.

    IMG_20200425_102156_ergebnis.jpg

    IMG_20200425_102206_ergebnis.jpg

  • ROCKPro64 - USB3

    ROCKPro64
    1
    0 Stimmen
    1 Beiträge
    281 Aufrufe
    Niemand hat geantwortet
  • ROCKPro64 - USB3 bootet von SSD!

    ROCKPro64
    4
    0 Stimmen
    4 Beiträge
    846 Aufrufe
    FrankMF

    Da oben steht viel Bullshit 🙂 Ich habe mich mal mit dem mechanischen Aufbau einer USB3 Buchse beschäftigt, bzw. dazu recherchiert. Auf dieser Seite ist ein klasse Bild, was das sehr gut verdeutlicht.

    https://kompendium.infotip.de/usb-3-0.html

    Abbildung 28. Dort sieht man das die USB3 Kontakte RX/TX und GND ganz hinten sind. Wenn ich den Stecker jetzt komplett einstecke, wird wohl versucht eine USB3 Verbindung aufzubauen, die ja im Moment aus irgendeinem Grund scheitert. Wenn ich den Stecker nun ein Stück raus ziehe, trenne ich die USB3-Verbindung und es kommt eine USB2-Verbindung zustande.

    So mit ist mir jetzt einiges klarer, aber das Problem ist ungelöst 😞

  • Mainline Kernel 4.18.0-rc3

    Linux
    1
    0 Stimmen
    1 Beiträge
    962 Aufrufe
    Niemand hat geantwortet
  • Lokale Einstellungen

    Verschoben ROCKPro64
    1
    0 Stimmen
    1 Beiträge
    564 Aufrufe
    Niemand hat geantwortet
  • stretch-minimal-rockpro64

    Verschoben Linux
    3
    0 Stimmen
    3 Beiträge
    1k Aufrufe
    FrankMF

    Mal ein Test was der Speicher so kann.

    rock64@rockpro64:~/tinymembench$ ./tinymembench tinymembench v0.4.9 (simple benchmark for memory throughput and latency) ========================================================================== == Memory bandwidth tests == == == == Note 1: 1MB = 1000000 bytes == == Note 2: Results for 'copy' tests show how many bytes can be == == copied per second (adding together read and writen == == bytes would have provided twice higher numbers) == == Note 3: 2-pass copy means that we are using a small temporary buffer == == to first fetch data into it, and only then write it to the == == destination (source -> L1 cache, L1 cache -> destination) == == Note 4: If sample standard deviation exceeds 0.1%, it is shown in == == brackets == ========================================================================== C copy backwards : 2812.7 MB/s C copy backwards (32 byte blocks) : 2811.9 MB/s C copy backwards (64 byte blocks) : 2632.8 MB/s C copy : 2667.2 MB/s C copy prefetched (32 bytes step) : 2633.5 MB/s C copy prefetched (64 bytes step) : 2640.8 MB/s C 2-pass copy : 2509.8 MB/s C 2-pass copy prefetched (32 bytes step) : 2431.6 MB/s C 2-pass copy prefetched (64 bytes step) : 2424.1 MB/s C fill : 4887.7 MB/s (0.5%) C fill (shuffle within 16 byte blocks) : 4883.0 MB/s C fill (shuffle within 32 byte blocks) : 4889.3 MB/s C fill (shuffle within 64 byte blocks) : 4889.2 MB/s --- standard memcpy : 2807.3 MB/s standard memset : 4890.4 MB/s (0.3%) --- NEON LDP/STP copy : 2803.7 MB/s NEON LDP/STP copy pldl2strm (32 bytes step) : 2802.1 MB/s NEON LDP/STP copy pldl2strm (64 bytes step) : 2800.7 MB/s NEON LDP/STP copy pldl1keep (32 bytes step) : 2745.5 MB/s NEON LDP/STP copy pldl1keep (64 bytes step) : 2745.8 MB/s NEON LD1/ST1 copy : 2801.9 MB/s NEON STP fill : 4888.9 MB/s (0.3%) NEON STNP fill : 4850.1 MB/s ARM LDP/STP copy : 2803.8 MB/s ARM STP fill : 4893.0 MB/s (0.5%) ARM STNP fill : 4851.7 MB/s ========================================================================== == Framebuffer read tests. == == == == Many ARM devices use a part of the system memory as the framebuffer, == == typically mapped as uncached but with write-combining enabled. == == Writes to such framebuffers are quite fast, but reads are much == == slower and very sensitive to the alignment and the selection of == == CPU instructions which are used for accessing memory. == == == == Many x86 systems allocate the framebuffer in the GPU memory, == == accessible for the CPU via a relatively slow PCI-E bus. Moreover, == == PCI-E is asymmetric and handles reads a lot worse than writes. == == == == If uncached framebuffer reads are reasonably fast (at least 100 MB/s == == or preferably >300 MB/s), then using the shadow framebuffer layer == == is not necessary in Xorg DDX drivers, resulting in a nice overall == == performance improvement. For example, the xf86-video-fbturbo DDX == == uses this trick. == ========================================================================== NEON LDP/STP copy (from framebuffer) : 602.5 MB/s NEON LDP/STP 2-pass copy (from framebuffer) : 551.6 MB/s NEON LD1/ST1 copy (from framebuffer) : 667.1 MB/s NEON LD1/ST1 2-pass copy (from framebuffer) : 605.6 MB/s ARM LDP/STP copy (from framebuffer) : 445.3 MB/s ARM LDP/STP 2-pass copy (from framebuffer) : 428.8 MB/s ========================================================================== == Memory latency test == == == == Average time is measured for random memory accesses in the buffers == == of different sizes. The larger is the buffer, the more significant == == are relative contributions of TLB, L1/L2 cache misses and SDRAM == == accesses. For extremely large buffer sizes we are expecting to see == == page table walk with several requests to SDRAM for almost every == == memory access (though 64MiB is not nearly large enough to experience == == this effect to its fullest). == == == == Note 1: All the numbers are representing extra time, which needs to == == be added to L1 cache latency. The cycle timings for L1 cache == == latency can be usually found in the processor documentation. == == Note 2: Dual random read means that we are simultaneously performing == == two independent memory accesses at a time. In the case if == == the memory subsystem can't handle multiple outstanding == == requests, dual random read has the same timings as two == == single reads performed one after another. == ========================================================================== block size : single random read / dual random read 1024 : 0.0 ns / 0.0 ns 2048 : 0.0 ns / 0.0 ns 4096 : 0.0 ns / 0.0 ns 8192 : 0.0 ns / 0.0 ns 16384 : 0.0 ns / 0.0 ns 32768 : 0.0 ns / 0.0 ns 65536 : 4.5 ns / 7.2 ns 131072 : 6.8 ns / 9.7 ns 262144 : 9.8 ns / 12.8 ns 524288 : 11.4 ns / 14.7 ns 1048576 : 16.0 ns / 22.6 ns 2097152 : 114.0 ns / 175.3 ns 4194304 : 161.7 ns / 219.9 ns 8388608 : 190.7 ns / 241.5 ns 16777216 : 205.3 ns / 250.5 ns 33554432 : 212.9 ns / 255.5 ns 67108864 : 222.3 ns / 271.1 ns
  • 2GB Version - Out of stock

    Verschoben Archiv
    1
    0 Stimmen
    1 Beiträge
    719 Aufrufe
    Niemand hat geantwortet