Skip to content

Debian Bookworm 12.11 released

Linux
1 1 220
  • Debian hat 12.11 für Bookworm veröffentlicht

    The Debian project is pleased to announce the eleventh update of its stable distribution Debian 12 (codename "bookworm"). This point release mainly adds corrections for security issues, along with a few adjustments for serious problems. Security advisories have already been published separately and are referenced where available.

    33 packages can be upgraded. Run 'apt list --upgradable' to see them.
    N: Repository 'http://deb.debian.org/debian bookworm InRelease' changed its 'Version' value from '12.10' to '12.11'
    
  • Der Longread zum Sonntag.

    Uncategorized microsoft mcsd developer windows linux
    2
    1
    0 Stimmen
    2 Beiträge
    4 Aufrufe
    frankm@nrw.socialF
    @TheTomas Informativer Blogbeitrag. Danke dafür.
  • Every Ubuntu Linux default wallpaper

    Linux linux
    6
    1
    0 Stimmen
    6 Beiträge
    128 Aufrufe
    julian@community.nodebb.orgJ
    > Ubuntu 8.10 Intrepid Ibex also had its namesake animal on the default wallpaper, but more subtle than the last release. That was an Ibex? All this time I thought it was a coffee stain.
  • Nextcloud - Upgrade Hub 9 (30.0.0)

    Nextcloud nextcloud linux
    3
    2
    0 Stimmen
    3 Beiträge
    2k Aufrufe
    FrankMF
    Ich habe dann mal weitergesucht, dank ein paar Tipps aus dem Fediverse, sehe ich jetzt was heller https://chaos.social/@towo/113152384137718991 Nachdem ich dann ein paar Apps gefunden und installiert hatte AppAPI Flow tauchte dann im Benutzermenü, rechts oben, folgendes auf. [image: 1726992766346-bildschirmfoto_20240922_101125.png] Das Interessante ist der Menüpunkt Externe Apps. Nun sollte ich diese Funktion verstanden haben. Das Nextcloud Team integriert also diese Windmill App via Docker Container und greift dann darauf zu. In der Videopräsentation war doch von in Nextcloud integriert die Werbeansprache!? Ein Docker Container ist für mich keine Integration. Ich habe einige rudimentäre Kenntnisse von Docker, ausschließlich lokal. Aber, ich komme nicht auf die Idee das auf einem produktiven Server zu installieren. Somit kann ich das Testen hier beenden und die Apps alle wieder deinstallieren. Jetzt habe ich noch im Kopf, ob man das mal mit einem Nextcloud-AIO testen soll? Natürlich auf einem Testsystem. https://github.com/nextcloud/all-in-one?tab=readme-ov-file#how-to-use-this
  • ZFS - Wichtige Befehle

    Linux zfs linux
    3
    0 Stimmen
    3 Beiträge
    1k Aufrufe
    FrankMF
    Heute mal drüber gestolpert, das es auch so was geben kann. root@pve2:~# zpool status pool: pool_NAS state: ONLINE status: Some supported and requested features are not enabled on the pool. The pool can still be used, but some features are unavailable. action: Enable all features using 'zpool upgrade'. Once this is done, the pool may no longer be accessible by software that does not support the features. See zpool-features(7) for details. scan: scrub repaired 0B in 00:20:50 with 0 errors on Sun Apr 13 00:44:51 2025 config: NAME STATE READ WRITE CKSUM pool_NAS ONLINE 0 0 0 mirror-0 ONLINE 0 0 0 ata-WDC_WDS100T1R0A-68A4W0_230520800733 ONLINE 0 0 0 ata-WDC_WDS100T1R0A-68A4W0_230520801376 ONLINE 0 0 0 errors: No known data errors Was machen? Als erstes mal ein Backup angestoßen. Danach root@pve2:~# zpool get all pool_NAS | grep feature pool_NAS feature@async_destroy enabled local pool_NAS feature@empty_bpobj active local pool_NAS feature@lz4_compress active local pool_NAS feature@multi_vdev_crash_dump enabled local pool_NAS feature@spacemap_histogram active local pool_NAS feature@enabled_txg active local pool_NAS feature@hole_birth active local pool_NAS feature@extensible_dataset active local pool_NAS feature@embedded_data active local pool_NAS feature@bookmarks enabled local pool_NAS feature@filesystem_limits enabled local pool_NAS feature@large_blocks enabled local pool_NAS feature@large_dnode enabled local pool_NAS feature@sha512 enabled local pool_NAS feature@skein enabled local pool_NAS feature@edonr enabled local pool_NAS feature@userobj_accounting active local pool_NAS feature@encryption enabled local pool_NAS feature@project_quota active local pool_NAS feature@device_removal enabled local pool_NAS feature@obsolete_counts enabled local pool_NAS feature@zpool_checkpoint enabled local pool_NAS feature@spacemap_v2 active local pool_NAS feature@allocation_classes enabled local pool_NAS feature@resilver_defer enabled local pool_NAS feature@bookmark_v2 enabled local pool_NAS feature@redaction_bookmarks enabled local pool_NAS feature@redacted_datasets enabled local pool_NAS feature@bookmark_written enabled local pool_NAS feature@log_spacemap active local pool_NAS feature@livelist enabled local pool_NAS feature@device_rebuild enabled local pool_NAS feature@zstd_compress enabled local pool_NAS feature@draid enabled local pool_NAS feature@zilsaxattr disabled local pool_NAS feature@head_errlog disabled local pool_NAS feature@blake3 disabled local pool_NAS feature@block_cloning disabled local pool_NAS feature@vdev_zaps_v2 disabled local Das kommt von neuen Funktionen, die zu ZFS hinzugefügt wurden und bei Erstellung des Pools nicht vorhanden waren. Dann upgraden wir mal root@pve2:~# zpool upgrade pool_NAS This system supports ZFS pool feature flags. Enabled the following features on 'pool_NAS': zilsaxattr head_errlog blake3 block_cloning vdev_zaps_v2 Kontrolle root@pve2:~# zpool status pool: pool_NAS state: ONLINE scan: scrub repaired 0B in 00:20:50 with 0 errors on Sun Apr 13 00:44:51 2025 config: NAME STATE READ WRITE CKSUM pool_NAS ONLINE 0 0 0 mirror-0 ONLINE 0 0 0 ata-WDC_WDS100T1R0A-68A4W0_230520800733 ONLINE 0 0 0 ata-WDC_WDS100T1R0A-68A4W0_230520801376 ONLINE 0 0 0 errors: No known data errors Features kontrollieren root@pve2:~# zpool get all pool_NAS | grep feature pool_NAS feature@async_destroy enabled local pool_NAS feature@empty_bpobj active local pool_NAS feature@lz4_compress active local pool_NAS feature@multi_vdev_crash_dump enabled local pool_NAS feature@spacemap_histogram active local pool_NAS feature@enabled_txg active local pool_NAS feature@hole_birth active local pool_NAS feature@extensible_dataset active local pool_NAS feature@embedded_data active local pool_NAS feature@bookmarks enabled local pool_NAS feature@filesystem_limits enabled local pool_NAS feature@large_blocks enabled local pool_NAS feature@large_dnode enabled local pool_NAS feature@sha512 enabled local pool_NAS feature@skein enabled local pool_NAS feature@edonr enabled local pool_NAS feature@userobj_accounting active local pool_NAS feature@encryption enabled local pool_NAS feature@project_quota active local pool_NAS feature@device_removal enabled local pool_NAS feature@obsolete_counts enabled local pool_NAS feature@zpool_checkpoint enabled local pool_NAS feature@spacemap_v2 active local pool_NAS feature@allocation_classes enabled local pool_NAS feature@resilver_defer enabled local pool_NAS feature@bookmark_v2 enabled local pool_NAS feature@redaction_bookmarks enabled local pool_NAS feature@redacted_datasets enabled local pool_NAS feature@bookmark_written enabled local pool_NAS feature@log_spacemap active local pool_NAS feature@livelist enabled local pool_NAS feature@device_rebuild enabled local pool_NAS feature@zstd_compress enabled local pool_NAS feature@draid enabled local pool_NAS feature@zilsaxattr enabled local pool_NAS feature@head_errlog active local pool_NAS feature@blake3 enabled local pool_NAS feature@block_cloning enabled local pool_NAS feature@vdev_zaps_v2 enabled local So, alle neuen Features aktiviert. Jetzt kann der Pool weiterhin seine Arbeit machen.
  • OpenWrt - Sysupgrade

    OpenWRT & Ubiquiti ER-X openwrt linux er-x
    1
    0 Stimmen
    1 Beiträge
    299 Aufrufe
    Niemand hat geantwortet
  • Kopia - HTTP/S Server

    Verschoben Kopia kopia linux
    3
    2
    0 Stimmen
    3 Beiträge
    2k Aufrufe
    FrankMF
    Ich hatte ein paar Probleme, die ich mir teilweise nicht erklären kann Ich möchte den Kopia Server gerne über systemd steuern. SystemD [Unit] Description=Kopia Server After=syslog.target After=network.target [Service] Type=simple User=kopia Group=kopia ExecStart=/usr/bin/kopia server --tls-cert-file /home/kopia-server/fullchain.pem --tls-key-file /home/kopia-server/privkey.pem --htpasswd-file /home/kopia-server/.htpasswd --address <IPv4>:51515 Restart=always RestartSec=5 [Install] WantedBy=multi-user.target Danach systemctl daemon-reload systemctl start kopia-server Mit systemctl status kopia-server kann man sich den Status anzeigen lassen. Client Rechner Auf dem Client, der das Backup zum Server schicken soll, machen wir dann folgendes. USER@HOSTNAME:~$ kopia repo connect server --url=https://<DOMAIN>:51515 --override-username=USER --override-hostname=HOSTNAME Enter password to open repository: Connected to repository API Server. NOTICE: Kopia will check for updates on GitHub every 7 days, starting 24 hours after first use. To disable this behavior, set environment variable KOPIA_CHECK_FOR_UPDATES=false Alternatively you can remove the file "/home/frank/.config/kopia/repository.config.update-info.json". 
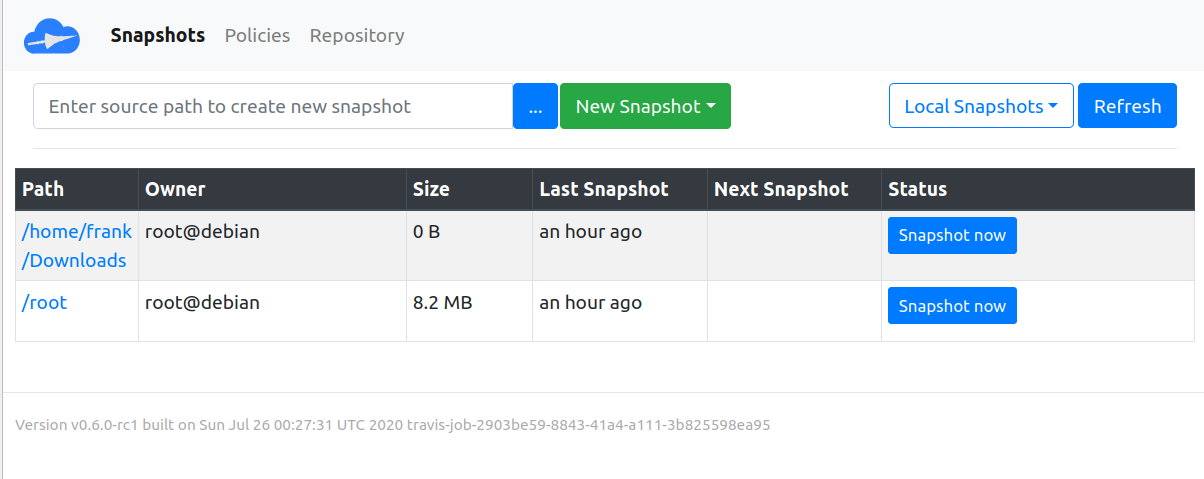
Danach steht die Verbindung und wir können Backups hochschieben. kopia snapshot create $HOME Damit wird das Homeverzeichnis gesichert. Das initiale Backup, hat 30 Minuten gebraucht. created snapshot with root kb9e50ff5xxxxxxxxxx265d40a5d0861 and ID cda5c0ffxxxxxxxxxxxxxxa4cb4a367b in 30m28s Ein späteres Backup, sieht so aus. USER@HOSTNAME:~$ kopia snapshot create $HOME Snapshotting USER@HOSTNAME:/home/frank ... * 0 hashing, 51 hashed (324.8 MB), 8524 cached (6.6 GB), 0 uploaded (0 B), 0 errors 100.0% Created snapshot with root kc20a4xxxxxxxxxxxx745c6c7b37c and ID d7a96eaxxxxxxxxxxx0961018eacffa in 3m12s Nach 3 Minuten durch. Zu diesem Zeitpunkt hat sich aber auch nicht wirklich was geändert! Fazit Das Tool macht immer noch einen sehr guten Eindruck. Die Geschwindigkeit ist sehr gut. Die Anleitung ist leider unzureichend. Da gibt es so viele Möglichkeiten, da braucht es sehr lange, bis man da mal durchsteigt. Zum Glück, ist das was man normalerweise braucht, recht überschaubar. Bis zum produktiven Einsatz braucht das aber bei mir noch eine Menge mehr Tests. Was ich noch testen möchte Verzeichnis mounten Backup testweise wieder herstellen (zumindestens teilweise) Der Test läuft mit Standard Einstellungen, also z.B. ohne Kompression. Das sollte man dann auch mal testen.. Bitte achtet auf gleiche Versionen auf dem Clienten, wie auf dem Server. Ich meine da ein paar Probleme festgestellt zu haben...
  • NGINX - Installation

    NGINX nginx linux
    1
    2
    0 Stimmen
    1 Beiträge
    367 Aufrufe
    Niemand hat geantwortet
  • checkmk - Agent installieren

    Verschoben checkmk checkmk linux
    1
    1
    0 Stimmen
    1 Beiträge
    3k Aufrufe
    Niemand hat geantwortet