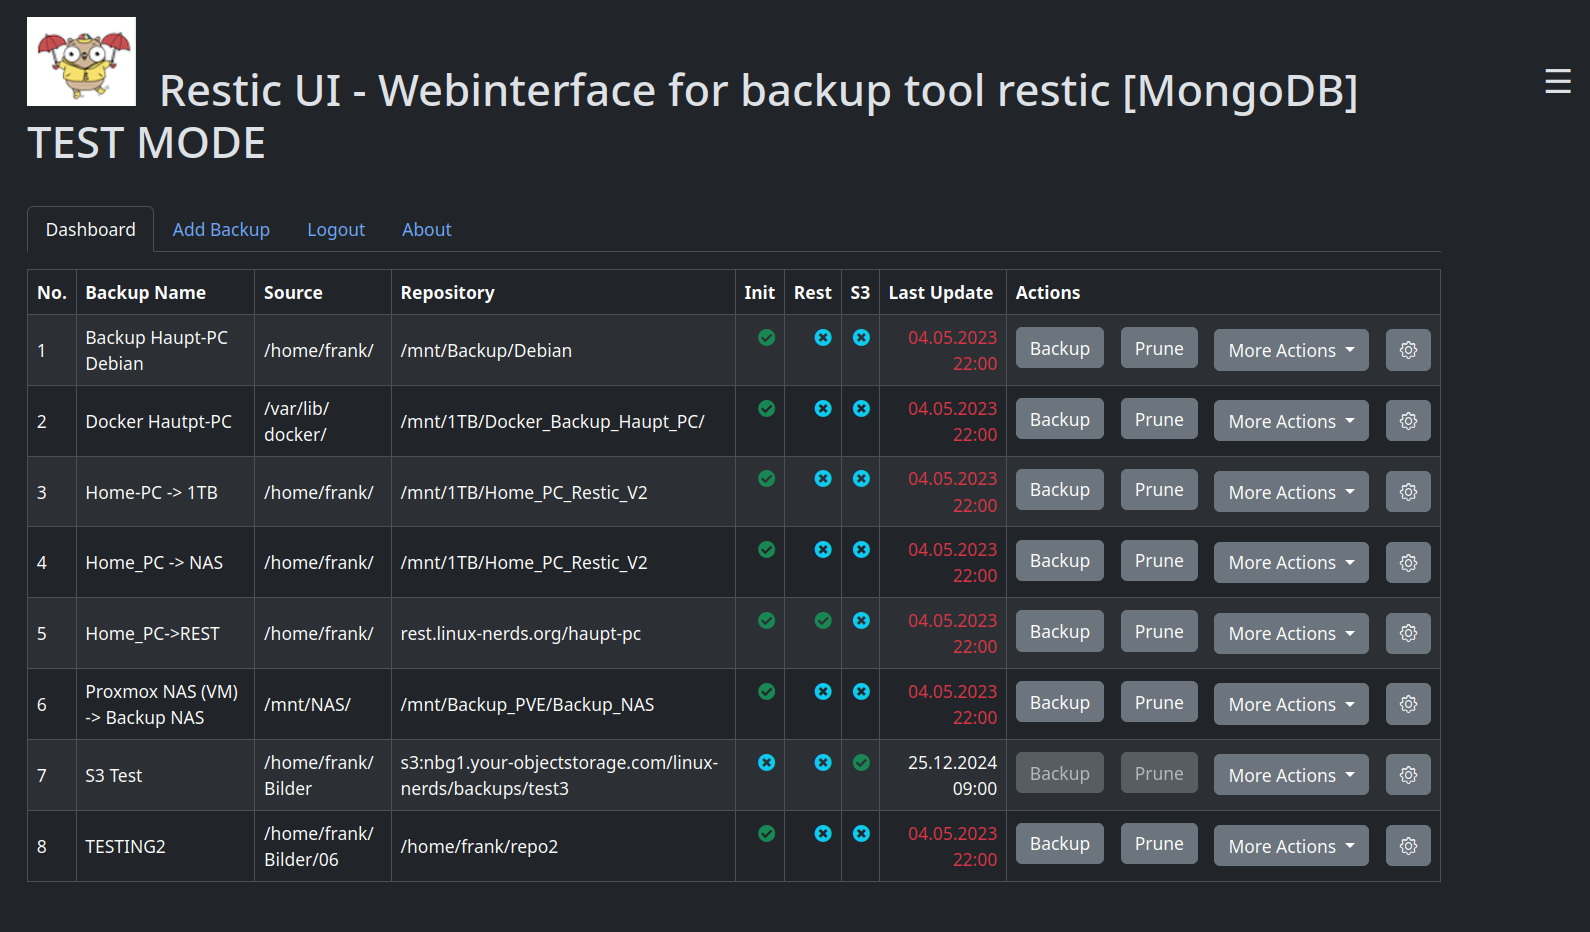
Skip to content

Restic v0.13.1 released

Restic
1 1 152
  • Rest-Server v0.13.0 released

    Restic rest-server restic linux
    2
    0 Stimmen
    2 Beiträge
    396 Aufrufe
    FrankMF
    Download Rest-Server und installieren Im Github Repository den aktuellen Release suchen. Hier am Beispiel der aktuellen Version 0.13.0 (27.07.2024) Datei herunterladen wget https://github.com/restic/rest-server/releases/download/v0.13.0/rest-server_0.13.0_linux_amd64.tar.gz Die Datei entpacken tar -xf rest-server_0.13.0_linux_amd64.tar.gz Ins Verzeichnis wechseln cd rest-server_0.13.0_linux_amd64 Wenn der Rest-Server läuft, dann muss man diesen erst mal stoppen. systemctl stop rest-server Danach kopiert man das File nach bin. Wer mag sichert vorher das alte File. cp rest-server /usr/local/bin Danach kann man den Rest-Server wieder starten. systemctl start rest-server Versionskontrolle root@rest-server:~# rest-server -v rest-server version rest-server 0.13.0 compiled with go1.22.5 on linux/amd64 Die Hilfe vom Rest-Server root@rest-server:~# rest-server -h Run a REST server for use with restic Usage: rest-server [flags] Flags: --append-only enable append only mode --cpu-profile string write CPU profile to file --debug output debug messages -h, --help help for rest-server --htpasswd-file string location of .htpasswd file (default: "<data directory>/.htpasswd)" --listen string listen address (default ":8000") --log filename write HTTP requests in the combined log format to the specified filename (use "-" for logging to stdout) --max-size int the maximum size of the repository in bytes --no-auth disable .htpasswd authentication --no-verify-upload do not verify the integrity of uploaded data. DO NOT enable unless the rest-server runs on a very low-power device --path string data directory (default "/tmp/restic") --private-repos users can only access their private repo --prometheus enable Prometheus metrics --prometheus-no-auth disable auth for Prometheus /metrics endpoint --tls turn on TLS support --tls-cert string TLS certificate path --tls-key string TLS key path -v, --version version for rest-server Systemd Wer noch ein passendes systemd File benötigt. [Unit] Description=Rest Server After=syslog.target After=network.target [Service] Type=simple User=rest-server Group=rest-server ExecStart=/usr/local/bin/rest-server --private-repos --tls --tls-cert /mnt/rest-server/<DOMAIN>/fullchain.pem --tls-key /mnt/rest-server/<DOMAIN>/key.pem --path /mnt/rest-server Restart=always RestartSec=5 # Optional security enhancements NoNewPrivileges=yes PrivateTmp=yes ProtectSystem=strict ProtectHome=yes ReadWritePaths=/mnt/rest-server [Install] WantedBy=multi-user.target
  • Restic v0.16.1 released

    Restic restic linux
    1
    0 Stimmen
    1 Beiträge
    171 Aufrufe
    Niemand hat geantwortet
  • Restic v0.16.0 released

    Restic restic linux
    1
    0 Stimmen
    1 Beiträge
    150 Aufrufe
    Niemand hat geantwortet
  • Rest-Server

    Verschoben Restic rest-server linux restic
    8
    0 Stimmen
    8 Beiträge
    767 Aufrufe
    FrankMF
    Dann mal eben ausprobiert. Auf meinem Server war die Version 0.9.7 selber, mit go, gebaut. Dann mache ich das auch mit der v0.10.0 so. Aber bevor ich anfange, wird die v0.9.7 gesichert. mv /usr/local/bin/rest-server /usr/local/bin/rest-server_0_9_7 So erspare ich mir im Problemfall das selber bauen. Ok, dann die neue Version bauen. git clone https://github.com/restic/rest-server.git cd rest-server go run build.go Danach befindet sich im Verzeichnis die Binärdatei rest-server Die kopieren wir jetzt cp rest-server /usr/local/bin Danach kurzer Test # rest-server --version rest-server 0.10.0 (v0.10.0-6-g037fe06) compiled with go1.11.6 on linux/amd64 Gut Version passt Dann ein Backup gestartet. Das sichert einen Teil meines Home-Verzeichnis Files: 153 new, 100 changed, 177857 unmodified Dirs: 0 new, 1 changed, 0 unmodified Added to the repo: 81.881 MiB processed 178110 files, 80.571 GiB in 0:28 snapshot 607e0027 saved Applying Policy: keep the last 3 snapshots, 3 monthly snapshots keep 5 snapshots: ID Time Host Tags Reasons Paths --------------------------------------------------------------------------------------- fa97890e 2020-07-25 21:02:05 frank-XXX monthly snapshot /home/frank 5b073bbb 2020-08-30 10:17:27 frank-XXX monthly snapshot /home/frank f7cf37ef 2020-09-06 15:13:03 frank-XXX last snapshot /home/frank 0157462c 2020-09-13 13:32:12 frank-XXX last snapshot /home/frank 607e0027 2020-09-14 08:09:34 frank-XXX last snapshot /home/frank monthly snapshot --------------------------------------------------------------------------------------- 5 snapshots remove 1 snapshots: ID Time Host Tags Paths --------------------------------------------------------------------- 3010b7cc 2020-09-06 11:39:27 frank-XXX /home/frank --------------------------------------------------------------------- 1 snapshots 1 snapshots have been removed, running prune counting files in repo building new index for repo [1:34] 100.00% 17351 / 17351 packs So weit funktioniert das genau wie vorher. Im Changelog stand ja was von Subfoldern. Das betrifft mich nicht, weil ich für jeden User genau ein Verzeichnis habe. So mit alles Gut Dann warte ich mal morgen ab, ob die täglichen Backups der Server rund laufen.
  • Restic - forget --keep-last 3 --prune

    Restic linux restic
    2
    0 Stimmen
    2 Beiträge
    676 Aufrufe
    FrankMF
    Ich habe mich damit noch ein wenig beschäftigt, die letzten drei zu behalten, ist nicht so optimal. Da es viele Optionen bei dem Befehl gibt, hier ein Ausschnitt Flags: -l, --keep-last n keep the last n snapshots -H, --keep-hourly n keep the last n hourly snapshots -d, --keep-daily n keep the last n daily snapshots -w, --keep-weekly n keep the last n weekly snapshots -m, --keep-monthly n keep the last n monthly snapshots -y, --keep-yearly n keep the last n yearly snapshots habe ich das ein wenig so angepasst, das ich denke es passt für mich. restic --password-file /root/passwd -r /media/NAS_neu/Restic/Home/ forget --keep-last 3 --keep-monthly 3 --prune Damit behalte ich auch die jeweils eines pro Monat. Und die letzten drei. Das sieht dann so aus. root@debian:~# ./backup2.sh repository 2f3f6147 opened successfully, password is correct Files: 38 new, 100 changed, 13268 unmodified Dirs: 0 new, 1 changed, 0 unmodified Added to the repo: 10.166 GiB processed 13406 files, 50.324 GiB in 3:24 snapshot 849f614c saved repository 2f3f6147 opened successfully, password is correct Applying Policy: keep the last 3 snapshots, 3 monthly snapshots snapshots for (host [debian], paths [/home/frank]): keep 5 snapshots: ID Time Host Tags Reasons Paths ------------------------------------------------------------------------------------ a7251cfd 2019-11-28 17:00:01 debian monthly snapshot /home/frank 283d4027 2019-12-31 17:00:01 debian monthly snapshot /home/frank ae2b96ec 2020-01-01 21:47:46 debian last snapshot /home/frank 079e00a6 2020-01-02 17:00:01 debian last snapshot /home/frank 849f614c 2020-01-03 21:08:45 debian last snapshot /home/frank monthly snapshot ------------------------------------------------------------------------------------ 5 snapshots remove 26 snapshots: ID Time Host Tags Paths ------------------------------------------------------------------ 896f16c2 2019-11-07 22:23:40 debian /home/frank b21bcf6d 2019-11-11 17:00:01 debian /home/frank f89248fb 2019-11-12 17:00:01 debian /home/frank 123ab546 2019-11-13 17:00:01 debian /home/frank b82d87d0 2019-11-18 17:00:01 debian /home/frank 040b0ab7 2019-11-19 17:00:01 debian /home/frank 7221d8ef 2019-11-20 17:00:01 debian /home/frank 84132a25 2019-11-21 17:00:01 debian /home/frank b558a52c 2019-11-25 17:00:01 debian /home/frank e5cc0c3e 2019-12-02 17:00:01 debian /home/frank 22423fa5 2019-12-03 17:00:01 debian /home/frank 39df1ab9 2019-12-04 17:00:01 debian /home/frank 98843457 2019-12-05 17:00:01 debian /home/frank b0cdd4b6 2019-12-09 17:00:01 debian /home/frank 828414f9 2019-12-10 17:00:01 debian /home/frank e34a27c3 2019-12-11 17:00:01 debian /home/frank 6e488c3b 2019-12-12 17:00:01 debian /home/frank 17898403 2019-12-16 17:00:01 debian /home/frank 1973305a 2019-12-17 17:00:01 debian /home/frank 9553bedd 2019-12-18 17:00:01 debian /home/frank fedf749d 2019-12-19 17:00:01 debian /home/frank 8e7cb876 2019-12-23 17:00:01 debian /home/frank 0bd0d102 2019-12-25 17:00:01 debian /home/frank 13d348b0 2019-12-26 17:00:01 debian /home/frank c7d960aa 2019-12-30 17:00:01 debian /home/frank f6ea9118 2020-01-01 17:00:01 debian /home/frank ------------------------------------------------------------------ 26 snapshots 26 snapshots have been removed, running prune counting files in repo building new index for repo [0:35] 100.00% 7806 / 7806 packs repository contains 7806 packs (46537 blobs) with 41.110 GiB processed 46537 blobs: 0 duplicate blobs, 0 B duplicate load all snapshots find data that is still in use for 5 snapshots [0:01] 100.00% 5 / 5 snapshots found 32654 of 46537 data blobs still in use, removing 13883 blobs will remove 0 invalid files will delete 715 packs and rewrite 752 packs, this frees 5.027 GiB [2:28] 100.00% 752 / 752 packs rewritten counting files in repo [0:01] 100.00% 6571 / 6571 packs finding old index files saved new indexes as [d137b425 f7caee99 a6e9711a] remove 35 old index files [1:13] 100.00% 1467 / 1467 packs deleted done using temporary cache in /tmp/restic-check-cache-916655151 repository 2f3f6147 opened successfully, password is correct created new cache in /tmp/restic-check-cache-916655151 create exclusive lock for repository load indexes check all packs check snapshots, trees and blobs read all data [7:47] 100.00% 6571 / 6571 items duration: 7:47 no errors were found root@debian:~# Am Ende seht ihr noch, wie Restic alle Files testet. Mein Script sieht jetzt so aus. #!/bin/bash # Script um mit Restic Daten automatisiert zu sichern! # Dient zum Sichern der Homepartition auf dem ROCKPro64 NAS! # Was soll gesichert werden? backup_pfad=/home/frank # Programm Start restic --password-file /root/passwd -r /media/NAS_neu/Restic/Home/ backup $backup_pfad --exclude-file=excludes.txt restic --password-file /root/passwd -r /media/NAS_neu/Restic/Home/ forget --keep-last 3 --keep-monthly 3 --prune # Testen restic --password-file /root/passwd -r /media/NAS_neu/Restic/Home/ check --read-data Das dann schön mit einem Cronjob laufen lassen und die Datensicherung ist erledigt
  • Restic - Beispielzeiten

    Restic linux restic
    1
    0 Stimmen
    1 Beiträge
    522 Aufrufe
    Niemand hat geantwortet
  • Restic - Einen ROCKPro64 als Datengrab benutzen

    Verschoben Restic linux restic
    2
    1
    0 Stimmen
    2 Beiträge
    915 Aufrufe
    FrankMF
    So, dann mal das Ganze testen wenn man seinen Haupt-PC neu installiert hat und ein paar Daten braucht. [image: 1534692579149-img_20180819_090116_ergebnis-resized.jpg] Also, mal Restic installiert. sudo apt-get install restic Nach erfolgter Installation ein Test frank@frank-MS-7A34:~/restic$ restic version restic 0.8.3 compiled with go1.10 on linux/amd64 Geht so weit. Snapshots auflisten. restic -r sftp:rock64@IP:/home/rock64/backup snapshots Sieht dann so aus. frank@frank-MS-7A34:~$ sudo restic -r sftp:rock64@192.168.3.207:/home/rock64/backup snapshots [sudo] Passwort für frank: rock64@192.168.3.207's password: enter password for repository: password is correct ID Date Host Tags Directory ---------------------------------------------------------------------- 7e2eddcb 2018-08-18 10:10:40 frank-MS-7A34 /home/frank/Bilder 073b7cb4 2018-08-18 14:21:17 frank-MS-7A34 /home/frank 6bc9b21b 2018-08-18 16:11:19 frank-MS-7A34 /home/frank ---------------------------------------------------------------------- 3 snapshots Snapshot wiederherstellen sudo restic -r sftp:rock64@IP:/home/rock64/backup restore latest --target /tmp/backup Hiermit stellen wir das Backup im temporären Ordner /tmp/backup wieder her. Hat ewig gedauert, aber ging !?!?!?
  • Restic - Ein Backupkonzept - Automatisieren!

    Verschoben Restic linux restic
    1
    1
    0 Stimmen
    1 Beiträge
    1k Aufrufe
    Niemand hat geantwortet