checkmk - Apache2 vs. NGINX
checkmk
2
Beiträge
1
Kommentatoren
859
Aufrufe
-
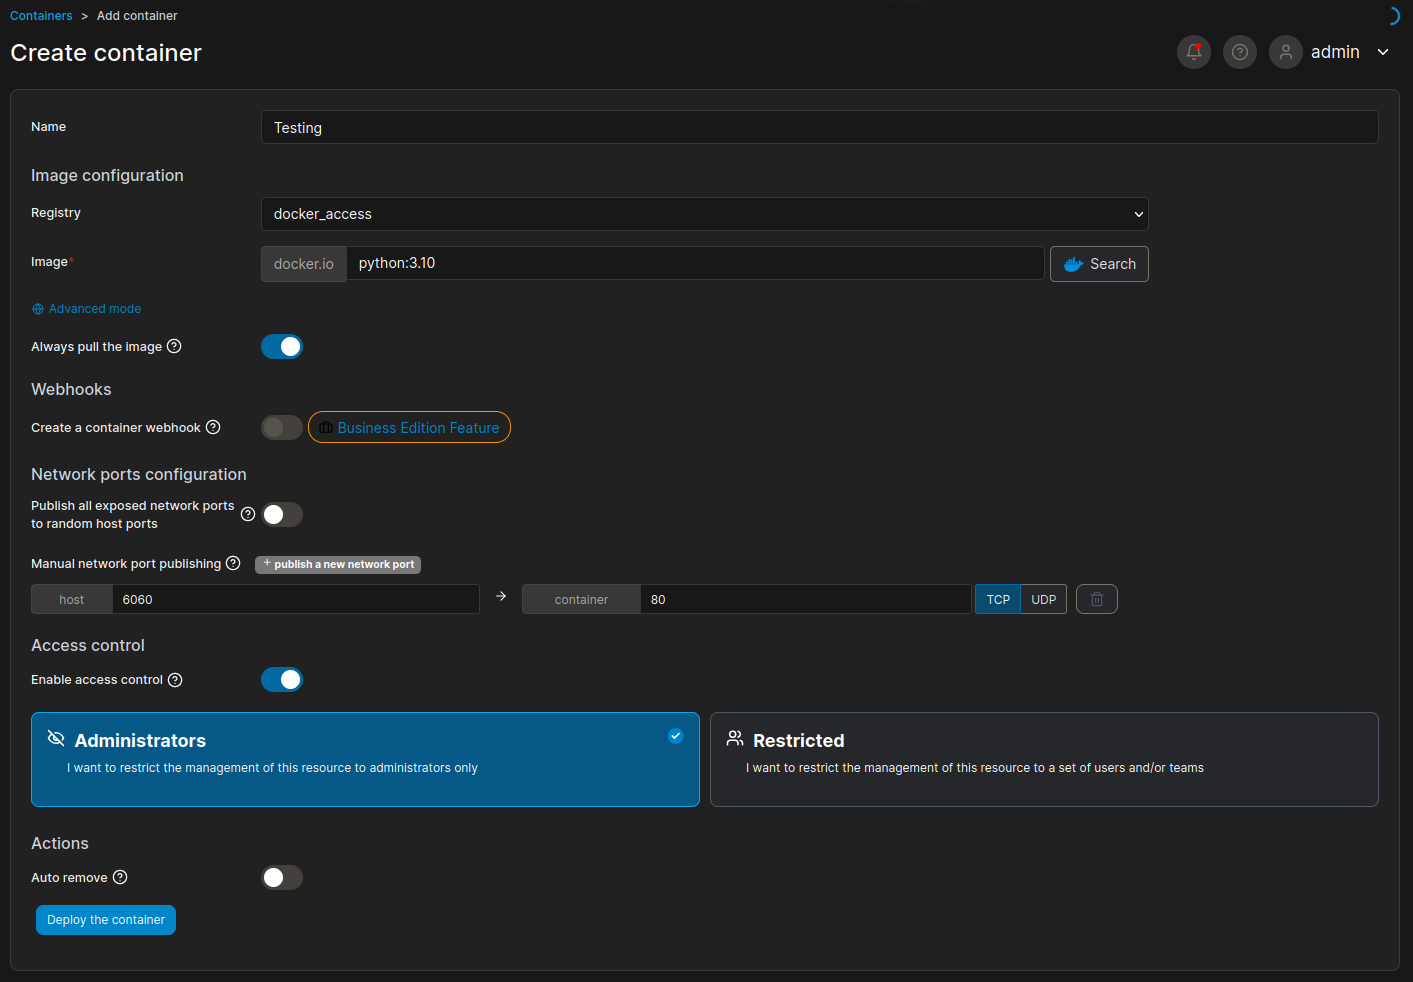
Ich wollte meine VMs im Proxmox mit meiner Dockerinstallation auf meinem Haupt-PC überwachen, bis ich feststellte, das diese Dockerinstallation kein IPv6 kann. Mein Netzwerk ist voll IPv6 fähig. Eine kurze Recherche ergab, das das bei Docker gar nicht soo einfach ist. Also wurde der Plan fallen gelassen.
Nun musste was auf dem Proxmox ran. Da ich die Container auch mal wieder ausprobieren wollte, habe ich mir gedacht, gut machen wir so
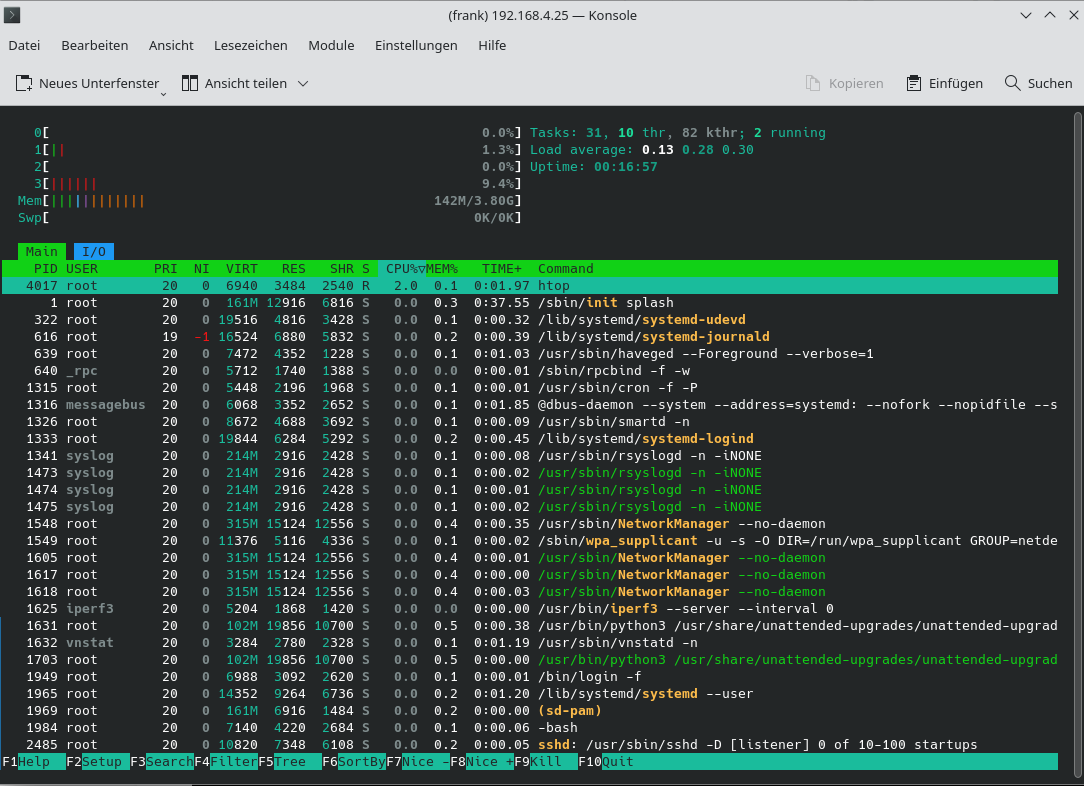
") Kurze Anmerkung, es ist im Normalfall nicht sinnvoll, das so zu machen, da man die Server von extern überwachen soll / muss! Für mich ist das aber nicht so wichtig. Was mir wichtiger ist, das ich ab und zu mal schauen kann, wie so der Status der Raids ist, wie voll sind die Platten und son Zeug.....
Kurze Anmerkung, es ist im Normalfall nicht sinnvoll, das so zu machen, da man die Server von extern überwachen soll / muss! Für mich ist das aber nicht so wichtig. Was mir wichtiger ist, das ich ab und zu mal schauen kann, wie so der Status der Raids ist, wie voll sind die Platten und son Zeug.....Installation
Die Installation von checkmk nach Dokumentation vorgenommen.
Apache2
Ich stelle hier direkt fest, das ich mit dem Apachen auf Kriegsfuß stehe. Ich mag das Konzept einfach nicht. Ich hatte mich also nun mal wieder an dieser Konfiguration herangetraut und es nach einiger Zeit auch geschafft. Die Installation war ein Debian Minimal Container.
/etc/apache2/sites-enabled/000-default.conf
<VirtualHost *:80>
        # The ServerName directive sets the request scheme, hostname and port that
        # the server uses to identify itself. This is used when creating
        # redirection URLs. In the context of virtual hosts, the ServerName
        # specifies what hostname must appear in the request's Host: header to
        # match this virtual host. For the default virtual host (this file) this
        # value is not decisive as it is used as a last resort host regardless.
        # However, you must set it for any further virtual host explicitly.
        #ServerName www.example.com

        ServerAdmin webmaster@localhost
        DocumentRoot /var/www/html

        # Available loglevels: trace8, ..., trace1, debug, info, notice, warn,
        # error, crit, alert, emerg.
        # It is also possible to configure the loglevel for particular
        # modules, e.g.
        #LogLevel info ssl:warn

        ErrorLog ${APACHE_LOG_DIR}/error.log
        CustomLog ${APACHE_LOG_DIR}/access.log combined

        # For most configuration files from conf-available/, which are
        # enabled or disabled at a global level, it is possible to
        # include a line for only one particular virtual host. For example the
        # following line enables the CGI configuration for this host only
        # after it has been globally disabled with "a2disconf".
        #Include conf-available/serve-cgi-bin.conf
        RewriteEngine On
        RewriteCond %{SERVER_PORT} !^443$
        RewriteRule (.*) https://%{HTTP_HOST}$1 [L]
        RequestHeader set X-Forwarded-Proto "https"
</VirtualHost>

# vim: syntax=apache ts=4 sw=4 sts=4 sr noet
/etc/apache2/sites-enabled/001-ssl.conf
<IfModule mod_ssl.c>
        <VirtualHost [IPv6]:443>
                ServerAdmin webmaster@localhost

                DocumentRoot /var/www/html

                # Available loglevels: trace8, ..., trace1, debug, info, notice, warn,
                # error, crit, alert, emerg.
                # It is also possible to configure the loglevel for particular
                # modules, e.g.
                #LogLevel info ssl:warn

                ErrorLog ${APACHE_LOG_DIR}/error.log
                CustomLog ${APACHE_LOG_DIR}/access.log combined

                # For most configuration files from conf-available/, which are
                # enabled or disabled at a global level, it is possible to
                # include a line for only one particular virtual host. For example the
                # following line enables the CGI configuration for this host only
                # after it has been globally disabled with "a2disconf".
                #Include conf-available/serve-cgi-bin.conf

                #   SSL Engine Switch:
                #   Enable/Disable SSL for this virtual host.
                SSLEngine on

                #   A self-signed (snakeoil) certificate can be created by installing
                #   the ssl-cert package. See
                #   /usr/share/doc/apache2/README.Debian.gz for more info.
                #   If both key and certificate are stored in the same file, only the
                #   SSLCertificateFile directive is needed.
                SSLCertificateFile      /etc/letsencrypt/live/DOMAIN/fullchain.pem
                SSLCertificateKeyFile   /etc/letsencrypt/live/DOMAIN/privkey.pem

                # Add the following to your Apache config.
                SSLOpenSSLConfCmd DHParameters "/etc/ssl/nginx/dhparam.pem"

                # enable HTTP/2, if available
                Protocols h2 http/1.1

                # HTTP Strict Transport Security (mod_headers is required) (63072000 seconds)
                Header always set Strict-Transport-Security "max-age=63072000"

                # Requires Apache 2.4.36 & OpenSSL 1.1.1
                SSLProtocol -all +TLSv1.3
                SSLOpenSSLConfCmd Curves X25519:secp521r1:secp384r1:prime256v1
                #SSLCipherSuite EECDH+AESGCM:EDH+AESGCM:AES256+EECDH:AES256+EDH
                SSLCipherSuite AES256+EECDH:AES256+EDH
                SSLHonorCipherOrder on

                <FilesMatch "\.(cgi|shtml|phtml|php)$">
                                SSLOptions +StdEnvVars
                </FilesMatch>
                <Directory /usr/lib/cgi-bin>
                                SSLOptions +StdEnvVars
                </Directory>

                #   SSL Protocol Adjustments:
                #   The safe and default but still SSL/TLS standard compliant shutdown
                #   approach is that mod_ssl sends the close notify alert but doesn't wait for
                #   the close notify alert from client. When you need a different shutdown
                #   approach you can use one of the following variables:
                #   o ssl-unclean-shutdown:
                #        This forces an unclean shutdown when the connection is closed, i.e. no
                #        SSL close notify alert is send or allowed to received.  This violates
                #        the SSL/TLS standard but is needed for some brain-dead browsers. Use
                #        this when you receive I/O errors because of the standard approach where
                #        mod_ssl sends the close notify alert.
                #   o ssl-accurate-shutdown:
                #        This forces an accurate shutdown when the connection is closed, i.e. a
                #        SSL close notify alert is send and mod_ssl waits for the close notify
                #        alert of the client. This is 100% SSL/TLS standard compliant, but in
                #        practice often causes hanging connections with brain-dead browsers. Use
                #        this only for browsers where you know that their SSL implementation
                #        works correctly.
                #   Notice: Most problems of broken clients are also related to the HTTP
                #   keep-alive facility, so you usually additionally want to disable
                #   keep-alive for those clients, too. Use variable "nokeepalive" for this.
                #   Similarly, one has to force some clients to use HTTP/1.0 to workaround
                #   their broken HTTP/1.1 implementation. Use variables "downgrade-1.0" and
                #   "force-response-1.0" for this.
                # BrowserMatch "MSIE [2-6]" \
                #               nokeepalive ssl-unclean-shutdown \
                #               downgrade-1.0 force-response-1.0

        </VirtualHost>
</IfModule>

# vim: syntax=apache ts=4 sw=4 sts=4 sr noet
NGINX
/etc/nginx/sites-enabled/default
### CheckMK

### redirect http requests to https Forum
server {
    listen               80;
    listen               [IPv6]:80;
    server_name          DOMAIN;
    return 301 https://DOMAIN$request_uri;
}


### redirect http requests to https Forum
server {
    listen               80;
    listen               [IPv6]:80;
    server_name          DPMAIN;
    return 301 https://$server_name$request_uri;
}


### https server Forum
server {
    listen               443 ssl http2;
    listen               [IPv6]:443 ssl http2;
    server_name          DOMAIN;
    client_max_body_size 10M;

    #### SSL & Nginx Settings - Begin

    # Grundeinstellungen
    ssl_session_timeout 10m;
    ssl_session_cache shared:SSL:10m;
    ssl_buffer_size 8k;


    # OSCP Online Certificate Status Protocol
    ssl_stapling_verify on;
    ssl_stapling on;

    # enables TLSv1.2 & TLSv1.3
    ssl_prefer_server_ciphers on;
    ssl_protocols TLSv1.2 TLSv1.3;
    ssl_ciphers ECDH+AESGCM:ECDH+CHACHA20:ECDH+AES256:ECDH+AES128:!aNULL:!SHA1;

    # SSL Certificate
    ssl_certificate      /etc/letsencrypt/live/DOMAIN/fullchain.pem;
    ssl_certificate_key  /etc/letsencrypt/live/DOMAIN/privkey.pem;
    ssl_dhparam /etc/ssl/nginx/dhparam-2048.pem;

    # HSTS
    add_header Strict-Transport-Security "max-age=31536000; includeSubDomains; always";

    # Cookie
    proxy_cookie_path / "/; HTTPOnly; Secure";

    # X-Frame-Options
    add_header X-Frame-Options  ^`^|SAMEORIGIN ^`^};

    # Referrer
    add_header Referrer-Policy  ^`^|no-referrer ^`^};

    # Robots
    add_header X-Robots-Tag all;

    # X-Download
    add_header X-Download-Options noopen;

    # X-Permitted-Cross-Domain-Policies
    add_header X-Permitted-Cross-Domain-Policies none;

    # Remove X-Powered-By, which is an information leak
    fastcgi_hide_header X-Powered-By;

    #### SSL & Nginx Settings - End


    ### Root
    location / {
        proxy_set_header X-Real-IP $remote_addr;
        proxy_set_header X-Forwarded-For $proxy_add_x_forwarded_for;
        proxy_set_header X-Forwarded-Proto $scheme;
        proxy_set_header Host $http_host;
        proxy_set_header X-NginX-Proxy true;

        proxy_pass http://127.0.0.1:5000;  # no trailing slash
        proxy_redirect off;

        # Socket.IO Support
        proxy_http_version 1.1;
        proxy_set_header Upgrade $http_upgrade;
        proxy_set_header Connection "upgrade";
    }
}
Fazit
Was stört mich am Apachen? Ich musste mal wieder irgendwelche Module hinterher installieren, so was wie ssl z.B. Leibe Macher, welche Seite lasst ihr ohne SSL laufen? Ok, vielleicht nur Kleinigkeiten. Weiter gehts mit irgendwelchen Configs, die man aktivieren muss. a2enconf usw. Ja, es mag sein, das ich das Konzept vom Apachen nicht verstehe, ich finde es einfach nur unkomfortabel.
NGINX installieren, Konfigurationsdateien erstellen, einmal neustarten und fertig
")
Ich habe oben beides angegeben, ihr könnt Euch dann das aussuchen was Euch liegt.
Der Ordnung halber, das Paket
dpkg -i /root/check-mk-free-2.0.0p11_0.buster_amd64.debhat eine Abhängikeit Apache2
Der installiert das also mit. -
Ich musste am Ende wieder den Apachen installieren, da checkmk zu viele Abhängigkeiten hat. So was wie omd-apache2(?), wurde mir dann als Fehler angezeigt. Die Server waren auf einmal offline usw. Schade, aber letztendlich für den Container auch egal.
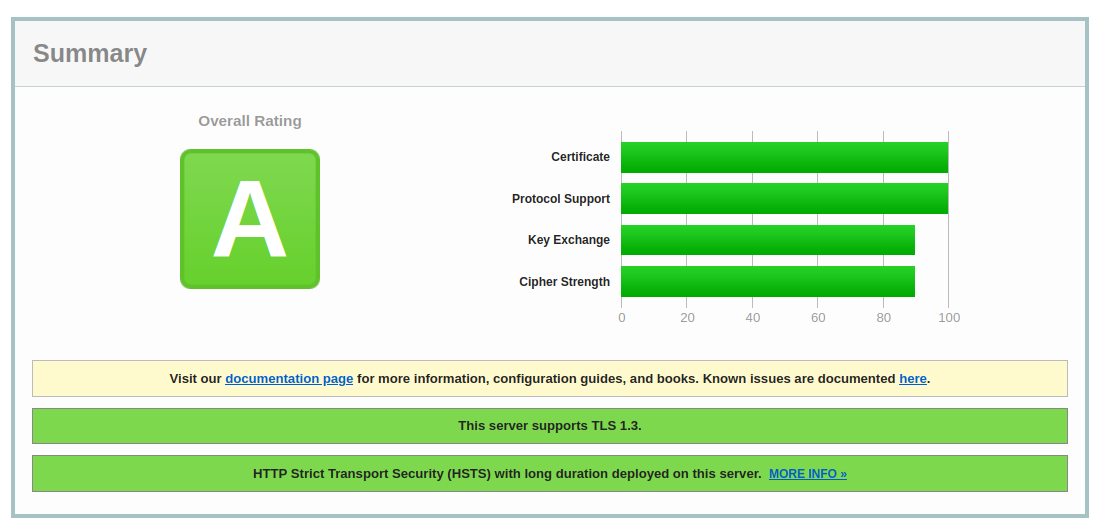
Oben im Apachen die SSL Sicherheit erhöht.