Skip to content

Zima Board

Linux
  • Ok, über eine Videoseite im Netz 🙂 auf neues Spielzeug aufmerksam geworden. Das könnte doch ein schönes "NAS" werden, kleine pfSense oder was anderes. Mal sehen wann ich Zeit habe mich damit zu beschäftigen.

    Das vorinstallierte Debian der Chinesen läuft, nur will man das nicht wirklich haben...

    Auf dem User Manual steht Single Board Server 😊

    20230425_173047.jpg

  • Ein paar schnelle Infos. Gestartet mit dem vorinstallierten CasaOS der Chinesen. Das ist ein Debian mit Gnome Desktop.

    lscpu

    root@CasaOS:~# lscpu
    Architecture:                    x86_64
    CPU op-mode(s):                  32-bit, 64-bit
    Byte Order:                      Little Endian
    Address sizes:                   39 bits physical, 48 bits virtual
    CPU(s):                          4
    On-line CPU(s) list:             0-3
    Thread(s) per core:              1
    Core(s) per socket:              4
    Socket(s):                       1
    NUMA node(s):                    1
    Vendor ID:                       GenuineIntel
    CPU family:                      6
    Model:                           92
    Model name:                      Intel(R) Celeron(R) CPU N3450 @ 1.10GHz
    Stepping:                        9
    CPU MHz:                         1445.919
    CPU max MHz:                     2200.0000
    CPU min MHz:                     800.0000
    BogoMIPS:                        2188.80
    Virtualization:                  VT-x
    L1d cache:                       96 KiB
    L1i cache:                       128 KiB
    L2 cache:                        2 MiB
    NUMA node0 CPU(s):               0-3
    Vulnerability Itlb multihit:     Not affected
    Vulnerability L1tf:              Not affected
    Vulnerability Mds:               Not affected
    Vulnerability Meltdown:          Not affected
    Vulnerability Mmio stale data:   Not affected
    Vulnerability Retbleed:          Not affected
    Vulnerability Spec store bypass: Not affected
    Vulnerability Spectre v1:        Mitigation; usercopy/swapgs barriers and __user pointer sanitization
    Vulnerability Spectre v2:        Mitigation; Retpolines, IBPB conditional, IBRS_FW, STIBP disabled, RSB filling, PBRSB-eIBRS Not affected
    Vulnerability Srbds:             Not affected
    Vulnerability Tsx async abort:   Not affected
    Flags:                           fpu vme de pse tsc msr pae mce cx8 apic sep mtrr pge mca cmov pat pse36 clflush dts acpi mmx fxsr sse sse2 ss
                                      ht tm pbe syscall nx pdpe1gb rdtscp lm constant_tsc art arch_perfmon pebs bts rep_good nopl xtopology tsc_re
                                     liable nonstop_tsc cpuid aperfmperf tsc_known_freq pni pclmulqdq dtes64 monitor ds_cpl vmx est tm2 ssse3 sdbg
                                      cx16 xtpr pdcm sse4_1 sse4_2 x2apic movbe popcnt tsc_deadline_timer aes xsave rdrand lahf_lm 3dnowprefetch c
                                     puid_fault cat_l2 ibrs ibpb stibp tpr_shadow vnmi flexpriority ept vpid ept_ad fsgsbase tsc_adjust smep erms 
                                     mpx rdt_a rdseed smap clflushopt intel_pt sha_ni xsaveopt xsavec xgetbv1 xsaves dtherm ida arat pln pts md_cl
                                     ear arch_capabilities
    

    free

    root@CasaOS:~# free -h
                   total        used        free      shared  buff/cache   available
    Mem:           7.6Gi       1.0Gi       5.3Gi       375Mi       1.3Gi       6.0Gi
    Swap:          976Mi          0B       976Mi
    

    fdisk

    root@CasaOS:~# df -h
    Filesystem      Size  Used Avail Use% Mounted on
    udev            3.8G     0  3.8G   0% /dev
    tmpfs           781M  2.9M  778M   1% /run
    /dev/mmcblk0p2   28G  8.6G   18G  34% /
    tmpfs           3.9G     0  3.9G   0% /dev/shm
    tmpfs           5.0M  4.0K  5.0M   1% /run/lock
    /dev/mmcblk0p1  511M  5.8M  506M   2% /boot/efi
    tmpfs           781M   88K  781M   1% /run/user/1000
    

    fdisk (mit angesteckter 2,5 Zoll SSD)

    root@CasaOS:~# fdisk -l
    Disk /dev/mmcblk0: 29.12 GiB, 31268536320 bytes, 61071360 sectors
    Units: sectors of 1 * 512 = 512 bytes
    Sector size (logical/physical): 512 bytes / 512 bytes
    I/O size (minimum/optimal): 512 bytes / 512 bytes
    Disklabel type: gpt
    Disk identifier: 002EB32E-EA04-4A34-8B17-240303106A2E
    
    Device            Start      End  Sectors  Size Type
    /dev/mmcblk0p1     2048  1050623  1048576  512M EFI System
    /dev/mmcblk0p2  1050624 59070463 58019840 27.7G Linux filesystem
    /dev/mmcblk0p3 59070464 61071326  2000863  977M Linux swap
    GPT PMBR size mismatch (12333055 != 468862127) will be corrected by write.
    The backup GPT table is not on the end of the device.
    
    
    Disk /dev/sda: 223.57 GiB, 240057409536 bytes, 468862128 sectors
    Disk model: SanDisk SDSSDA24
    Units: sectors of 1 * 512 = 512 bytes
    Sector size (logical/physical): 512 bytes / 512 bytes
    I/O size (minimum/optimal): 512 bytes / 512 bytes
    Disklabel type: gpt
    Disk identifier: C0586116-CBB4-48AB-AAAC-BFD7E6A7B567
    
    Device      Start      End  Sectors   Size Type
    /dev/sda1   16384    30719    14336     7M Microsoft basic data
    /dev/sda2   62500   500000   437501 213.6M EFI System
    /dev/sda3  500001 12333022 11833022   5.6G Linux filesystem
    

    Kernel

    root@CasaOS:~# uname -a
    Linux CasaOS 5.10.0-20-amd64 #1 SMP Debian 5.10.158-2 (2022-12-13) x86_64 GNU/Linux
    

    Debian

    root@CasaOS:/etc# cat debian_version 
    11.6
    

    eMMC

    So langsam ist der gar nicht, wie ich erwartet habe.

    root@CasaOS:~# dd if=/dev/zero of=sd.img bs=1M count=4096 conv=fdatasync
    4096+0 records in
    4096+0 records out
    4294967296 bytes (4.3 GB, 4.0 GiB) copied, 32.6777 s, 131 MB/s
    

    lspci

    root@CasaOS:~# lspci
    00:00.0 Host bridge: Intel Corporation Celeron N3350/Pentium N4200/Atom E3900 Series Host Bridge (rev 0b)
    00:02.0 VGA compatible controller: Intel Corporation HD Graphics 500 (rev 0b)
    00:0e.0 Audio device: Intel Corporation Celeron N3350/Pentium N4200/Atom E3900 Series Audio Cluster (rev 0b)
    00:0f.0 Communication controller: Intel Corporation Celeron N3350/Pentium N4200/Atom E3900 Series Trusted Execution Engine (rev 0b)
    00:12.0 SATA controller: Intel Corporation Celeron N3350/Pentium N4200/Atom E3900 Series SATA AHCI Controller (rev 0b)
    00:13.0 PCI bridge: Intel Corporation Celeron N3350/Pentium N4200/Atom E3900 Series PCI Express Port A #1 (rev fb)
    00:14.0 PCI bridge: Intel Corporation Celeron N3350/Pentium N4200/Atom E3900 Series PCI Express Port B #1 (rev fb)
    00:14.1 PCI bridge: Intel Corporation Celeron N3350/Pentium N4200/Atom E3900 Series PCI Express Port B #2 (rev fb)
    00:15.0 USB controller: Intel Corporation Celeron N3350/Pentium N4200/Atom E3900 Series USB xHCI (rev 0b)
    00:1c.0 SD Host controller: Intel Corporation Celeron N3350/Pentium N4200/Atom E3900 Series eMMC Controller (rev 0b)
    00:1f.0 ISA bridge: Intel Corporation Celeron N3350/Pentium N4200/Atom E3900 Series Low Pin Count Interface (rev 0b)
    00:1f.1 SMBus: Intel Corporation Celeron N3350/Pentium N4200/Atom E3900 Series SMBus Controller (rev 0b)
    01:00.0 Ethernet controller: Realtek Semiconductor Co., Ltd. RTL8125 2.5GbE Controller (rev 04)
    02:00.0 Ethernet controller: Realtek Semiconductor Co., Ltd. RTL8111/8168/8411 PCI Express Gigabit Ethernet Controller (rev 15)
    03:00.0 Ethernet controller: Realtek Semiconductor Co., Ltd. RTL8111/8168/8411 PCI Express Gigabit Ethernet Controller (rev 15)
    

    Netzwerkkarte (2.5G) im PCIe Slot

    root@CasaOS:~# ethtool enp1s0
    Settings for enp1s0:
            Supported ports: [ TP    MII ]
            Supported link modes:   10baseT/Half 10baseT/Full
                                    100baseT/Half 100baseT/Full
                                    1000baseT/Full
                                    2500baseT/Full
            Supported pause frame use: Symmetric Receive-only
            Supports auto-negotiation: Yes
            Supported FEC modes: Not reported
            Advertised link modes:  10baseT/Half 10baseT/Full
                                    100baseT/Half 100baseT/Full
                                    1000baseT/Full
                                    2500baseT/Full
            Advertised pause frame use: Symmetric Receive-only
            Advertised auto-negotiation: Yes
            Advertised FEC modes: Not reported
            Speed: Unknown!
            Duplex: Unknown! (255)
            Auto-negotiation: on
            master-slave cfg: preferred slave
            master-slave status: unknown
            Port: Twisted Pair
            PHYAD: 0
            Transceiver: external
            MDI-X: Unknown
            Supports Wake-on: pumbg
            Wake-on: d
            Link detected: no
    

    Das sollte als erster grober Überblick reichen. Wer mich kennt, weiß das ich mit diesem Debian und dem Kernel nicht so richtig viel anfangen kann. Das wird sich dann mit dem Testen anderer Betriebssysteme sowieso erledigen.

    Grundsätzlich macht das Zima-Board für mich aktuell einen guten Eindruck. Verarbeitung ist solide. Geht auch soweit alles, was ich auf die Schnelle testen konnte. Freue mich schon auf eine Installation, aber was zuerst? 🤓

  • Proxmox Installation (auf eine SSD am SATA-Port) ohne Probleme. Ob das Sinn macht, darüber muss ich noch nachdenken. Bin noch nicht sicher, in welche Richtung ich damit gehe.

    Proxmox.png

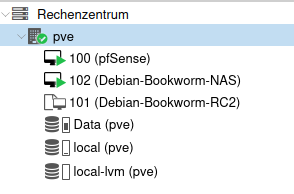
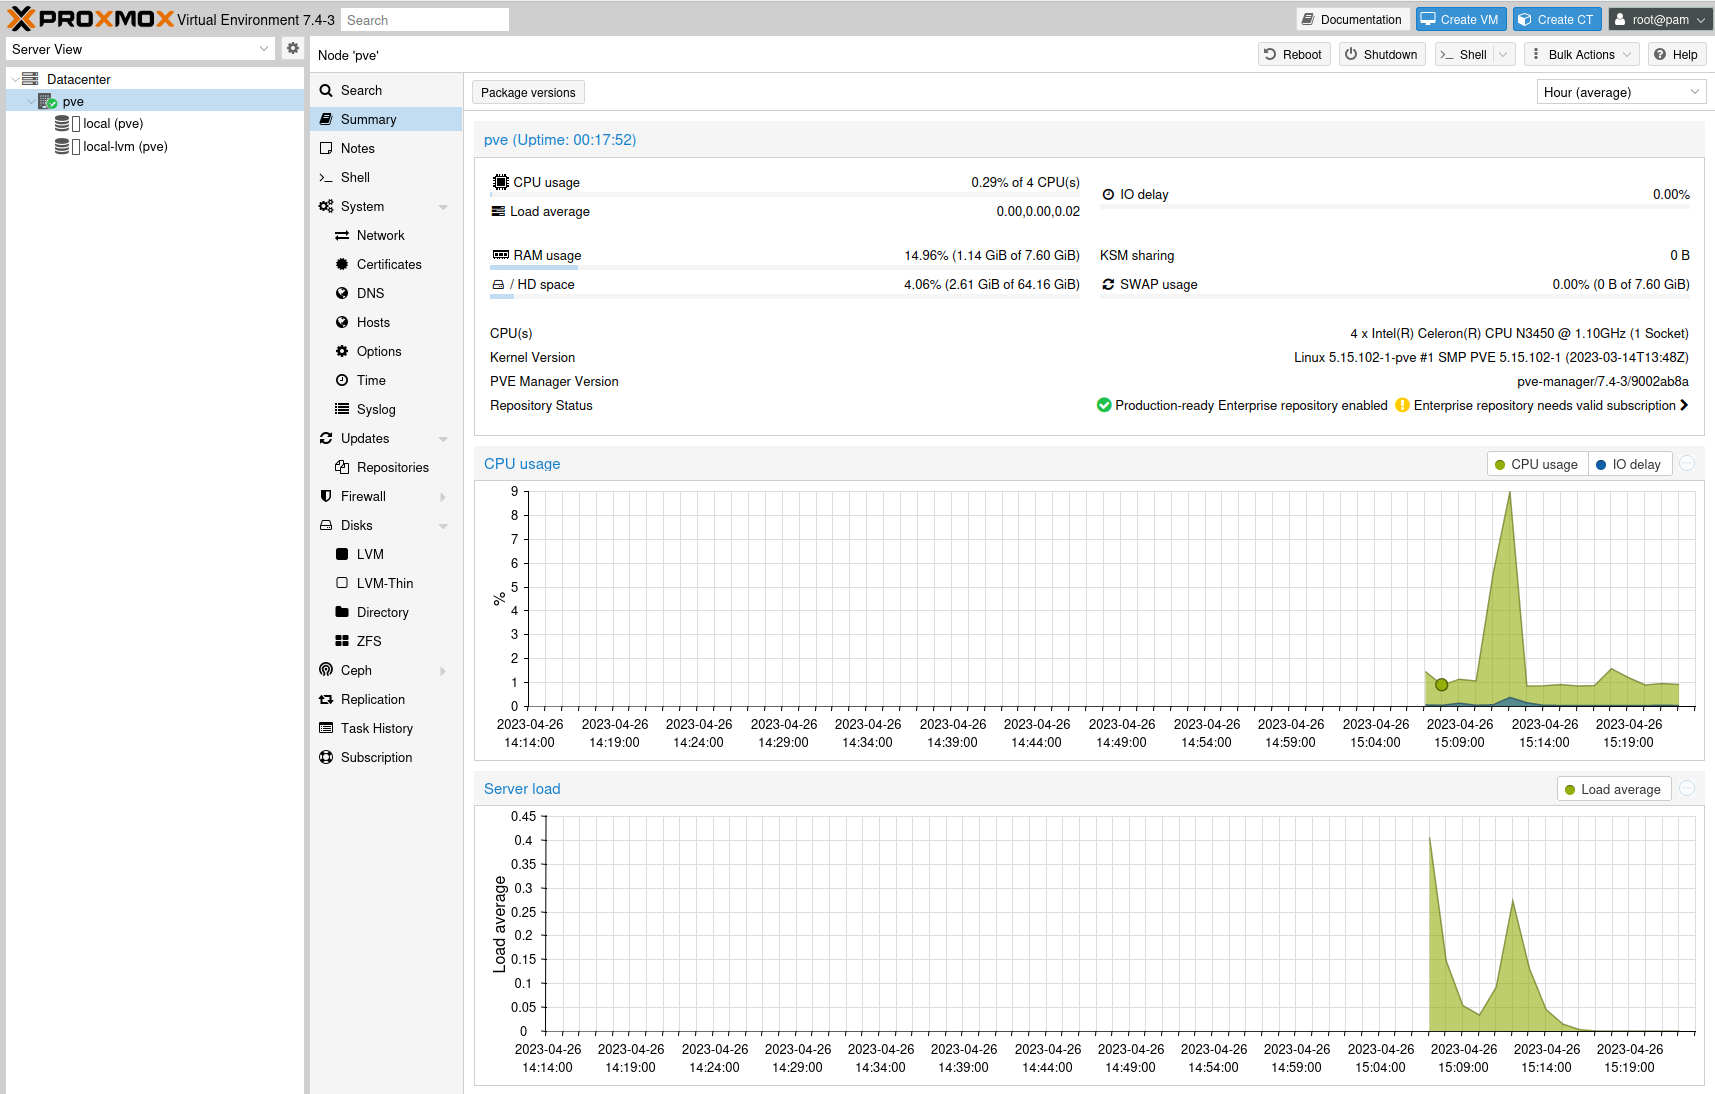
  • Ich mag ja den Proxmox, habe da schließlich in Vergangenheit schon viel mit rumgespielt. Hatte schon mal einen echten Proxmox-Server im Netz, wurde aus Kostengründen eingestampft. Dann lange hier zu Hause einen, eingestampft wegen Energiepreisanstieg. Da könnte dieses Zima-Board eine echte Alternative sein.

    Also, aktuell läuft er immer noch. Mittlerweile habe ich das Setup auch verfeinert.

    2531e8c3-07bc-41fe-b4f4-166f648a0d96-grafik.png

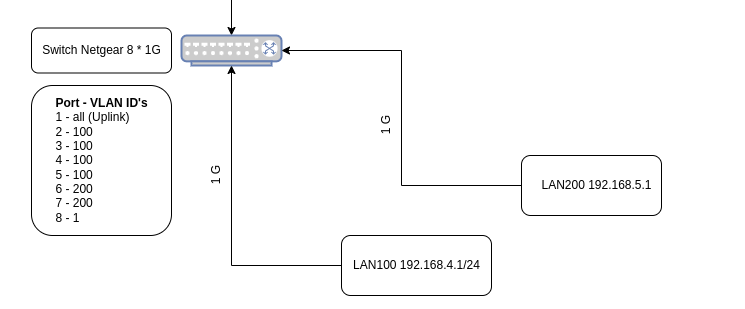
    Die pfSense stellt mir diverse VLAN's zur Verfügung, die am Switch wieder getrennt werden. So in etwa..

    dac33c47-42d9-439e-a330-4a7a1b127404-grafik.png

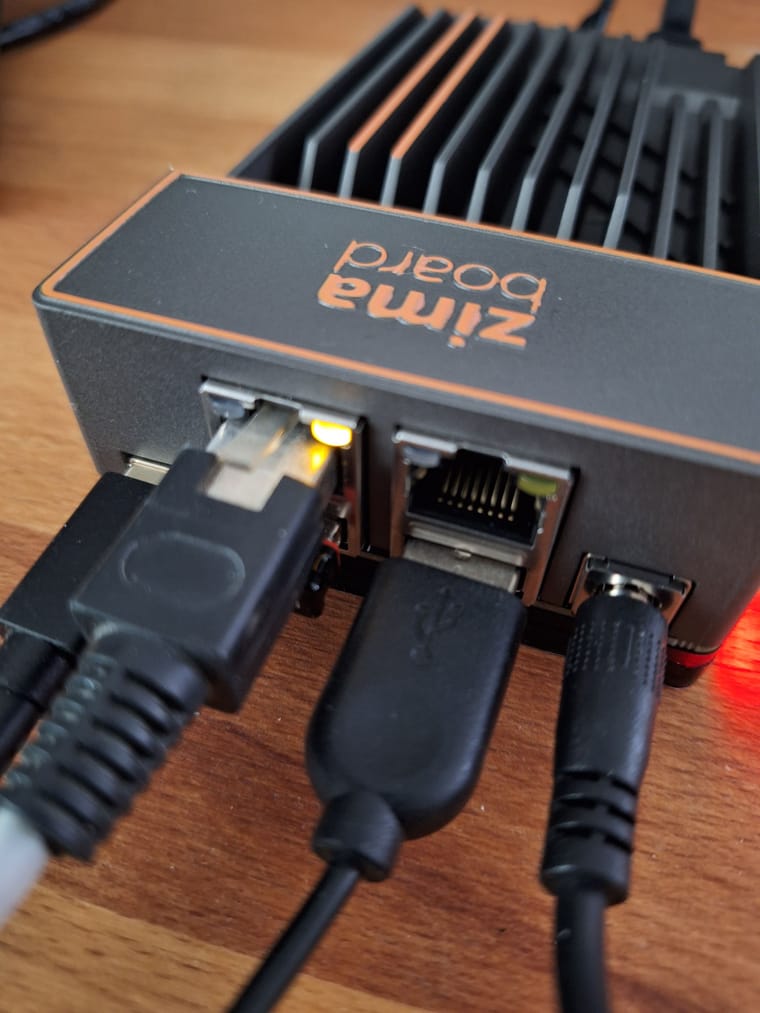
    Aktuelles Setup des Zima-Boards

    • 2,5 Zoll SATA SSD 240GB (Systemplatte)
    • PCIe-Adapter für 500GB NVMe SSD (Daten)
    • WAN zur Fritzbox
    • LAN zum Netgear-Router

    20230501_081258.jpg

    Jetzt mal als erstes ein Energiemessgerät suchen...

  • Energieverbrauch

    Zu meinem NanoPi R5S, der aktuell hier alles macht, hatte ich folgendes geschrieben.

    Die Proxmox Maschine verbrät 40 Watt, der NanoPi R5S so ca. 5 - 6 Watt. Bei den aktuellen Energiepreisen lohnt sich das, vor allen Dingen bei einem Gerät was 24/7 läuft.

    Das Zima Board braucht hier mit dem Proxmox, mehr oder weniger im Idle, ca. 10,12 Watt. Also, etwas mehr als der NanoPi R5S, aber auch mit mehr Komfort. So zwei Punkte, die mir spontan einfallen.

    • Natives Linux, wo ich ohne Probleme meine Pakete installieren kann.
    • Einfache Updatemöglichkeit, da beiß ich mir beim NanoPi R5S immer die Zähne dran aus (OpenWrt)
  • FrankMF FrankM hat am auf dieses Thema verwiesen
  • FrankMF FrankM hat am auf dieses Thema verwiesen
  • Wer noch einen braucht, sind wieder ein paar im Shop erhältlich.

    ZimaBoard 832 is IN STOCK & AVAILABLE NOW
    ‌ ‌ ‌ ‌ ‌ ‌ ‌ ‌ ‌ ‌ ‌ ‌ ‌ ‌ ‌ ‌ ‌ ‌ ‌ ‌ ‌ ‌ ‌ ‌ ‌ ‌ ‌ ‌ ‌ ‌ ‌ ‌ ‌ ‌ ‌ ‌ ‌ ‌ ‌ ‌ ‌ ‌ ‌ ‌ ‌ ‌ ‌ ‌ ‌ ‌ ‌ ‌ ‌ ‌ ‌ ‌ ‌ ‌ ‌ ‌ ‌ ‌ ‌ ‌ ‌ ‌ ‌ ‌ ‌ ‌ ‌ ‌ ‌ ‌ ‌ ‌ ‌ ‌ ‌ ‌ ‌ ‌ ‌ ‌ ‌ ‌ ‌ ‌ ‌ ‌ ‌ ‌ ‌ ‌
    ZimaBoard Official Store

    Back In Stock

    The item you've been waiting for is back in stock

    ZimaBoard 832 - Single Board Server for Creators

    $199.90

    Model: ZimaBoard 832

    Stock: 190

  • MongoDB - Erste Erfahrungen

    Linux
    2
    0 Stimmen
    2 Beiträge
    87 Aufrufe
    FrankMF

    So frisch von der MongoDB Front und wieder viel gelernt, weil beim Üben macht man Fehler 🙂

    Oben war ja mongodump & mongorestore von der KI empfohlen. Hier das wie ich es gemacht habe.

    mongodump frank@redis-stack:~$ mongodump -u frank -p '<password>' --host 192.168.3.9 --authenticationDatabase admin -d portfolio -o mongodump/ 2024-04-06T09:29:25.174+0200 writing portfolio.stockList to mongodump/portfolio/stockList.bson 2024-04-06T09:29:25.175+0200 writing portfolio.users to mongodump/portfolio/users.bson 2024-04-06T09:29:25.175+0200 done dumping portfolio.stockList (8 documents) 2024-04-06T09:29:25.176+0200 writing portfolio.total_sum to mongodump/portfolio/total_sum.bson 2024-04-06T09:29:25.177+0200 done dumping portfolio.total_sum (1 document) 2024-04-06T09:29:25.177+0200 writing portfolio.old_total_sum to mongodump/portfolio/old_total_sum.bson 2024-04-06T09:29:25.177+0200 writing portfolio.stocks to mongodump/portfolio/stocks.bson 2024-04-06T09:29:25.177+0200 done dumping portfolio.users (4 documents) 2024-04-06T09:29:25.178+0200 writing portfolio.settings to mongodump/portfolio/settings.bson 2024-04-06T09:29:25.178+0200 done dumping portfolio.settings (1 document) 2024-04-06T09:29:25.179+0200 done dumping portfolio.old_total_sum (1 document) 2024-04-06T09:29:25.179+0200 done dumping portfolio.stocks (34 documents) mongorestore mongorestore -u frank -p '<password>' --host 192.168.3.9 --authenticationDatabase admin -d portfolio mongodump/meineDatenbank/

    Hier wird die Datensicherung mongodump/meineDatenbank/ in die neue Datenbank portfolio transferiert.

    Grund für das Ganze? Mich hatte der Datenbank Name meineDatenbank gestört.

    Benutzerrechte

    Jetzt der Teil wo man schnell was falsch machen kann 🙂 Ich hatte also die neue Datenbank, konnte sie aber nicht lesen. Fehlten halt die Rechte. Ich hatte dann so was hier gemacht.

    db.updateUser("frank", { roles: [ { role: "readWrite", db: "meineDatenbank" }, { role: "readWrite", db: "portfolio" }]})

    Ging auch prima, kam ein ok zurück. Nun das Problem, ich hatte beim Einrichten, den User frank als admin benutzt. Durch den oben abgesetzten Befehl (frank ist ja admin), wurden die neuen Rechte gesetzt und die Rechte als Admin entzogen!! Das war jetzt nicht wirklich das was ich gebrauchen konnte. LOL

    Ich hatte jetzt keine Kontrolle mehr über die DB. Das war aber nicht so wirklich kompliziert, das wieder zu ändern. Die Authentication temporär abstellen. Also /etc/mongod.conf editieren und

    #security: security.authorization: enabled

    eben mal auskommentieren. Den Daemon neustarten und anmelden an der DB.

    mongosh --host 192.168.3.9

    Danach neuen User anlegen

    db.createUser({ user: "<name>", pwd: "<password>", roles: [ { role: "userAdminAnyDatabase", db: "admin" } ] })

    mongod.conf wieder ändern und neustarten. Danach hat man wieder eine DB mit Authentifizierung und einen neuen Admin. Ich bin diesmal, man lernt ja, anders vorgegangen. Es gibt nun einen Admin für die DB und einen User zum Benutzen der Datenbanken! So wie man es auch auf einem produktiven System auch machen würde. Wenn ich jetzt mal was an den Benutzerrechten des Users ändere, kann mir das mit dem Admin nicht mehr passieren. Hoffe ich 🙂

  • Plasma 6

    Linux
    1
    0 Stimmen
    1 Beiträge
    98 Aufrufe
    Niemand hat geantwortet
  • Docker - Portainer

    Linux
    3
    0 Stimmen
    3 Beiträge
    616 Aufrufe
    FrankMF

    Dann grabe ich das mal wieder aus 😉

    Bedingt durch den Wegfall meines Proxmox, musste ich mir Gedanken darüber machen, wie ein paar Dienste auch weiterhin laufen sollen. Um mal die zwei wichtigsten zu nennen.

    checkmk DokuWiki

    Diese sollen später, wenn der zweite NanoPi R5S aus China da ist, dort laufen. Da der aber mit der Schneckenpost kommt, kann man ja in der Zwischenzeit mal wieder mit Docker spielen.

    Ich erinnerte mich daran, das checkmk eine sehr gute Anleitung hat, so das ich das mal wieder ausprobierte. Klappte einwandfrei. Dann erinnerte mich an Portainer und dachte mir, das probiere ich mal wieder aus 🙂

    1d2dc9b3-ad71-45c5-b552-72c88a1bf773-grafik.png

    Ich hatte übrigens die Endpoints gesucht und nicht gefunden, die heißen jetzt Environments. Auf dem Bild ist noch keiner eingerichtet.

    4bdbf196-1b36-4e65-94d0-0e56daa473bf-grafik.png

    Irgendwie ist das wirklich richtig gute Software. Ich mag den Portainer und auch als selbst ausgebildeter ITler 😉 kommt man damit sehr schnell ganz gut zurecht.

    Ja, man kann die ganzen Docker Befehle auch über die Konsole eingeben, was ich normalerweise auch mit ganz vielen Dingen mache, aber das macht hier einfach Spaß. Man hat auch schnell einen guten Überblick was wo läuft usw.

    Wer so was sucht, einfach mal ausprobieren. Klare Empfehlung von mir.

  • Cockpit

    Linux
    1
    0 Stimmen
    1 Beiträge
    204 Aufrufe
    Niemand hat geantwortet
  • 0 Stimmen
    1 Beiträge
    237 Aufrufe
    Niemand hat geantwortet
  • Restic - forget --keep-last 3 --prune

    Restic
    2
    0 Stimmen
    2 Beiträge
    579 Aufrufe
    FrankMF

    Ich habe mich damit noch ein wenig beschäftigt, die letzten drei zu behalten, ist nicht so optimal. Da es viele Optionen bei dem Befehl gibt, hier ein Ausschnitt

    Flags: -l, --keep-last n keep the last n snapshots -H, --keep-hourly n keep the last n hourly snapshots -d, --keep-daily n keep the last n daily snapshots -w, --keep-weekly n keep the last n weekly snapshots -m, --keep-monthly n keep the last n monthly snapshots -y, --keep-yearly n keep the last n yearly snapshots

    habe ich das ein wenig so angepasst, das ich denke es passt für mich.

    restic --password-file /root/passwd -r /media/NAS_neu/Restic/Home/ forget --keep-last 3 --keep-monthly 3 --prune

    Damit behalte ich auch die jeweils eines pro Monat. Und die letzten drei. Das sieht dann so aus.

    root@debian:~# ./backup2.sh repository 2f3f6147 opened successfully, password is correct Files: 38 new, 100 changed, 13268 unmodified Dirs: 0 new, 1 changed, 0 unmodified Added to the repo: 10.166 GiB processed 13406 files, 50.324 GiB in 3:24 snapshot 849f614c saved repository 2f3f6147 opened successfully, password is correct Applying Policy: keep the last 3 snapshots, 3 monthly snapshots snapshots for (host [debian], paths [/home/frank]): keep 5 snapshots: ID Time Host Tags Reasons Paths ------------------------------------------------------------------------------------ a7251cfd 2019-11-28 17:00:01 debian monthly snapshot /home/frank 283d4027 2019-12-31 17:00:01 debian monthly snapshot /home/frank ae2b96ec 2020-01-01 21:47:46 debian last snapshot /home/frank 079e00a6 2020-01-02 17:00:01 debian last snapshot /home/frank 849f614c 2020-01-03 21:08:45 debian last snapshot /home/frank monthly snapshot ------------------------------------------------------------------------------------ 5 snapshots remove 26 snapshots: ID Time Host Tags Paths ------------------------------------------------------------------ 896f16c2 2019-11-07 22:23:40 debian /home/frank b21bcf6d 2019-11-11 17:00:01 debian /home/frank f89248fb 2019-11-12 17:00:01 debian /home/frank 123ab546 2019-11-13 17:00:01 debian /home/frank b82d87d0 2019-11-18 17:00:01 debian /home/frank 040b0ab7 2019-11-19 17:00:01 debian /home/frank 7221d8ef 2019-11-20 17:00:01 debian /home/frank 84132a25 2019-11-21 17:00:01 debian /home/frank b558a52c 2019-11-25 17:00:01 debian /home/frank e5cc0c3e 2019-12-02 17:00:01 debian /home/frank 22423fa5 2019-12-03 17:00:01 debian /home/frank 39df1ab9 2019-12-04 17:00:01 debian /home/frank 98843457 2019-12-05 17:00:01 debian /home/frank b0cdd4b6 2019-12-09 17:00:01 debian /home/frank 828414f9 2019-12-10 17:00:01 debian /home/frank e34a27c3 2019-12-11 17:00:01 debian /home/frank 6e488c3b 2019-12-12 17:00:01 debian /home/frank 17898403 2019-12-16 17:00:01 debian /home/frank 1973305a 2019-12-17 17:00:01 debian /home/frank 9553bedd 2019-12-18 17:00:01 debian /home/frank fedf749d 2019-12-19 17:00:01 debian /home/frank 8e7cb876 2019-12-23 17:00:01 debian /home/frank 0bd0d102 2019-12-25 17:00:01 debian /home/frank 13d348b0 2019-12-26 17:00:01 debian /home/frank c7d960aa 2019-12-30 17:00:01 debian /home/frank f6ea9118 2020-01-01 17:00:01 debian /home/frank ------------------------------------------------------------------ 26 snapshots 26 snapshots have been removed, running prune counting files in repo building new index for repo [0:35] 100.00% 7806 / 7806 packs repository contains 7806 packs (46537 blobs) with 41.110 GiB processed 46537 blobs: 0 duplicate blobs, 0 B duplicate load all snapshots find data that is still in use for 5 snapshots [0:01] 100.00% 5 / 5 snapshots found 32654 of 46537 data blobs still in use, removing 13883 blobs will remove 0 invalid files will delete 715 packs and rewrite 752 packs, this frees 5.027 GiB [2:28] 100.00% 752 / 752 packs rewritten counting files in repo [0:01] 100.00% 6571 / 6571 packs finding old index files saved new indexes as [d137b425 f7caee99 a6e9711a] remove 35 old index files [1:13] 100.00% 1467 / 1467 packs deleted done using temporary cache in /tmp/restic-check-cache-916655151 repository 2f3f6147 opened successfully, password is correct created new cache in /tmp/restic-check-cache-916655151 create exclusive lock for repository load indexes check all packs check snapshots, trees and blobs read all data [7:47] 100.00% 6571 / 6571 items duration: 7:47 no errors were found root@debian:~#

    Am Ende seht ihr noch, wie Restic alle Files testet. Mein Script sieht jetzt so aus.

    #!/bin/bash # Script um mit Restic Daten automatisiert zu sichern! # Dient zum Sichern der Homepartition auf dem ROCKPro64 NAS! # Was soll gesichert werden? backup_pfad=/home/frank # Programm Start restic --password-file /root/passwd -r /media/NAS_neu/Restic/Home/ backup $backup_pfad --exclude-file=excludes.txt restic --password-file /root/passwd -r /media/NAS_neu/Restic/Home/ forget --keep-last 3 --keep-monthly 3 --prune # Testen restic --password-file /root/passwd -r /media/NAS_neu/Restic/Home/ check --read-data

    Das dann schön mit einem Cronjob laufen lassen und die Datensicherung ist erledigt 😉

  • SSHFS

    Linux
    1
    0 Stimmen
    1 Beiträge
    292 Aufrufe
    Niemand hat geantwortet
  • 0 Stimmen
    1 Beiträge
    706 Aufrufe
    Niemand hat geantwortet