Skip to content

ZFS - One Disk Pool -> Mirror Pool

Linux
1 1 222
  • Auf meinem neuen Rechner, habe ich einen Proxmox installiert. Als Datengrab hatte ich eine Platte meines alten RAID Verbundes genommen und dort eingebaut.

    Dann alle Daten vom NAS auf die neue Platte im Proxmox geschaufelt. Die Platte sieht so aus.

    root@pve:~# zpool status
      pool: ZFS-Pool
     state: ONLINE
    config:
    
    	NAME                                        STATE     READ WRITE CKSUM
    	ZFS-Pool                                    ONLINE       0     0     0
    	  ata-WDC_WD40EZRZ-00GXCB0_WD-WCC7K6XD2C26  ONLINE       0     0     0
    
    errors: No known data errors
    

    Ok, so weit so gut. Nachdem jetzt alle Daten drüben sind, ich das so weit es ging kontrolliert habe, nehme ich jetzt die zweite Platte aus dem NAS heraus und möchte diese zu dem ZFS-Pool hängen, so das ein Mirror entsteht. Keine Sorge, wenn was schief geht, ich habe auch immer noch ein Backup des NAS 🙂

    Mal schnell im Netz ein paar Seiten angeschaut und ein, zwei Videos angesehen. Ich denke ich weiß jetzt, wie es geht ....

    Ok, erster Versuch

    Bitte nicht die Disk Label sda sdb usw. benutzen! Nur die IDs aus /dev/disk/by-id !!

    root@pve:~# zpool attach ZFS-Pool sda sdb
    cannot attach sdb to sda: no such device in pool
    

    Hmm, geht nicht. Mir war aber sehr schnell klar, woran das lag. Wie man im Status sieht, hat die PVE Software, den Namen von /dev/disk/by-id genommen.

    root@pve:/dev/disk# ls by-id/
    ata-WDC_ata-WDC_WD40EZRZ-00GXCB0_WD-WCC7K6XD2C26
    [..gekürzt..]
    

    Ich hatte jetzt folgendes eingegeben

    root@pve:~# zpool attach ZFS-Pool ata-WDC_WD40EZRZ-00GXCB0_WD-WCC7K6XD2C26 sdb
    

    Nach kurzer Zeit war der Befehl fertig. Kontrolle

    root@pve:~# zpool status
      pool: ZFS-Pool
     state: ONLINE
    status: One or more devices is currently being resilvered.  The pool will
    	continue to function, possibly in a degraded state.
    action: Wait for the resilver to complete.
      scan: resilver in progress since Sun Oct 17 08:25:49 2021
    	55.7G scanned at 6.19G/s, 264K issued at 29.3K/s, 838G total
    	0B resilvered, 0.00% done, no estimated completion time
    config:
    
    	NAME                                          STATE     READ WRITE CKSUM
    	ZFS-Pool                                      ONLINE       0     0     0
    	  mirror-0                                    ONLINE       0     0     0
    	    ata-WDC_WD40EZRZ-00GXCB0_WD-WCC7K6XD2C26  ONLINE       0     0     0
    	    sdb                                       ONLINE       0     0     0
    
    errors: No known data errors
    

    Wie man sieht, ist der Mirror vorhanden. Der Mirror macht aktuell einen "resilver", ok kann ich mir nicht richtig übersetzen aber ich weiß ja was er jetzt macht. Er spiegelt die Daten von der einen Platte auf die anderen. Später sieht das so aus.

    root@pve:/dev/disk# zpool status -v ZFS-Pool
      pool: ZFS-Pool
     state: ONLINE
    status: One or more devices is currently being resilvered.  The pool will
    	continue to function, possibly in a degraded state.
    action: Wait for the resilver to complete.
      scan: resilver in progress since Sun Oct 17 08:25:49 2021
    	838G scanned at 502M/s, 185G issued at 111M/s, 838G total
    	187G resilvered, 22.06% done, 01:40:33 to go
    config:
    
    	NAME                                          STATE     READ WRITE CKSUM
    	ZFS-Pool                                      ONLINE       0     0     0
    	  mirror-0                                    ONLINE       0     0     0
    	    ata-WDC_WD40EZRZ-00GXCB0_WD-WCC7K6XD2C26  ONLINE       0     0     0
    	    sdb                                       ONLINE       0     0     0  (resilvering)
    
    errors: No known data errors
    

    OK, ist noch dran 🙂

    Jetzt so im Nachhinein betrachtet, bekomme ich ein wenig Kopfschmerzen, ob ich nicht auch besser die by-id benutzt hätte!?? Das weiß ich aktuell nicht, muss ich googeln.

    Was man machen könnte, das Laufwerk sdb detachen und dann mit by-id attachen. Aber, ob das Sinn macht???

    Hier ein netter Beitrag im Netz, was man machen kann wenn die Label falsch sind.

  • Open Source Software - Nur mit Luft & Liebe läuft es auch nicht rund

    Linux linux kde
    1
    0 Stimmen
    1 Beiträge
    183 Aufrufe
    Niemand hat geantwortet
  • ZFS - Wichtige Befehle

    Linux zfs linux
    3
    0 Stimmen
    3 Beiträge
    1k Aufrufe
    FrankMF
    Heute mal drüber gestolpert, das es auch so was geben kann. root@pve2:~# zpool status pool: pool_NAS state: ONLINE status: Some supported and requested features are not enabled on the pool. The pool can still be used, but some features are unavailable. action: Enable all features using 'zpool upgrade'. Once this is done, the pool may no longer be accessible by software that does not support the features. See zpool-features(7) for details. scan: scrub repaired 0B in 00:20:50 with 0 errors on Sun Apr 13 00:44:51 2025 config: NAME STATE READ WRITE CKSUM pool_NAS ONLINE 0 0 0 mirror-0 ONLINE 0 0 0 ata-WDC_WDS100T1R0A-68A4W0_230520800733 ONLINE 0 0 0 ata-WDC_WDS100T1R0A-68A4W0_230520801376 ONLINE 0 0 0 errors: No known data errors Was machen? Als erstes mal ein Backup angestoßen. Danach root@pve2:~# zpool get all pool_NAS | grep feature pool_NAS feature@async_destroy enabled local pool_NAS feature@empty_bpobj active local pool_NAS feature@lz4_compress active local pool_NAS feature@multi_vdev_crash_dump enabled local pool_NAS feature@spacemap_histogram active local pool_NAS feature@enabled_txg active local pool_NAS feature@hole_birth active local pool_NAS feature@extensible_dataset active local pool_NAS feature@embedded_data active local pool_NAS feature@bookmarks enabled local pool_NAS feature@filesystem_limits enabled local pool_NAS feature@large_blocks enabled local pool_NAS feature@large_dnode enabled local pool_NAS feature@sha512 enabled local pool_NAS feature@skein enabled local pool_NAS feature@edonr enabled local pool_NAS feature@userobj_accounting active local pool_NAS feature@encryption enabled local pool_NAS feature@project_quota active local pool_NAS feature@device_removal enabled local pool_NAS feature@obsolete_counts enabled local pool_NAS feature@zpool_checkpoint enabled local pool_NAS feature@spacemap_v2 active local pool_NAS feature@allocation_classes enabled local pool_NAS feature@resilver_defer enabled local pool_NAS feature@bookmark_v2 enabled local pool_NAS feature@redaction_bookmarks enabled local pool_NAS feature@redacted_datasets enabled local pool_NAS feature@bookmark_written enabled local pool_NAS feature@log_spacemap active local pool_NAS feature@livelist enabled local pool_NAS feature@device_rebuild enabled local pool_NAS feature@zstd_compress enabled local pool_NAS feature@draid enabled local pool_NAS feature@zilsaxattr disabled local pool_NAS feature@head_errlog disabled local pool_NAS feature@blake3 disabled local pool_NAS feature@block_cloning disabled local pool_NAS feature@vdev_zaps_v2 disabled local Das kommt von neuen Funktionen, die zu ZFS hinzugefügt wurden und bei Erstellung des Pools nicht vorhanden waren. Dann upgraden wir mal root@pve2:~# zpool upgrade pool_NAS This system supports ZFS pool feature flags. Enabled the following features on 'pool_NAS': zilsaxattr head_errlog blake3 block_cloning vdev_zaps_v2 Kontrolle root@pve2:~# zpool status pool: pool_NAS state: ONLINE scan: scrub repaired 0B in 00:20:50 with 0 errors on Sun Apr 13 00:44:51 2025 config: NAME STATE READ WRITE CKSUM pool_NAS ONLINE 0 0 0 mirror-0 ONLINE 0 0 0 ata-WDC_WDS100T1R0A-68A4W0_230520800733 ONLINE 0 0 0 ata-WDC_WDS100T1R0A-68A4W0_230520801376 ONLINE 0 0 0 errors: No known data errors Features kontrollieren root@pve2:~# zpool get all pool_NAS | grep feature pool_NAS feature@async_destroy enabled local pool_NAS feature@empty_bpobj active local pool_NAS feature@lz4_compress active local pool_NAS feature@multi_vdev_crash_dump enabled local pool_NAS feature@spacemap_histogram active local pool_NAS feature@enabled_txg active local pool_NAS feature@hole_birth active local pool_NAS feature@extensible_dataset active local pool_NAS feature@embedded_data active local pool_NAS feature@bookmarks enabled local pool_NAS feature@filesystem_limits enabled local pool_NAS feature@large_blocks enabled local pool_NAS feature@large_dnode enabled local pool_NAS feature@sha512 enabled local pool_NAS feature@skein enabled local pool_NAS feature@edonr enabled local pool_NAS feature@userobj_accounting active local pool_NAS feature@encryption enabled local pool_NAS feature@project_quota active local pool_NAS feature@device_removal enabled local pool_NAS feature@obsolete_counts enabled local pool_NAS feature@zpool_checkpoint enabled local pool_NAS feature@spacemap_v2 active local pool_NAS feature@allocation_classes enabled local pool_NAS feature@resilver_defer enabled local pool_NAS feature@bookmark_v2 enabled local pool_NAS feature@redaction_bookmarks enabled local pool_NAS feature@redacted_datasets enabled local pool_NAS feature@bookmark_written enabled local pool_NAS feature@log_spacemap active local pool_NAS feature@livelist enabled local pool_NAS feature@device_rebuild enabled local pool_NAS feature@zstd_compress enabled local pool_NAS feature@draid enabled local pool_NAS feature@zilsaxattr enabled local pool_NAS feature@head_errlog active local pool_NAS feature@blake3 enabled local pool_NAS feature@block_cloning enabled local pool_NAS feature@vdev_zaps_v2 enabled local So, alle neuen Features aktiviert. Jetzt kann der Pool weiterhin seine Arbeit machen.
  • Debian Buster 10.8 released

    Linux debian linux
    1
    0 Stimmen
    1 Beiträge
    255 Aufrufe
    Niemand hat geantwortet
  • OpenWRT - Zonen

    Verschoben OpenWRT & Ubiquiti ER-X openwrt linux
    2
    3
    0 Stimmen
    2 Beiträge
    743 Aufrufe
    FrankMF
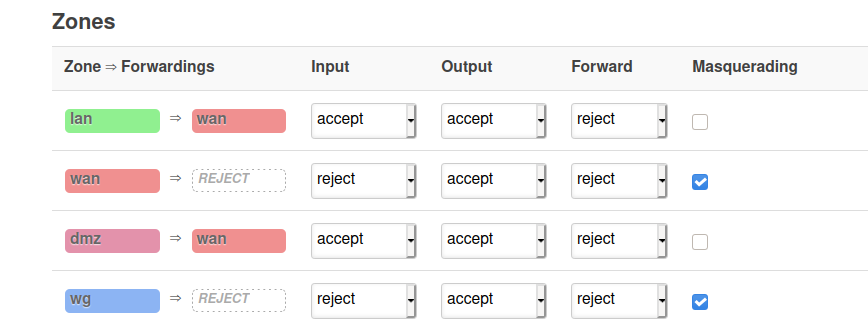
    Es ist was heller geworden [image: 1610188645165-7b86e97c-31a5-44b6-809f-25d9d1c2ee4a-image.png] Die besagte Forward Regel [image: 1610188840619-zonen.png] Diese Forward Regel zieht erst dann, wenn es mehrere Interfaces in einer Zone gibt. Aus der Doku INPUT rules for a zone describe what happens to traffic trying to reach the router itself through an interface in that zone. OUTPUT rules for a zone describe what happens to traffic originating from the router itself going through an interface in that zone. FORWARD rules for a zone describe what happens to traffic passing between different interfaces belonging in the same zone. Das heisst nun, das ein Forwarding zwischen zwei Zonen immer eine spezifische Regel unter Traffic Rules benötigt. Forwarding between zones always requires a specific rule. Somit ist ein Forwarding zwischen zwei Zonen in den Standard Einstellungen nicht erlaubt. Das kann ich hier auch so bestätigen. Das ist ja auch das was ich mit meiner "DMZ"-Zone erreichen möchte. Kein Zugriff auf LAN. Unter Zone ⇒ Forwardings kann man jetzt sehen, das das Forwarding von LAN in Richtung WAN und DMZ erlaubt ist. WAN ist logisch, sonst komme ich ja nicht ins Internet. DMZ habe ich eingestellt, damit ich auch Teilnehmer im DMZ Netz erreichen kann, wenn ich da mal ran muss. [image: 1610189307657-8a548c29-8bc5-4074-8099-66460bcea9a8-image.png] Stelle ich das jetzt so ein. [image: 1610189398985-dca8b393-f613-4cab-a377-ffbc2bb8ddf5-image.png] Dann kann ich von der DMZ Zone aus das LAN erreichen. Aha, so langsam verstehe ich Quelle: https://forum.openwrt.org/t/firewall-zones-and-settings/84369
  • ROCKPro64 - Projekt Wireguard Server

    Verschoben ROCKPro64 linux rockpro64 wireguard
    2
    2
    0 Stimmen
    2 Beiträge
    603 Aufrufe
    FrankMF
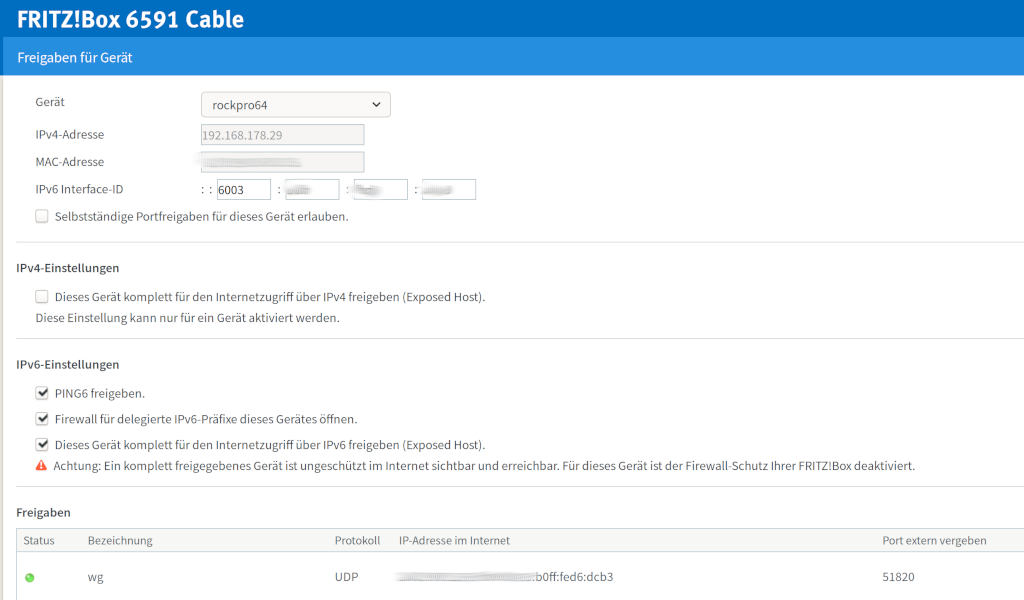
    Hat ein wenig Nerven gekostet und der Artikel ist auch was länger geworden Viel Spaß beim Lesen und testen!
  • Wenn dir der Redis-Server flöten geht....

    Verschoben Redis linux redis
    3
    0 Stimmen
    3 Beiträge
    703 Aufrufe
    FrankMF
    So, nach einer kleinen Pause und ein wenig nachdenken ist mir doch noch was eingefallen Backports! Man so einfach! nano /etc/apt/sources.list Das folgende eintragen. # backports deb http://deb.debian.org/debian stretch-backports main Danach ein apt update Und dann schauen wir uns mal die Version an.... apt -t stretch-backports search redis-server Sorting... Done Full Text Search... Done golang-github-stvp-tempredis-dev/stretch-backports 0.0~git20160122.0.83f7aae-1~bpo9+1 all Go package to start and stop temporary redis-server processes libtest-redisserver-perl/oldstable,oldstable 0.20-1 all redis-server runner for tests python-hiredis/oldstable,oldstable 0.2.0-1+b2 amd64 redis protocol reader for Python 2.X using hiredis python3-hiredis/oldstable,oldstable 0.2.0-1+b2 amd64 redis protocol reader for Python using hiredis redis/stretch-backports 5:5.0.3-3~bpo9+2 all Persistent key-value database with network interface (metapackage) redis-server/stretch-backports 5:5.0.3-3~bpo9+2 amd64 [residual-config] Persistent key-value database with network interface Und die habe ich gestern Abend gebaut. 127.0.0.1:6379> INFO # Server redis_version:5.0.5 Ok, das schmerzt jetzt
  • ACER und der UEFI-Booteintrag!

    Linux linux
    1
    0 Stimmen
    1 Beiträge
    254 Aufrufe
    Niemand hat geantwortet
  • tmate - Instant terminal sharing

    Linux linux
    2
    0 Stimmen
    2 Beiträge
    669 Aufrufe
    FrankMF
    Heute mal wieder benutzt, um bei meinem Bruder auf der Kiste nach dem Rechten zu schauen. Absolut genial. Sollte man evt. nicht zu "geheime" Sachen drüber schicken (meine die Leitung), aber für ein wenig Service ist das Tool wirklich super zu gebrauchen.