OpenWRT - Zonen
-
Was mir immer noch etwas Kopfschmerzen bereitet, ist die Firewall. Mal ein Beispiel.
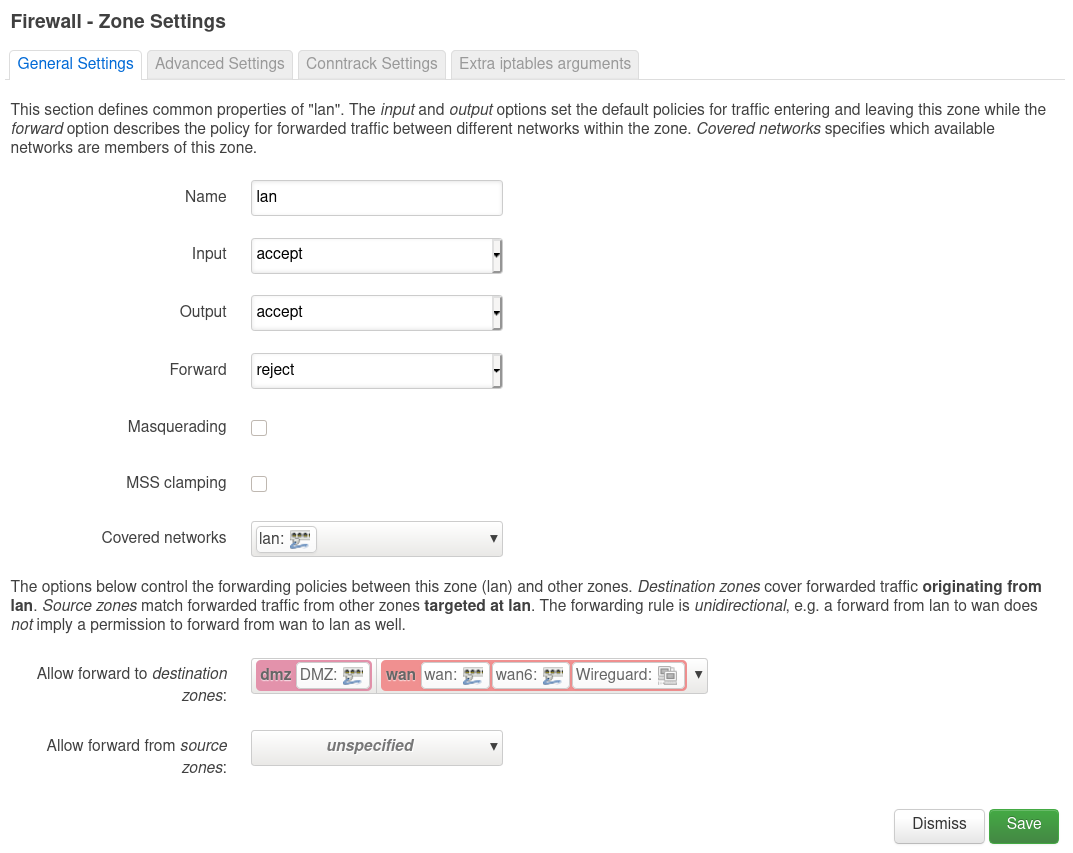
Ich habe zwei LANs, einmal LAN und einmal "DMZ". Wenn ich nun vom LAN aus Teilnehmer in der "DMZ" erreichen will, geht das so nicht. Dafür muss man die Einstellungen von LAN editieren.
Danach kann ich dann einen Teilnehmer aus der "DMZ" z.B. pingen.
frank@:~$ ping 192.168.5.99
PING 192.168.5.99 (192.168.5.99) 56(84) Bytes Daten.
64 Bytes von 192.168.5.99: icmp_seq=1 ttl=63 Zeit=0.707 ms
64 Bytes von 192.168.5.99: icmp_seq=2 ttl=63 Zeit=0.712 ms
^C
--- 192.168.5.99 ping statistics ---
2 Pakete übertragen, 2 empfangen, 0% Paketverlust, Zeit 1019ms
rtt min/avg/max/mdev = 0.707/0.709/0.712/0.002 ms
Ok, so weit verstanden. Aber wofür ist dann dieses Forward zuständig


Im Fediverse -> @FrankM@nrw.social
- NanoPi R5S
- Quartz64 Model B, 4GB RAM
- Quartz64 Model A, 4GB RAM
- RockPro64 v2.1
-
Was mir immer noch etwas Kopfschmerzen bereitet, ist die Firewall. Mal ein Beispiel.
Ich habe zwei LANs, einmal LAN und einmal "DMZ". Wenn ich nun vom LAN aus Teilnehmer in der "DMZ" erreichen will, geht das so nicht. Dafür muss man die Einstellungen von LAN editieren.
Danach kann ich dann einen Teilnehmer aus der "DMZ" z.B. pingen.
frank@:~$ ping 192.168.5.99
PING 192.168.5.99 (192.168.5.99) 56(84) Bytes Daten.
64 Bytes von 192.168.5.99: icmp_seq=1 ttl=63 Zeit=0.707 ms
64 Bytes von 192.168.5.99: icmp_seq=2 ttl=63 Zeit=0.712 ms
^C
--- 192.168.5.99 ping statistics ---
2 Pakete übertragen, 2 empfangen, 0% Paketverlust, Zeit 1019ms
rtt min/avg/max/mdev = 0.707/0.709/0.712/0.002 ms
Ok, so weit verstanden. Aber wofür ist dann dieses Forward zuständig
Es ist was heller geworden
")
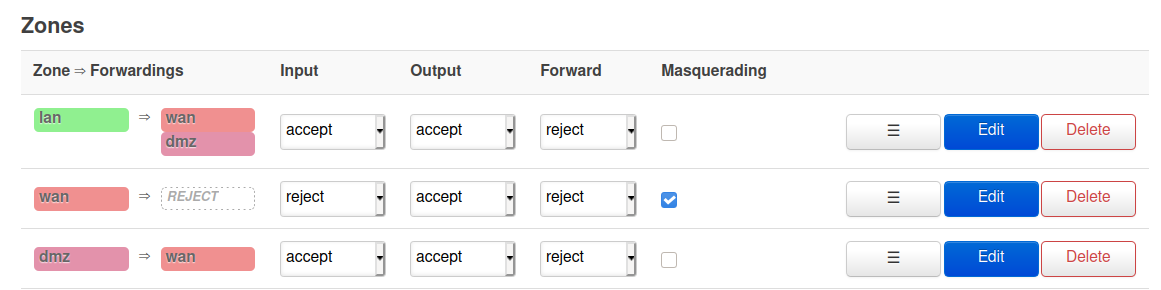
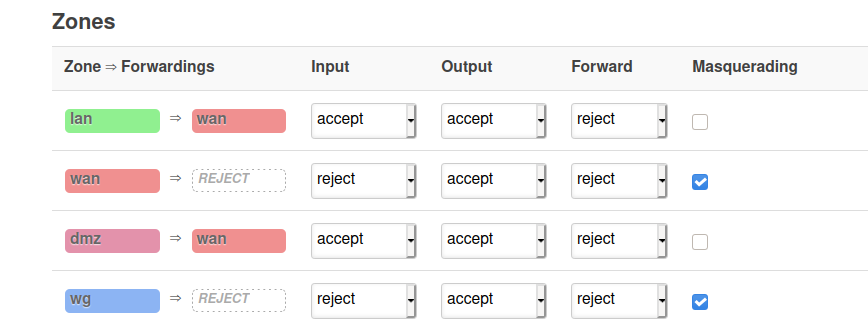
Die besagte Forward Regel
Diese Forward Regel zieht erst dann, wenn es mehrere Interfaces in einer Zone gibt. Aus der Doku
- INPUT rules for a zone describe what happens to traffic trying to reach the router itself through an interface in that zone.
- OUTPUT rules for a zone describe what happens to traffic originating from the router itself going through an interface in that zone.
- FORWARD rules for a zone describe what happens to traffic passing between different interfaces belonging in the same zone.
Das heisst nun, das ein Forwarding zwischen zwei Zonen immer eine spezifische Regel unter Traffic Rules benötigt.
Forwarding between zones always requires a specific rule.
Somit ist ein Forwarding zwischen zwei Zonen in den Standard Einstellungen nicht erlaubt. Das kann ich hier auch so bestätigen. Das ist ja auch das was ich mit meiner "DMZ"-Zone erreichen möchte. Kein Zugriff auf LAN.
Unter Zone ⇒ Forwardings kann man jetzt sehen, das das Forwarding von LAN in Richtung WAN und DMZ erlaubt ist. WAN ist logisch, sonst komme ich ja nicht ins Internet. DMZ habe ich eingestellt, damit ich auch Teilnehmer im DMZ Netz erreichen kann, wenn ich da mal ran muss.

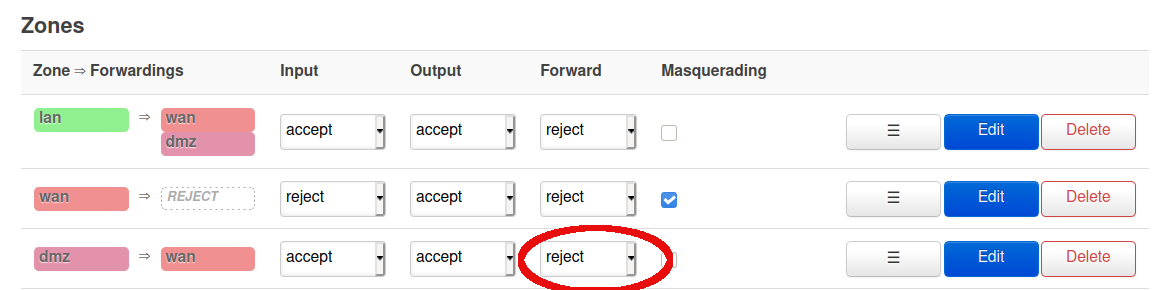
Stelle ich das jetzt so ein.

Dann kann ich von der DMZ Zone aus das LAN erreichen. Aha, so langsam verstehe ich
")
Quelle: https://forum.openwrt.org/t/firewall-zones-and-settings/84369
-
-
-
-
-
-
-
-
Redis Replication
Angeheftet Verschoben Redis