Skip to content

Ubiquiti ER-X - DMZ

Verschoben OpenWRT & Ubiquiti ER-X
  • Wie ich schon geschrieben hatte, betreibe ich das bei mir zu Hause so.

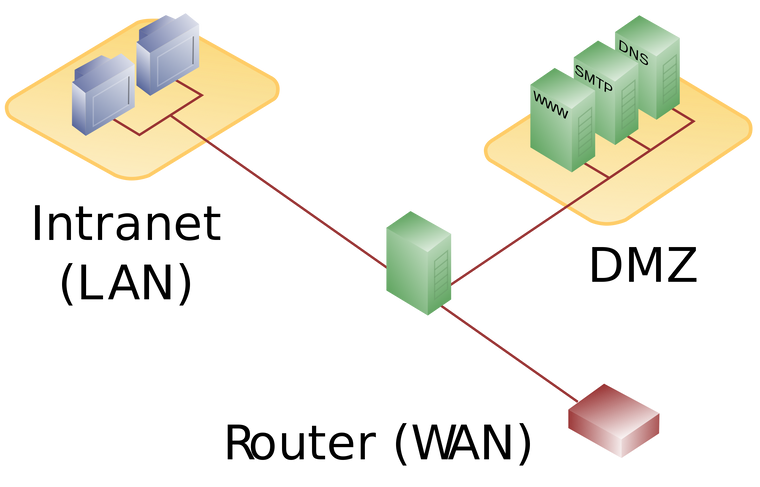
    DMZ_network_diagram_1_firewall.svg.png
    Bildquelle

    Im LAN sind alle vertrauenswürdigen Geräte. In der DMZ befinden sich alle Geräte, die ich als nicht vertrauenswürdig einstufe. Also, Playstation, TV usw.

    Meine Konfiguration sieht so aus /etc/config/network

    config interface 'loopback'
            option ifname 'lo'
            option proto 'static'
            option ipaddr '127.0.0.1'
            option netmask '255.0.0.0'
    
    config globals 'globals'
            option ula_prefix 'fdd5:a13b:e125::/48'
    
    config interface 'lan'
            option type 'bridge'
            option ifname 'eth0.1'
            option proto 'static'
            option ipaddr '192.168.1.1'
            option netmask '255.255.255.0'
            option ip6assign '60'
            option ip6hint '0'
    
    config device 'lan_eth0_1_dev'
            option name 'eth0.1'
            option macaddr 'XX:xx:b9:a7:8b:23'
    
    config interface 'wan'
            option ifname 'eth0.2'
            option proto 'dhcp'
    
    config device 'wan_eth0_2_dev'
            option name 'eth0.2'
            option macaddr 'XX:xx:b9:a7:8b:24'
    
    config interface 'wan6'
            option ifname 'eth0.2'
            option proto 'dhcpv6'
    
    config switch
            option name 'switch0'
            option reset '1'
            option enable_vlan '1'
    
    config switch_vlan
            option device 'switch0'
            option vlan '1'
            option vid '1'
            option ports '1 2 3 6t'
    
    config switch_vlan
            option device 'switch0'
            option vlan '2'
            option ports '0 6t'
            option vid '2'
    
    config switch_vlan
            option device 'switch0'
            option vlan '3'
            option ports '4 6t'
            option vid '3'
    
    config interface 'DMZ'
            option ifname 'eth0.3'
            option proto 'static'
            option ip6assign '64'
            option ip6hint '1'
            list ipaddr '192.168.2.1/24'
    

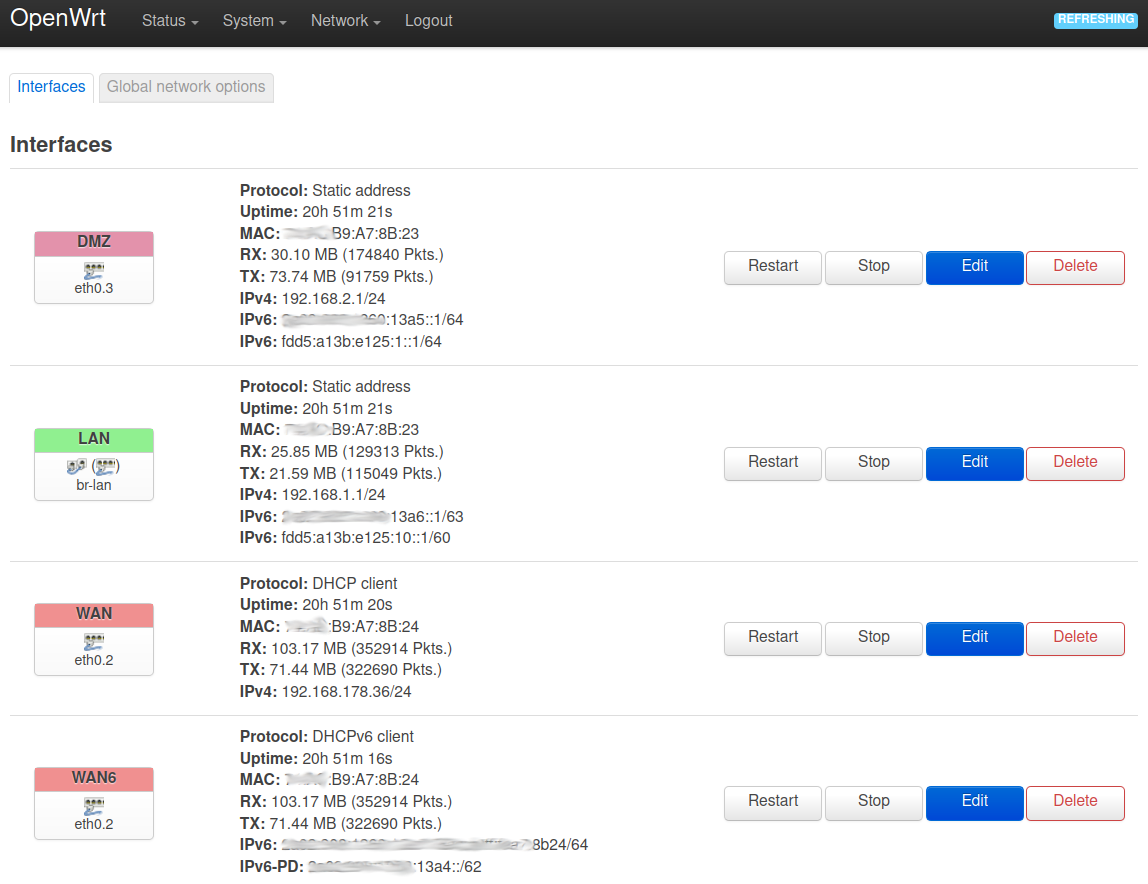
    Das ergibt dann folgende Interfaces.

    pic009.png

    Auf dem Port eth4 befindet sich jetzt die DMZ. Ein DHCP Server verteilt Adressen. Auch die IPv6 Adresse wird ordentlich eingetragen.

    Weitere Beiträge zum Thema ER-X

    Vorstellung
    Installation
    Switch

  • 0 Stimmen
    1 Beiträge
    2k Aufrufe
    Niemand hat geantwortet
  • Nextcloud - Upgrade auf Bookworm 12

    Angeheftet Verschoben Nextcloud
    1
    0 Stimmen
    1 Beiträge
    1k Aufrufe
    Niemand hat geantwortet
  • Mainline 5.13.x

    Images
    1
    0 Stimmen
    1 Beiträge
    196 Aufrufe
    Niemand hat geantwortet
  • Docker - Portainer

    Linux
    3
    0 Stimmen
    3 Beiträge
    711 Aufrufe
    FrankMF

    Dann grabe ich das mal wieder aus 😉

    Bedingt durch den Wegfall meines Proxmox, musste ich mir Gedanken darüber machen, wie ein paar Dienste auch weiterhin laufen sollen. Um mal die zwei wichtigsten zu nennen.

    checkmk DokuWiki

    Diese sollen später, wenn der zweite NanoPi R5S aus China da ist, dort laufen. Da der aber mit der Schneckenpost kommt, kann man ja in der Zwischenzeit mal wieder mit Docker spielen.

    Ich erinnerte mich daran, das checkmk eine sehr gute Anleitung hat, so das ich das mal wieder ausprobierte. Klappte einwandfrei. Dann erinnerte mich an Portainer und dachte mir, das probiere ich mal wieder aus 🙂

    1d2dc9b3-ad71-45c5-b552-72c88a1bf773-grafik.png

    Ich hatte übrigens die Endpoints gesucht und nicht gefunden, die heißen jetzt Environments. Auf dem Bild ist noch keiner eingerichtet.

    4bdbf196-1b36-4e65-94d0-0e56daa473bf-grafik.png

    Irgendwie ist das wirklich richtig gute Software. Ich mag den Portainer und auch als selbst ausgebildeter ITler 😉 kommt man damit sehr schnell ganz gut zurecht.

    Ja, man kann die ganzen Docker Befehle auch über die Konsole eingeben, was ich normalerweise auch mit ganz vielen Dingen mache, aber das macht hier einfach Spaß. Man hat auch schnell einen guten Überblick was wo läuft usw.

    Wer so was sucht, einfach mal ausprobieren. Klare Empfehlung von mir.

  • Ubiquiti ER-X - iperf

    Verschoben OpenWRT & Ubiquiti ER-X
    2
    0 Stimmen
    2 Beiträge
    282 Aufrufe
    FrankMF

    Hier noch ein Test von DMZ / LAN und andersrum.

    frank@frank-MS-7C37:~$ iperf3 -c 192.168.5.15 Connecting to host 192.168.5.15, port 5201 [ 5] local 192.168.3.213 port 44052 connected to 192.168.5.15 port 5201 [ ID] Interval Transfer Bitrate Retr Cwnd [ 5] 0.00-1.00 sec 114 MBytes 952 Mbits/sec 314 153 KBytes [ 5] 1.00-2.00 sec 112 MBytes 937 Mbits/sec 259 205 KBytes [ 5] 2.00-3.00 sec 111 MBytes 929 Mbits/sec 210 212 KBytes [ 5] 3.00-4.00 sec 111 MBytes 934 Mbits/sec 235 202 KBytes [ 5] 4.00-5.00 sec 112 MBytes 936 Mbits/sec 263 153 KBytes [ 5] 5.00-6.00 sec 111 MBytes 935 Mbits/sec 255 209 KBytes [ 5] 6.00-7.00 sec 112 MBytes 937 Mbits/sec 313 129 KBytes [ 5] 7.00-8.00 sec 111 MBytes 932 Mbits/sec 296 209 KBytes [ 5] 8.00-9.00 sec 111 MBytes 934 Mbits/sec 258 208 KBytes [ 5] 9.00-10.00 sec 111 MBytes 934 Mbits/sec 292 201 KBytes - - - - - - - - - - - - - - - - - - - - - - - - - [ ID] Interval Transfer Bitrate Retr [ 5] 0.00-10.00 sec 1.09 GBytes 936 Mbits/sec 2695 sender [ 5] 0.00-10.00 sec 1.09 GBytes 935 Mbits/sec receiver iperf Done. frank@frank-MS-7C37:~$ iperf3 -R -c 192.168.5.15 Connecting to host 192.168.5.15, port 5201 Reverse mode, remote host 192.168.5.15 is sending [ 5] local 192.168.3.213 port 44058 connected to 192.168.5.15 port 5201 [ ID] Interval Transfer Bitrate [ 5] 0.00-1.00 sec 109 MBytes 911 Mbits/sec [ 5] 1.00-2.00 sec 109 MBytes 912 Mbits/sec [ 5] 2.00-3.00 sec 109 MBytes 912 Mbits/sec [ 5] 3.00-4.00 sec 109 MBytes 912 Mbits/sec [ 5] 4.00-5.00 sec 109 MBytes 912 Mbits/sec [ 5] 5.00-6.00 sec 108 MBytes 903 Mbits/sec [ 5] 6.00-7.00 sec 109 MBytes 912 Mbits/sec [ 5] 7.00-8.00 sec 109 MBytes 912 Mbits/sec [ 5] 8.00-9.00 sec 109 MBytes 912 Mbits/sec [ 5] 9.00-10.00 sec 109 MBytes 912 Mbits/sec - - - - - - - - - - - - - - - - - - - - - - - - - [ ID] Interval Transfer Bitrate Retr [ 5] 0.00-10.00 sec 1.06 GBytes 913 Mbits/sec 114 sender [ 5] 0.00-10.00 sec 1.06 GBytes 911 Mbits/sec receiver iperf Done.
  • Restic - forget --keep-last 3 --prune

    Restic
    2
    0 Stimmen
    2 Beiträge
    608 Aufrufe
    FrankMF

    Ich habe mich damit noch ein wenig beschäftigt, die letzten drei zu behalten, ist nicht so optimal. Da es viele Optionen bei dem Befehl gibt, hier ein Ausschnitt

    Flags: -l, --keep-last n keep the last n snapshots -H, --keep-hourly n keep the last n hourly snapshots -d, --keep-daily n keep the last n daily snapshots -w, --keep-weekly n keep the last n weekly snapshots -m, --keep-monthly n keep the last n monthly snapshots -y, --keep-yearly n keep the last n yearly snapshots

    habe ich das ein wenig so angepasst, das ich denke es passt für mich.

    restic --password-file /root/passwd -r /media/NAS_neu/Restic/Home/ forget --keep-last 3 --keep-monthly 3 --prune

    Damit behalte ich auch die jeweils eines pro Monat. Und die letzten drei. Das sieht dann so aus.

    root@debian:~# ./backup2.sh repository 2f3f6147 opened successfully, password is correct Files: 38 new, 100 changed, 13268 unmodified Dirs: 0 new, 1 changed, 0 unmodified Added to the repo: 10.166 GiB processed 13406 files, 50.324 GiB in 3:24 snapshot 849f614c saved repository 2f3f6147 opened successfully, password is correct Applying Policy: keep the last 3 snapshots, 3 monthly snapshots snapshots for (host [debian], paths [/home/frank]): keep 5 snapshots: ID Time Host Tags Reasons Paths ------------------------------------------------------------------------------------ a7251cfd 2019-11-28 17:00:01 debian monthly snapshot /home/frank 283d4027 2019-12-31 17:00:01 debian monthly snapshot /home/frank ae2b96ec 2020-01-01 21:47:46 debian last snapshot /home/frank 079e00a6 2020-01-02 17:00:01 debian last snapshot /home/frank 849f614c 2020-01-03 21:08:45 debian last snapshot /home/frank monthly snapshot ------------------------------------------------------------------------------------ 5 snapshots remove 26 snapshots: ID Time Host Tags Paths ------------------------------------------------------------------ 896f16c2 2019-11-07 22:23:40 debian /home/frank b21bcf6d 2019-11-11 17:00:01 debian /home/frank f89248fb 2019-11-12 17:00:01 debian /home/frank 123ab546 2019-11-13 17:00:01 debian /home/frank b82d87d0 2019-11-18 17:00:01 debian /home/frank 040b0ab7 2019-11-19 17:00:01 debian /home/frank 7221d8ef 2019-11-20 17:00:01 debian /home/frank 84132a25 2019-11-21 17:00:01 debian /home/frank b558a52c 2019-11-25 17:00:01 debian /home/frank e5cc0c3e 2019-12-02 17:00:01 debian /home/frank 22423fa5 2019-12-03 17:00:01 debian /home/frank 39df1ab9 2019-12-04 17:00:01 debian /home/frank 98843457 2019-12-05 17:00:01 debian /home/frank b0cdd4b6 2019-12-09 17:00:01 debian /home/frank 828414f9 2019-12-10 17:00:01 debian /home/frank e34a27c3 2019-12-11 17:00:01 debian /home/frank 6e488c3b 2019-12-12 17:00:01 debian /home/frank 17898403 2019-12-16 17:00:01 debian /home/frank 1973305a 2019-12-17 17:00:01 debian /home/frank 9553bedd 2019-12-18 17:00:01 debian /home/frank fedf749d 2019-12-19 17:00:01 debian /home/frank 8e7cb876 2019-12-23 17:00:01 debian /home/frank 0bd0d102 2019-12-25 17:00:01 debian /home/frank 13d348b0 2019-12-26 17:00:01 debian /home/frank c7d960aa 2019-12-30 17:00:01 debian /home/frank f6ea9118 2020-01-01 17:00:01 debian /home/frank ------------------------------------------------------------------ 26 snapshots 26 snapshots have been removed, running prune counting files in repo building new index for repo [0:35] 100.00% 7806 / 7806 packs repository contains 7806 packs (46537 blobs) with 41.110 GiB processed 46537 blobs: 0 duplicate blobs, 0 B duplicate load all snapshots find data that is still in use for 5 snapshots [0:01] 100.00% 5 / 5 snapshots found 32654 of 46537 data blobs still in use, removing 13883 blobs will remove 0 invalid files will delete 715 packs and rewrite 752 packs, this frees 5.027 GiB [2:28] 100.00% 752 / 752 packs rewritten counting files in repo [0:01] 100.00% 6571 / 6571 packs finding old index files saved new indexes as [d137b425 f7caee99 a6e9711a] remove 35 old index files [1:13] 100.00% 1467 / 1467 packs deleted done using temporary cache in /tmp/restic-check-cache-916655151 repository 2f3f6147 opened successfully, password is correct created new cache in /tmp/restic-check-cache-916655151 create exclusive lock for repository load indexes check all packs check snapshots, trees and blobs read all data [7:47] 100.00% 6571 / 6571 items duration: 7:47 no errors were found root@debian:~#

    Am Ende seht ihr noch, wie Restic alle Files testet. Mein Script sieht jetzt so aus.

    #!/bin/bash # Script um mit Restic Daten automatisiert zu sichern! # Dient zum Sichern der Homepartition auf dem ROCKPro64 NAS! # Was soll gesichert werden? backup_pfad=/home/frank # Programm Start restic --password-file /root/passwd -r /media/NAS_neu/Restic/Home/ backup $backup_pfad --exclude-file=excludes.txt restic --password-file /root/passwd -r /media/NAS_neu/Restic/Home/ forget --keep-last 3 --keep-monthly 3 --prune # Testen restic --password-file /root/passwd -r /media/NAS_neu/Restic/Home/ check --read-data

    Das dann schön mit einem Cronjob laufen lassen und die Datensicherung ist erledigt 😉

  • SCP mit IPv6 nutzen

    Linux
    1
    0 Stimmen
    1 Beiträge
    229 Aufrufe
    Niemand hat geantwortet
  • Restic - Update

    Restic
    1
    0 Stimmen
    1 Beiträge
    416 Aufrufe
    Niemand hat geantwortet