Skip to content

Proxmox Setup 2025

Proxmox
1 1 42
  • Ja, so als Server Spielkind baut man ab und zu, einfach alles um 🙂

    Zuletzt lief mein Proxmox auf folgender Hardware -> https://linux-nerds.org/topic/1450/asrock-n100dc-itx

    Mein Bericht damals zum Umzug auf die neue Hardware -> https://linux-nerds.org/topic/1452/proxmox-umzug-auf-neue-hardware-asrock-n100dc-itx/8

    Lief alles tadellos, aber ich brauchte etwas schnelleres und mit mehr RAM. Ja, das kostet leider auch etwas mehr Strom 😞 (ca. 38W mit meinem aktuellen Ausbau)

    Ich habe hier ein Mini-ITX MSI B550i rumliegen. Das war jetzt auserkoren, meinen Proxmox zu beherbergen. Mein Netzwerksetup sieht ein drei LAN-Schnittstellen Setup vor.

    • WAN
    • LAN
    • OPT1

    Auf dem Board ist eine 2.5G Schnittstelle drauf, die macht dann WAN. Jetzt brauchte ich eine PCIe Karte mit zwei LAN Schnittstellen. Ich wollte die 1G nicht mehr nutzen, man muss ja auch was testen 😉

    Meine Wahl fiel auf diese PCIe- Karte -> https://www.amazon.de/dp/B0C4H4KCRJ?th=1
    Die Karte beinhaltet 2 * RTL8125B Controller.

    Danach pfSense eingerichtet, bzw. den Dump restored. Die Hardware an die neuen Netzwerkkarten angepasst und fertig. Gestartet - läuft.

    Schnell noch ein Speedtest

    root@nas:~# iperf3 -s
    -----------------------------------------------------------
    Server listening on 5201 (test #1)
    -----------------------------------------------------------
    ^Ciperf3: interrupt - the server has terminated
    root@nas:~# iperf3 -c 192.168.3.213
    Connecting to host 192.168.3.213, port 5201
    [  5] local 192.168.3.19 port 33950 connected to 192.168.3.213 port 5201
    [ ID] Interval           Transfer     Bitrate         Retr  Cwnd
    [  5]   0.00-1.00   sec   281 MBytes  2.36 Gbits/sec    0   3.58 MBytes       
    [  5]   1.00-2.00   sec   280 MBytes  2.35 Gbits/sec    0   3.58 MBytes       
    [  5]   2.00-3.00   sec   279 MBytes  2.34 Gbits/sec    0   3.58 MBytes       
    [  5]   3.00-4.00   sec   280 MBytes  2.35 Gbits/sec    0   3.58 MBytes       
    [  5]   4.00-5.00   sec   279 MBytes  2.34 Gbits/sec    0   3.58 MBytes       
    [  5]   5.00-6.00   sec   280 MBytes  2.35 Gbits/sec    0   3.58 MBytes       
    [  5]   6.00-7.00   sec   279 MBytes  2.34 Gbits/sec  184   2.70 MBytes       
    [  5]   7.00-8.00   sec   280 MBytes  2.35 Gbits/sec    0   2.91 MBytes       
    [  5]   8.00-9.00   sec   279 MBytes  2.34 Gbits/sec    0   3.08 MBytes       
    [  5]   9.00-10.00  sec   280 MBytes  2.35 Gbits/sec    0   3.22 MBytes       
    - - - - - - - - - - - - - - - - - - - - - - - - -
    [ ID] Interval           Transfer     Bitrate         Retr
    [  5]   0.00-10.00  sec  2.73 GBytes  2.35 Gbits/sec  184             sender
    [  5]   0.00-10.01  sec  2.73 GBytes  2.34 Gbits/sec                  receiver
    
    iperf Done.
    root@nas:~# iperf3 -R -c 192.168.3.213
    Connecting to host 192.168.3.213, port 5201
    Reverse mode, remote host 192.168.3.213 is sending
    [  5] local 192.168.3.19 port 59378 connected to 192.168.3.213 port 5201
    [ ID] Interval           Transfer     Bitrate
    [  5]   0.00-1.00   sec   280 MBytes  2.35 Gbits/sec                  
    [  5]   1.00-2.00   sec   280 MBytes  2.35 Gbits/sec                  
    [  5]   2.00-3.00   sec   280 MBytes  2.35 Gbits/sec                  
    [  5]   3.00-4.00   sec   280 MBytes  2.35 Gbits/sec                  
    [  5]   4.00-5.00   sec   280 MBytes  2.35 Gbits/sec                  
    [  5]   5.00-6.00   sec   280 MBytes  2.35 Gbits/sec                  
    [  5]   6.00-7.00   sec   280 MBytes  2.35 Gbits/sec                  
    [  5]   7.00-8.00   sec   280 MBytes  2.35 Gbits/sec                  
    [  5]   8.00-9.00   sec   280 MBytes  2.35 Gbits/sec                  
    [  5]   9.00-10.00  sec   280 MBytes  2.35 Gbits/sec                  
    - - - - - - - - - - - - - - - - - - - - - - - - -
    [ ID] Interval           Transfer     Bitrate         Retr
    [  5]   0.00-10.00  sec  2.74 GBytes  2.35 Gbits/sec    0             sender
    [  5]   0.00-10.00  sec  2.74 GBytes  2.35 Gbits/sec                  receiver
    
    iperf Done.
    

    Und wer sich jetzt fragt, was ich als Switch genommen habe -> https://www.amazon.de/dp/B0CFQKYDRM

    Ein China Teil, was laut Kommentaren furchtbar heiß werden soll. In meinem Setup gar nicht. In den Kommentaren schreiben viele, das sie das Webinterface schlecht erreichen konnte. War kein Problem, man sollte halt auch im selben Netzwerk sein. Läuft jetzt hier seit einer Woche ohne Probleme.

    Setup Proxmox

    68eb573d-ca8e-462d-9903-4e8afaf6bea6-grafik.png

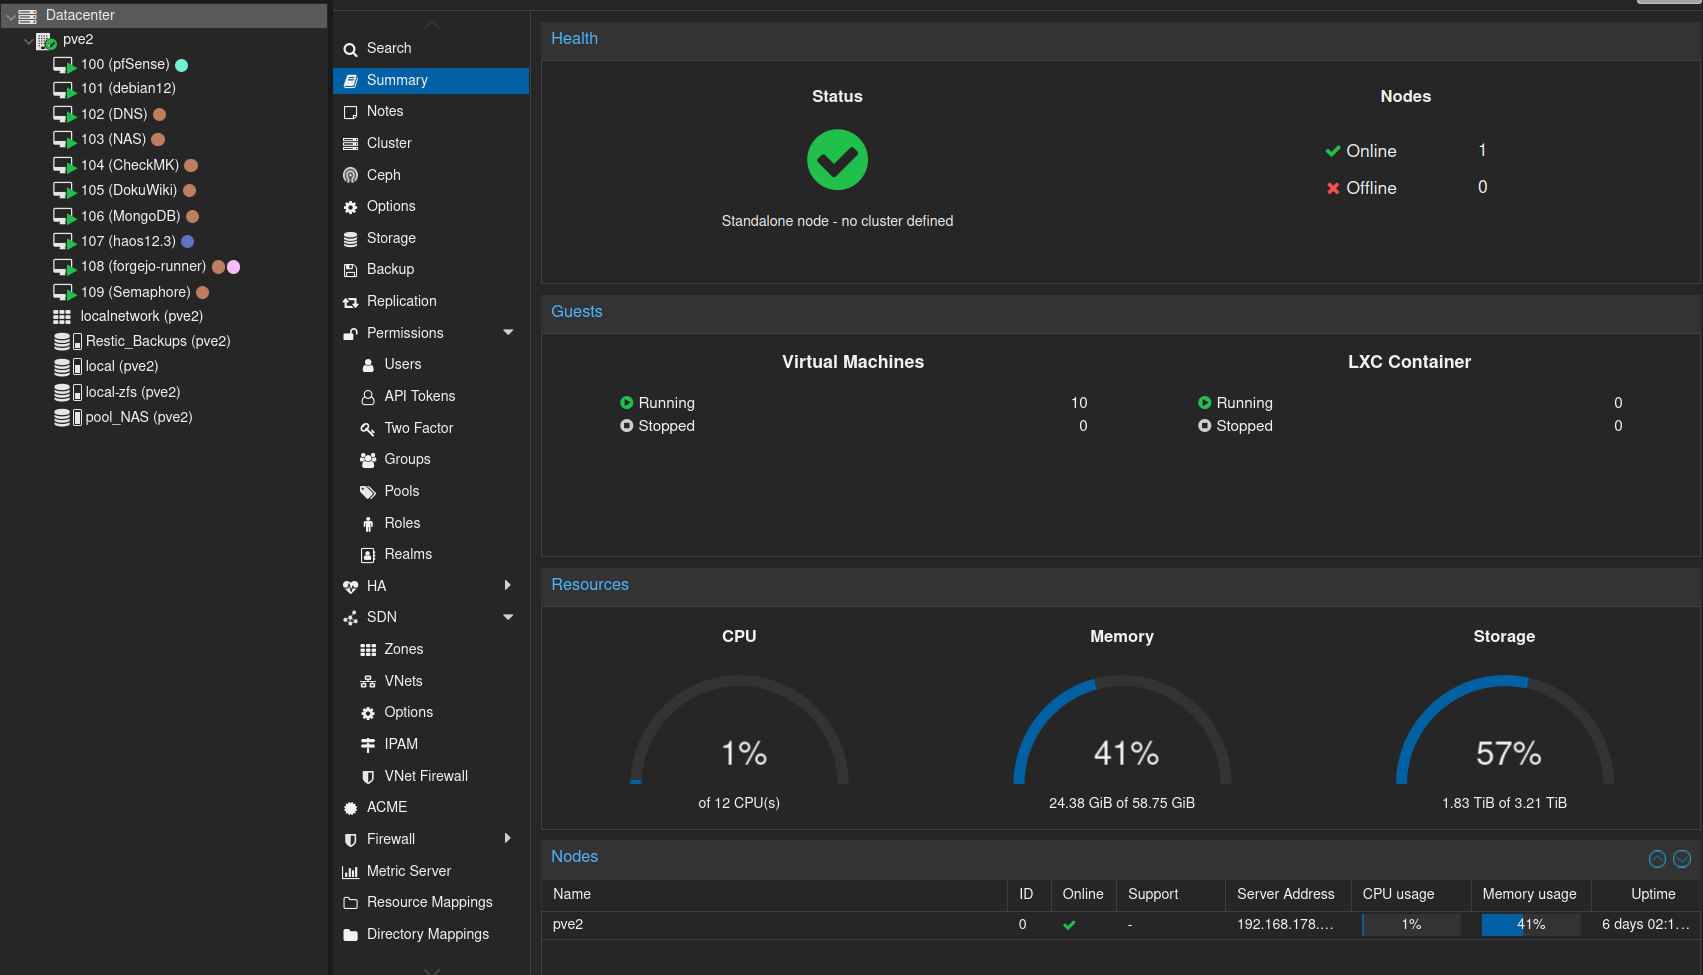
    Den Proxmox eingerichtet, das ist ja jetzt nicht so die Herausforderung. Auf dem Board sind zwei NVMe Steckplätze, die auch beide bestückt sind, So mit 500GB jeweils.

    Da bot es sich an, bei der Installation eine ZFS Raid 1 Installation vorzunehmen. Das habe ich dann auch so gemacht. Macht dann

    root@pve2:~# dd if=/dev/zero of=test.img bs=1M count=4096 conv=fdatasync
    4096+0 records in
    4096+0 records out
    4294967296 bytes (4.3 GB, 4.0 GiB) copied, 1.08774 s, 3.9 GB/s
    

    Restore VMs

    Das ist wirklich so mit das Einfachste was es gibt. Mit scp vom alten Proxmox alle Dumps auf den Neuen kopiert. Dann braucht man den letzten Dump nur Auswählen auf Restore klicken, Datenspeicher auswählen und fertig.

    b25eb59a-e40f-412b-aa6e-dedccd9b2a18-grafik.png

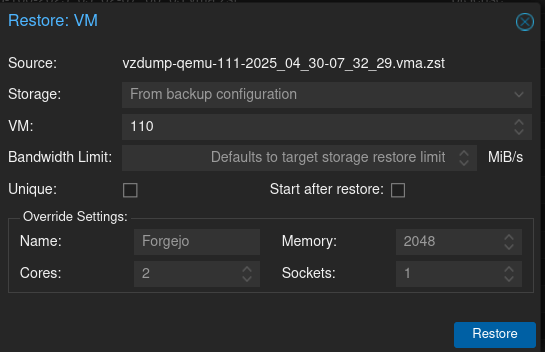
    Gut, das war jetzt nicht so die Herausforderung.

    NAS ZFS Pool

    Mein NAS beinhaltet einen ZFS Pool Raid 1, den ich damals mit Proxmox angelegt hatte und dann an die VM durchreiche. Ok, wie bekomme ich das auf den neuen Proxmox?

    Man kopiert die Einstellung vom alten Proxmox.

    zfspool: pool_NAS
            pool pool_NAS
            content rootdir,images
            mountpoint /pool_NAS
            nodes pve2
    

    Man achtet auf den richtigen Namen bei nodes

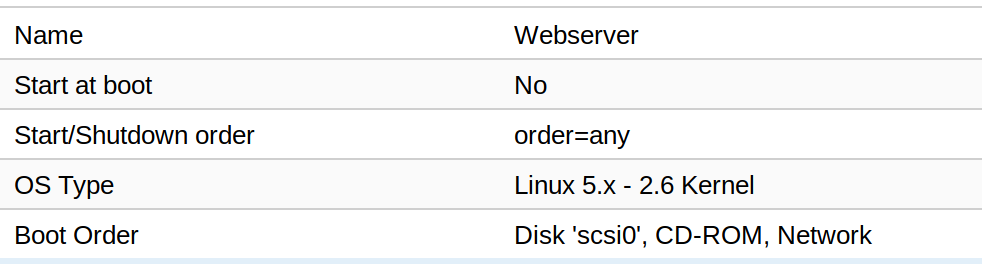
    Danach muss man den Pool an die VM dran hängen. Meine neue VM für das NAS hat die ID 103, die alte hatte die ID 106. Ich habe das so gelassen, weil ich nicht wusste ob ich den Namen einfach so anpassen konnte. War aber nicht nötig, weil es auch so gut funktionierte.

    qm set 103 --virtio0 /dev/zvol/pool_NAS/vm-106-disk-0
    

    0cc08e40-76d3-4292-9cf1-91ffefafe417-grafik.png

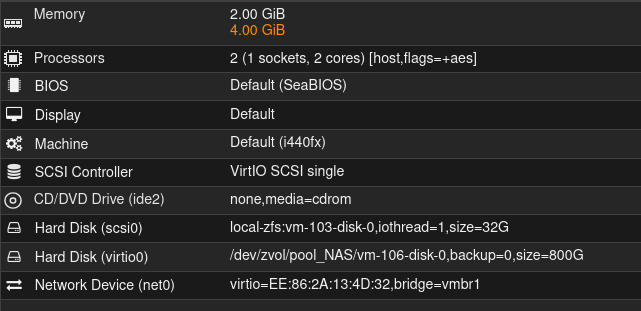
    Der Rest war dann ganz normale Arbeit, VMs restoren, Backups einrichten, Domains konfigurieren, Mail Setup usw.

  • Linux security update [DSA 5658-1]

    Linux linux
    1
    0 Stimmen
    1 Beiträge
    270 Aufrufe
    Niemand hat geantwortet
  • MongoDB - Erste Erfahrungen

    Linux mongodb linux ki-generiert
    2
    2
    0 Stimmen
    2 Beiträge
    219 Aufrufe
    FrankMF
    So frisch von der MongoDB Front und wieder viel gelernt, weil beim Üben macht man Fehler Oben war ja mongodump & mongorestore von der KI empfohlen. Hier das wie ich es gemacht habe. mongodump frank@redis-stack:~$ mongodump -u frank -p '<password>' --host 192.168.3.9 --authenticationDatabase admin -d portfolio -o mongodump/ 2024-04-06T09:29:25.174+0200 writing portfolio.stockList to mongodump/portfolio/stockList.bson 2024-04-06T09:29:25.175+0200 writing portfolio.users to mongodump/portfolio/users.bson 2024-04-06T09:29:25.175+0200 done dumping portfolio.stockList (8 documents) 2024-04-06T09:29:25.176+0200 writing portfolio.total_sum to mongodump/portfolio/total_sum.bson 2024-04-06T09:29:25.177+0200 done dumping portfolio.total_sum (1 document) 2024-04-06T09:29:25.177+0200 writing portfolio.old_total_sum to mongodump/portfolio/old_total_sum.bson 2024-04-06T09:29:25.177+0200 writing portfolio.stocks to mongodump/portfolio/stocks.bson 2024-04-06T09:29:25.177+0200 done dumping portfolio.users (4 documents) 2024-04-06T09:29:25.178+0200 writing portfolio.settings to mongodump/portfolio/settings.bson 2024-04-06T09:29:25.178+0200 done dumping portfolio.settings (1 document) 2024-04-06T09:29:25.179+0200 done dumping portfolio.old_total_sum (1 document) 2024-04-06T09:29:25.179+0200 done dumping portfolio.stocks (34 documents) mongorestore mongorestore -u frank -p '<password>' --host 192.168.3.9 --authenticationDatabase admin -d portfolio mongodump/meineDatenbank/ Hier wird die Datensicherung mongodump/meineDatenbank/ in die neue Datenbank portfolio transferiert. Grund für das Ganze? Mich hatte der Datenbank Name meineDatenbank gestört. Benutzerrechte Jetzt der Teil wo man schnell was falsch machen kann Ich hatte also die neue Datenbank, konnte sie aber nicht lesen. Fehlten halt die Rechte. Ich hatte dann so was hier gemacht. db.updateUser("frank", { roles: [ { role: "readWrite", db: "meineDatenbank" }, { role: "readWrite", db: "portfolio" }]}) Ging auch prima, kam ein ok zurück. Nun das Problem, ich hatte beim Einrichten, den User frank als admin benutzt. Durch den oben abgesetzten Befehl (frank ist ja admin), wurden die neuen Rechte gesetzt und die Rechte als Admin entzogen!! Das war jetzt nicht wirklich das was ich gebrauchen konnte. LOL Ich hatte jetzt keine Kontrolle mehr über die DB. Das war aber nicht so wirklich kompliziert, das wieder zu ändern. Die Authentication temporär abstellen. Also /etc/mongod.conf editieren und #security: security.authorization: enabled eben mal auskommentieren. Den Daemon neustarten und anmelden an der DB. mongosh --host 192.168.3.9 Danach neuen User anlegen db.createUser({ user: "<name>", pwd: "<password>", roles: [ { role: "userAdminAnyDatabase", db: "admin" } ] }) mongod.conf wieder ändern und neustarten. Danach hat man wieder eine DB mit Authentifizierung und einen neuen Admin. Ich bin diesmal, man lernt ja, anders vorgegangen. Es gibt nun einen Admin für die DB und einen User zum Benutzen der Datenbanken! So wie man es auch auf einem produktiven System auch machen würde. Wenn ich jetzt mal was an den Benutzerrechten des Users ändere, kann mir das mit dem Admin nicht mehr passieren. Hoffe ich
  • Update 1.30.2 released

    Vaultwarden vaultwarden linux
    1
    0 Stimmen
    1 Beiträge
    120 Aufrufe
    Niemand hat geantwortet
  • Fritzbox - Proxmox - pfSense - IPv6

    Verschoben Linux fritzbox proxmox pfsense ipv6
    1
    10
    0 Stimmen
    1 Beiträge
    679 Aufrufe
    Niemand hat geantwortet
  • Ubuntu Cinnamon Remix 21.04

    Linux ubuntu cinnamon linux
    2
    1
    0 Stimmen
    2 Beiträge
    338 Aufrufe
    FrankMF
    Nach einem kurzen Test denke ich, das für das Projekt noch eine Menge Arbeit wartet. Verschlüsselte Installation Geht nicht, nach Reboot klappt die Passwortabfrage nicht Unverschlüsselte Installation Ok, nachdem ich dann die Zeichensatzprobleme im Griff hatte, warum bekommt man das eigentlich nicht in den Griff?, hatte ich nach der zweiten Installation eine funktionierende Installation. Kurz Fazit Dringend den Installer überarbeiten. Die Ubuntu Installation funktioniert auf dem Rechner problemlos. Der Desktop gefällt mir auf den ersten Blick ganz gut. Kein Wunder, man fühlt sich ja sofort zu Hause Aktuell in meinen Augen produktiv nicht einsetzbar! Und HiDPi habe ich noch gar nicht getestet...
  • ROCKPro64 - Debian Bullseye Teil 1

    ROCKPro64 debian linux rockpro64
    17
    4
    0 Stimmen
    17 Beiträge
    2k Aufrufe
    FrankMF
    Durch diesen Beitrag ist mir mal wieder eingefallen, das wir das erneut testen könnten Also die aktuellen Daten von Debian gezogen. Das Image gebaut, könnt ihr alles hier im ersten Beitrag nachlesen. Da die eingebaute Netzwerkschnittstelle nicht erkannt wurde, habe ich mal wieder den USB-to-LAN Adapter eingesetzt. Bus 005 Device 002: ID 0b95:1790 ASIX Electronics Corp. AX88179 Gigabit Ethernet Die Installation wollte ich auf einem NVMe Riegel installieren. Die Debian Installation durchgezogen und nach erfolgreicher Installation neugestartet. Und siehe da, ohne das man alles möglich ändern musste, bootete die NVMe SSD Eingesetzter uboot -> 2020.01-ayufan-2013...... Die nicht erkannte LAN-Schnittstelle müsste an nicht freien Treibern liegen, hatte ich da irgendwo kurz gelesen. Beim Schreiben dieses Satzes kam die Nacht und ich konnte noch mal drüber schlafen. Heute Morgen, beim ersten Kaffee, dann noch mal logischer an die Sache ran gegangen. Wir schauen uns mal die wichtigsten Dinge an. root@debian:~# ip a 1: lo: <LOOPBACK,UP,LOWER_UP> mtu 65536 qdisc noqueue state UNKNOWN group default qlen 1000 link/loopback 00:00:00:00:00:00 brd 00:00:00:00:00:00 inet 127.0.0.1/8 scope host lo valid_lft forever preferred_lft forever inet6 ::1/128 scope host valid_lft forever preferred_lft forever 2: eth0: <BROADCAST,MULTICAST> mtu 1500 qdisc noop state DOWN group default qlen 1000 link/ether 62:03:b0:d6:dc:b3 brd ff:ff:ff:ff:ff:ff 3: enx000acd26e2c8: <BROADCAST,MULTICAST,UP,LOWER_UP> mtu 1500 qdisc pfifo_fast state UP group default qlen 1000 link/ether 00:0a:cd:26:e2:c8 brd ff:ff:ff:ff:ff:ff inet 192.168.3.208/24 brd 192.168.3.255 scope global dynamic enx000acd26e2c8 valid_lft 42567sec preferred_lft 42567sec inet6 fd8a:6ff:2880:0:20a:cdff:fe26:e2c8/64 scope global dynamic mngtmpaddr valid_lft forever preferred_lft forever inet6 2a02:908:1260:13bc:20a:xxxx:xxxx:xxxx/64 scope global dynamic mngtmpaddr valid_lft 5426sec preferred_lft 1826sec inet6 fe80::20a:cdff:fe26:e2c8/64 scope link valid_lft forever preferred_lft forever Ok, er zeigt mir die Schnittstelle eth0 ja an, dann kann es an fehlenden Treibern ja nicht liegen. Lässt dann auf eine fehlerhafte Konfiguration schließen. Nächster Halt wäre dann /etc/network/interfaces Das trägt Debian ein # This file describes the network interfaces available on your system # and how to activate them. For more information, see interfaces(5). source /etc/network/interfaces.d/* # The loopback network interface auto lo iface lo inet loopback # The primary network interface allow-hotplug enx000acd26e2c8 iface enx000acd26e2c8 inet dhcp # This is an autoconfigured IPv6 interface iface enx000acd26e2c8 inet6 auto Gut, bei der Installation hat Debian ja nur die zusätzliche Netzwerkschnittstelle erkannt, folgerichtig ist die auch als primäre Schnittstelle eingetragen. Dann ändern wir das mal... # This file describes the network interfaces available on your system # and how to activate them. For more information, see interfaces(5). source /etc/network/interfaces.d/* # The loopback network interface auto lo iface lo inet loopback # The primary network interface #allow-hotplug enx000acd26e2c8 allow-hotplug eth0 #iface enx000acd26e2c8 inet dhcp iface eth0 inet dhcp # This is an autoconfigured IPv6 interface #iface enx000acd26e2c8 inet6 auto iface eth0 inet6 auto Danach einmal alles neu starten bitte systemctl status networking Da fehlte mir aber jetzt die IPv4 Adresse, so das ich einmal komplett neugestartet habe. Der Ordnung halber, so hätte man die IPv4 Adresse bekommen. dhclient eth0 Nachdem Neustart kam dann das root@debian:/etc/network# ip a 1: lo: <LOOPBACK,UP,LOWER_UP> mtu 65536 qdisc noqueue state UNKNOWN group default qlen 1000 link/loopback 00:00:00:00:00:00 brd 00:00:00:00:00:00 inet 127.0.0.1/8 scope host lo valid_lft forever preferred_lft forever inet6 ::1/128 scope host valid_lft forever preferred_lft forever 2: eth0: <BROADCAST,MULTICAST,UP,LOWER_UP> mtu 1500 qdisc mq state UP group default qlen 1000 link/ether 62:03:b0:d6:dc:b3 brd ff:ff:ff:ff:ff:ff inet 192.168.3.172/24 brd 192.168.3.255 scope global dynamic eth0 valid_lft 42452sec preferred_lft 42452sec inet6 fd8a:6ff:2880:0:6003:b0ff:fed6:dcb3/64 scope global dynamic mngtmpaddr valid_lft forever preferred_lft forever inet6 2a02:908:1260:13bc:6003:xxxx:xxxx:xxxx/64 scope global dynamic mngtmpaddr valid_lft 5667sec preferred_lft 2067sec inet6 fe80::6003:b0ff:fed6:dcb3/64 scope link valid_lft forever preferred_lft forever 3: enx000acd26e2c8: <BROADCAST,MULTICAST> mtu 1500 qdisc noop state DOWN group default qlen 1000 link/ether 00:0a:cd:26:e2:c8 brd ff:ff:ff:ff:ff:ff Fertig, eth0 läuft. Nun kann man den zusätzlichen Adapter entfernen oder halt konfigurieren, wenn man ihn braucht. Warum der Debian Installer die eth0 nicht erkennt verstehe ich nicht, aber vielleicht wird das irgendwann auch noch gefixt. Jetzt habe ich erst mal einen Workaround um eine Installation auf den ROCKPro64 zu bekommen.
  • FAN control OMV Auyfan 0.10.12: gitlab-ci-linux-build-184, Kernel 5.6

    Linux linux
    12
    1 Stimmen
    12 Beiträge
    1k Aufrufe
    M
    Hi, since I'm currently change my rockpro64 setup I came across this. With the kernel from ayufan you need to set PWM_CTL to /sys/devices/platform/pwm-fan/hwmon/hwmon3/pwm1 for my self compiled one I need /sys/devices/platform/pwm-fan/hwmon/hwmon0/pwm1 But I got it only working with one entry for PWM_CTL e.g. PWM_CTL = "/sys/devices/platform/pwm-fan/hwmon/hwmon0/pwm1", after that you need to start ats again sudo systemctl stop ats sudo systemctl start ats initially the fan should start immediately for a short period of time. In case it is even a different one on your kernel you can find the right one using this command. sudo find /sys -name pwm1 | grep hwmon So far I'm not sure which kernel parameter or modul changes this. Martin
  • Restic - forget --keep-last 3 --prune

    Restic linux restic
    2
    0 Stimmen
    2 Beiträge
    667 Aufrufe
    FrankMF
    Ich habe mich damit noch ein wenig beschäftigt, die letzten drei zu behalten, ist nicht so optimal. Da es viele Optionen bei dem Befehl gibt, hier ein Ausschnitt Flags: -l, --keep-last n keep the last n snapshots -H, --keep-hourly n keep the last n hourly snapshots -d, --keep-daily n keep the last n daily snapshots -w, --keep-weekly n keep the last n weekly snapshots -m, --keep-monthly n keep the last n monthly snapshots -y, --keep-yearly n keep the last n yearly snapshots habe ich das ein wenig so angepasst, das ich denke es passt für mich. restic --password-file /root/passwd -r /media/NAS_neu/Restic/Home/ forget --keep-last 3 --keep-monthly 3 --prune Damit behalte ich auch die jeweils eines pro Monat. Und die letzten drei. Das sieht dann so aus. root@debian:~# ./backup2.sh repository 2f3f6147 opened successfully, password is correct Files: 38 new, 100 changed, 13268 unmodified Dirs: 0 new, 1 changed, 0 unmodified Added to the repo: 10.166 GiB processed 13406 files, 50.324 GiB in 3:24 snapshot 849f614c saved repository 2f3f6147 opened successfully, password is correct Applying Policy: keep the last 3 snapshots, 3 monthly snapshots snapshots for (host [debian], paths [/home/frank]): keep 5 snapshots: ID Time Host Tags Reasons Paths ------------------------------------------------------------------------------------ a7251cfd 2019-11-28 17:00:01 debian monthly snapshot /home/frank 283d4027 2019-12-31 17:00:01 debian monthly snapshot /home/frank ae2b96ec 2020-01-01 21:47:46 debian last snapshot /home/frank 079e00a6 2020-01-02 17:00:01 debian last snapshot /home/frank 849f614c 2020-01-03 21:08:45 debian last snapshot /home/frank monthly snapshot ------------------------------------------------------------------------------------ 5 snapshots remove 26 snapshots: ID Time Host Tags Paths ------------------------------------------------------------------ 896f16c2 2019-11-07 22:23:40 debian /home/frank b21bcf6d 2019-11-11 17:00:01 debian /home/frank f89248fb 2019-11-12 17:00:01 debian /home/frank 123ab546 2019-11-13 17:00:01 debian /home/frank b82d87d0 2019-11-18 17:00:01 debian /home/frank 040b0ab7 2019-11-19 17:00:01 debian /home/frank 7221d8ef 2019-11-20 17:00:01 debian /home/frank 84132a25 2019-11-21 17:00:01 debian /home/frank b558a52c 2019-11-25 17:00:01 debian /home/frank e5cc0c3e 2019-12-02 17:00:01 debian /home/frank 22423fa5 2019-12-03 17:00:01 debian /home/frank 39df1ab9 2019-12-04 17:00:01 debian /home/frank 98843457 2019-12-05 17:00:01 debian /home/frank b0cdd4b6 2019-12-09 17:00:01 debian /home/frank 828414f9 2019-12-10 17:00:01 debian /home/frank e34a27c3 2019-12-11 17:00:01 debian /home/frank 6e488c3b 2019-12-12 17:00:01 debian /home/frank 17898403 2019-12-16 17:00:01 debian /home/frank 1973305a 2019-12-17 17:00:01 debian /home/frank 9553bedd 2019-12-18 17:00:01 debian /home/frank fedf749d 2019-12-19 17:00:01 debian /home/frank 8e7cb876 2019-12-23 17:00:01 debian /home/frank 0bd0d102 2019-12-25 17:00:01 debian /home/frank 13d348b0 2019-12-26 17:00:01 debian /home/frank c7d960aa 2019-12-30 17:00:01 debian /home/frank f6ea9118 2020-01-01 17:00:01 debian /home/frank ------------------------------------------------------------------ 26 snapshots 26 snapshots have been removed, running prune counting files in repo building new index for repo [0:35] 100.00% 7806 / 7806 packs repository contains 7806 packs (46537 blobs) with 41.110 GiB processed 46537 blobs: 0 duplicate blobs, 0 B duplicate load all snapshots find data that is still in use for 5 snapshots [0:01] 100.00% 5 / 5 snapshots found 32654 of 46537 data blobs still in use, removing 13883 blobs will remove 0 invalid files will delete 715 packs and rewrite 752 packs, this frees 5.027 GiB [2:28] 100.00% 752 / 752 packs rewritten counting files in repo [0:01] 100.00% 6571 / 6571 packs finding old index files saved new indexes as [d137b425 f7caee99 a6e9711a] remove 35 old index files [1:13] 100.00% 1467 / 1467 packs deleted done using temporary cache in /tmp/restic-check-cache-916655151 repository 2f3f6147 opened successfully, password is correct created new cache in /tmp/restic-check-cache-916655151 create exclusive lock for repository load indexes check all packs check snapshots, trees and blobs read all data [7:47] 100.00% 6571 / 6571 items duration: 7:47 no errors were found root@debian:~# Am Ende seht ihr noch, wie Restic alle Files testet. Mein Script sieht jetzt so aus. #!/bin/bash # Script um mit Restic Daten automatisiert zu sichern! # Dient zum Sichern der Homepartition auf dem ROCKPro64 NAS! # Was soll gesichert werden? backup_pfad=/home/frank # Programm Start restic --password-file /root/passwd -r /media/NAS_neu/Restic/Home/ backup $backup_pfad --exclude-file=excludes.txt restic --password-file /root/passwd -r /media/NAS_neu/Restic/Home/ forget --keep-last 3 --keep-monthly 3 --prune # Testen restic --password-file /root/passwd -r /media/NAS_neu/Restic/Home/ check --read-data Das dann schön mit einem Cronjob laufen lassen und die Datensicherung ist erledigt