Skip to content

List comprehensions

Python3
1 1 104
  • Fangen wir mal an, mit einer Übersetzung. Mein Englisch ist nicht perfekt, so muss ich ab und zu mal was nachschauen.

    7a6d9323-81a5-451b-86c4-387ca41fe497-grafik.png Quelle: deepl.com

    Ok, jetzt haben wir eine Vorstellung davon, was es machen soll. Ein Beispiel wie ich das so als Anfänger gemacht habe.

    # Delete key_list
    keys_list = []
    
    # redo keys_list
    for key in backups:
        keys_list.append(key)
    

    Finde ich jetzt eigentlich gut lesbar und verständlich. Aber mit List comprehensions soll es eleganter sein.

    Die Listen-Abstraktion, eigentlich auch im Deutschen besser als "List Comprehension" bekannt, ist eine elegante Methode Mengen in Python zu definieren oder zu erzeugen.
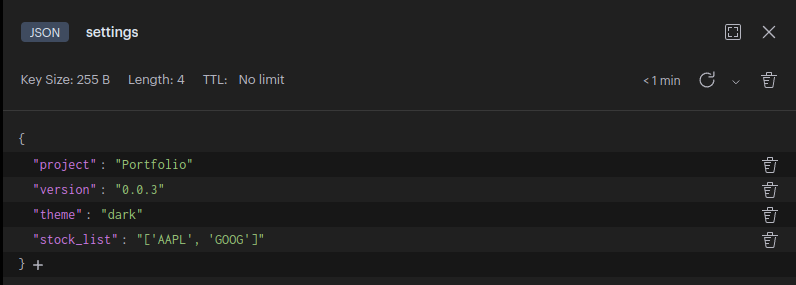
    Quelle: https://www.python-kurs.eu/list_comprehension.php

    In meiner Datei speicher ich die Daten der Backups mit einem Key. Hier mal ein Add, aus diesem Beispiel

    backups[(BackupList.last_key()) + 1] = BackupList(name, repository)
    

    Damit man zum Beispiel einen Eintrag jetzt editieren oder auch löschen kann, muss ich den Key kennen. Mit dem obigen Beispiel erhält man jetzt alle Keys, die in dem Objekt enthalten sind.

    Ausgabe

     ['1', '7', '8', '10', '14', '17', '18', '20']
    

    Diese Daten werden in eine neue Liste keys_list geschrieben.

    Das kann man dann mit List comprehensions so lösen.

    # Delete key_list
    keys_list = []
    
    # redo keys_list
    [keys_list.append(key) for key in backups]
    

    In folgendem Video wird das exzellent erklärt. Unbedingt als Einsteiger anschauen.

    Diese List Comprehensions können auch noch eine Condition (if) beinhalten. In o.g. Video wird das an diesem Besipiel sehr anschaulich vermittelt.

    67b88929-3cc0-4a66-b438-45a6807ca7b0-grafik.png
    Besonders die Ergänzung, als Erklärung, mit SELECT, FROM und WHERE sollte es allen, die schon mal mit einer MySQL Dataenbank gearbeitet haben, einfacher machen.

    Eine weitere sehr gute Anleitung dazu findet man auf

    Viel Spaß beim Coden 🙂

  • 0 Stimmen
    2 Beiträge
    467 Aufrufe
    FrankMF
    Ich habe den Sonntag mal genutzt um ein wenig was einzubauen. Einmal habe ich mit datatables.net die Tabelle etwas funktionaler gestaltet. [image: 1736705735786-00a95363-1f41-4bbf-884a-34f21aea81e4-grafik.png] Man kann nun suchen, sortieren und wenn man mehr als 10 Datenpunkte hat, hat die Tabelle auch Pagination. Ein nettes Projekt, macht einiges einfacher Das nächste, ich hatte es im Video ja kurz erwähnt, mir fehlte ja noch die Restore Funktion von Restic. Ok, ist jetzt auch drin. Da die Benutzerverwaltung mittlerweile komplett eingebaut ist, werde ich demnächst meine Test Datenbanken und alles was damit zu tuen hat, aus dem Code entfernen. Brauch ich jetzt nicht mehr. Habe jetzt zwei Benutzer, einen Produktiven und einen zum Testen. Langfristig steht auch noch eine zweite Sprache auf dem Zettel. Aber, dafür muss ich Lust haben, das Thema juckt nicht so richtig
  • PyWebIO vs. Flask

    Python3 pywebio flask linux python
    2
    0 Stimmen
    2 Beiträge
    243 Aufrufe
    FrankMF
    Mist, jetzt habe ich auch noch Streamlit gefunden. Jetzt geht mir langsam die Zeit aus...
  • Portfolio - mein kleines Flask Projekt

    Python3 python flask bootstrap ki-generiert
    5
    0 Stimmen
    5 Beiträge
    333 Aufrufe
    FrankMF
    Hab ChatGPT nochmal nach der Installation auf einem Production Server befragt. ChatGPT Certainly! Here's a short example of the steps you can follow to deploy a Flask application on a production server using Nginx and Gunicorn: Prepare your server: Set up a server (e.g., using a cloud provider like AWS, DigitalOcean, or a dedicated server) and ensure it has a clean, up-to-date installation of a Linux distribution (e.g., Ubuntu or CentOS). Install required software: Install necessary software packages on your server. You'll need Python, pip (Python package manager), Nginx, and Gunicorn. You can use your distribution's package manager (e.g., apt for Ubuntu or yum for CentOS) to install these dependencies. Deploy your Flask application: Copy your Flask application code and any required dependencies to your server. Set up a virtual environment (optional but recommended): Create a virtual environment for your Flask application to isolate its dependencies. You can use venv or virtualenv for this purpose. Install Flask and any required Python packages within your virtual environment: pip install flask Test your Flask application: Ensure your Flask application runs correctly within your server's virtual environment. Configure Gunicorn: Create a Gunicorn configuration file (e.g., gunicorn_config.py) to specify the settings for running your Flask application. Here's a simple example: workers = 4 # Number of Gunicorn worker processes bind = '0.0.0.0:8000' # The address and port Gunicorn should listen on Start Gunicorn: Start Gunicorn with your Flask application: gunicorn -c gunicorn_config.py your_app:app Configure Nginx: Create an Nginx server block (often located in /etc/nginx/sites-available) to define how Nginx should handle incoming requests. Here's a simplified example: server { listen 80; server_name your_domain.com www.your_domain.com; location / { proxy_pass http://127.0.0.1:8000; # Pass requests to Gunicorn proxy_set_header Host $host; proxy_set_header X-Real-IP $remote_addr; } } Enable the Nginx server block and restart Nginx: sudo ln -s /etc/nginx/sites-available/your_config /etc/nginx/sites-enabled/ sudo nginx -t # Test Nginx configuration sudo systemctl restart nginx Configure your DNS: Point your domain name to your server's IP address. Secure your server (optional but recommended): Set up SSL/TLS certificates for your domain to enable HTTPS. You can use Let's Encrypt for free SSL certificates. Monitor your application: Set up monitoring tools and logs to keep track of your application's performance and troubleshoot any issues. These are the basic steps to deploy a Flask application on a production server with Nginx and Gunicorn. Please note that this is a simplified example, and there are many additional considerations, such as database configuration, security, and optimization, depending on your specific application and requirements. It's also important to keep your server and software up to date and follow security best practices to ensure the stability and security of your production environment. Das werde ich doch mal ausprobieren
  • NiceGUI

    Linux nicegui linux python
    2
    0 Stimmen
    2 Beiträge
    398 Aufrufe
    FrankMF
    Ich habe mir das jetzt einige Tage gegeben und habe mich dagegen entschieden. Werde weiterhin PyWebIO benutzen. Hauptgrund ist die wesentlich bessere Dokumentation -> https://pywebio.readthedocs.io/en/latest/index.html Da kann ich mir auch mit meinem Python Kenntnisstand die Informationen holen, die ich brauche um es einzusetzen.
  • Ruff - Linting

    Python3 ruff python
    1
    1
    0 Stimmen
    1 Beiträge
    116 Aufrufe
    Niemand hat geantwortet
  • Python - Dict -> JSON und umgekehrt

    Python3 python
    1
    0 Stimmen
    1 Beiträge
    340 Aufrufe
    Niemand hat geantwortet
  • PyWebIO - put_buttons

    PyWebIO pywebio python
    2
    1
    0 Stimmen
    2 Beiträge
    222 Aufrufe
    FrankMF
    Und noch eine kleine Übung, wie man den Buttton abhängig von einem Value enabled/disabled # we build header and tdata for table tab_mount = [] for count, value in enumerate(backups): if count == 0: tab_mount.append(['No.', 'Backup name of the restic data backup', 'Actions']) if backups[value].init == "0": tab_mount.append([count + 1, backups[count].name, put_buttons([ dict(label='Mount', value='Mount', color='primary', disabled=True), dict(label='UMount', value='UMount', color='primary', disabled=True), dict(label='Restore', value='Restore', color='primary', disabled=True), ] , onclick=partial(actions, count + 1)) ]) else: tab_mount.append([count + 1, backups[count].name, put_buttons([ dict(label='Mount', value='Mount', color='primary'), dict(label='UMount', value='UMount', color='primary'), dict(label='Restore', value='Restore', color='primary'), ], onclick=partial(actions, count + 1)) ])
  • ResticUI with PyWebIO - Repo

    PyWebIO pywebio python restic-ui
    1
    0 Stimmen
    1 Beiträge
    122 Aufrufe
    Niemand hat geantwortet