Skip to content

Infrarot Empfänger

Hardware
  • Wie ich berichtet hatte, war beim Preproduction SOC(v2.0) der IR-Empfänger lose im Paket mit einem Informationszettel, das wohl auf dem SOC was vertauscht sei.

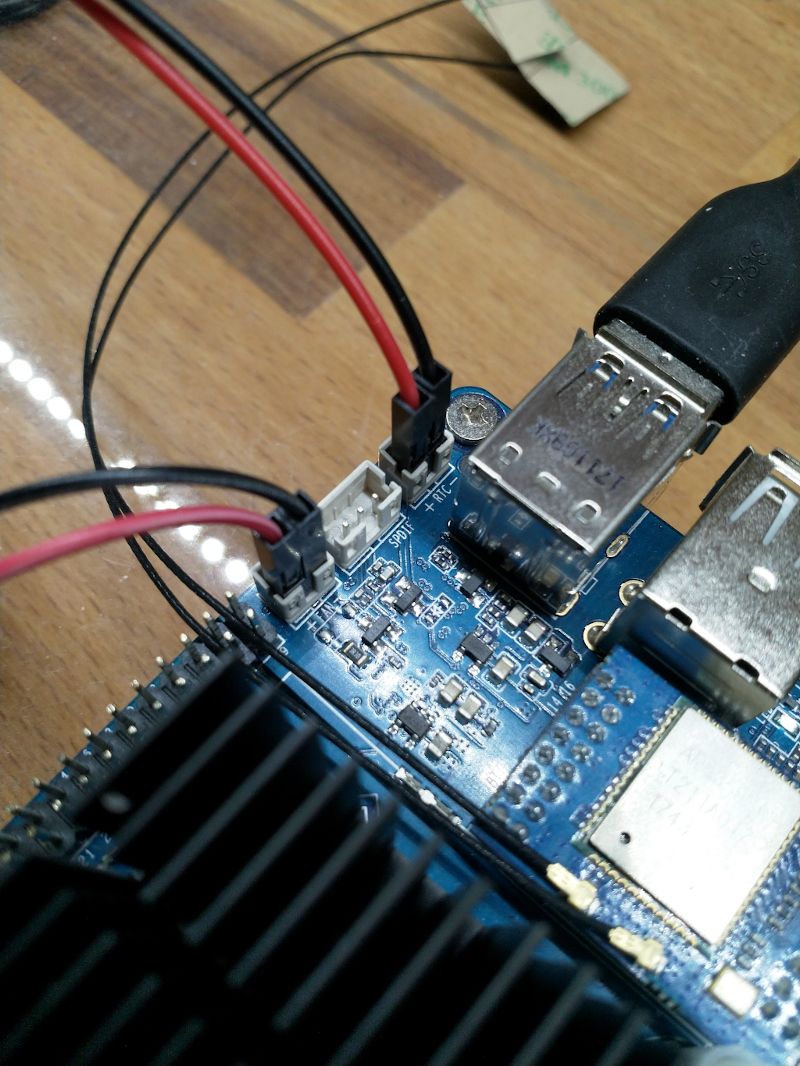
    Nun ist beim ROCKPro v2.1 kein Empfänger dabei, nur der Anschluss auf dem SOC. Ich habe da mal beim Chef (tllim) nachgefragt.

    • Den IR-Empfänger liefert Pine64 nur mit der IR Fernbedienung aus.

    Auf meine Nachfrage warum, kam folgendes

    • Manche Anwender schließen an den Anschluss nur Drähte an um den Empfänger etwas weiter entfernt zu montieren.
    • Manche Anwender schließen an den Anschluss einen 433 MHz Empfänger an.
    • Manche Anwender schließen an diesen Anschluss Sicherheits Chips an (?)

    Das alles macht Sinn und sollte für die meisten Anwender auch kein Problem sein, ich denke es ist aber gut wenn man das vorher weiß!

    Quelle:

    (19:39:05) frankm: Hi tllim, i got my rpv2.1 and i am missing IR receiver, in first batch it was in the package. And i remember that you wrote, that it will be on the board in v2.1 (?)
    (19:39:08) frankm: And thank you, that's a great board
    (19:40:36) tllim: Hi Frankm, the IR receiver always accompany with IR remote control, not the main board. The RPro64 v2.o include IR receiver due to the board layout error
    (19:41:23) frankm: Ok, i understand. Thank you for the info.
    (19:41:31) tllim: welcome
    (19:41:51) frankm: But why is not he soldered?
    (19:42:34) tllim: this due to below several reasons:
    (19:43:09) tllim: 1. Some people interest to wire out the IR to match with their case design
    (19:43:59) tllim: 2. Some people use the IR receiver slot to put wireless RF receiver
    (19:44:38) tllim: 3. Some people use the IR slot for security chip
    (19:44:54) frankm: ok, makes sense 😉 thanks
    (19:45:04) tllim: 🙂

  • Serielle Konsole UART2 (2)

    Angeheftet Hardware uart rockpro64
    1
    8
    0 Stimmen
    1 Beiträge
    250 Aufrufe
    Niemand hat geantwortet
  • ROCKPro64 - Zwei LAN Schnittstellen / VLAN einrichten

    ROCKPro64 linux vlan rockpro64
    4
    0 Stimmen
    4 Beiträge
    662 Aufrufe
    FrankMF
    Das Setup heute mal getestet um zu sehen, ob das auch so funktioniert. LAN an meine Fritzbox (DHCP) an eth1.100 mein Notebook an eth1.200 meine PS4 Und dann mal gemütlich eine Runde MW gezockt. Läuft alles einwandfrei
  • ROCKPro64 - Kernel 5.3.0-rc4-1117 angetestet!

    ROCKPro64 rockpro64
    1
    0 Stimmen
    1 Beiträge
    405 Aufrufe
    Niemand hat geantwortet
  • ROCKPro64 - USB3 bootet von SSD!

    ROCKPro64 rockpro64
    4
    0 Stimmen
    4 Beiträge
    934 Aufrufe
    FrankMF
    Da oben steht viel Bullshit Ich habe mich mal mit dem mechanischen Aufbau einer USB3 Buchse beschäftigt, bzw. dazu recherchiert. Auf dieser Seite ist ein klasse Bild, was das sehr gut verdeutlicht. https://kompendium.infotip.de/usb-3-0.html Abbildung 28. Dort sieht man das die USB3 Kontakte RX/TX und GND ganz hinten sind. Wenn ich den Stecker jetzt komplett einstecke, wird wohl versucht eine USB3 Verbindung aufzubauen, die ja im Moment aus irgendeinem Grund scheitert. Wenn ich den Stecker nun ein Stück raus ziehe, trenne ich die USB3-Verbindung und es kommt eine USB2-Verbindung zustande. So mit ist mir jetzt einiges klarer, aber das Problem ist ungelöst
  • Video PCIe SATA Karte

    ROCKPro64 rockpro64
    1
    0 Stimmen
    1 Beiträge
    533 Aufrufe
    Niemand hat geantwortet
  • ROCKPro64 - Der Bootvorgang

    Verschoben Hardware hardware rockpro64
    3
    0 Stimmen
    3 Beiträge
    2k Aufrufe
    FrankMF
    Um einen neuen Kernel booten zu können, brauche ich diese 4 Dateien unter /boot config-4.19.0-rc4-1065-ayufan-g72e04c7b3e06 initrd.img-4.19.0-rc4-1065-ayufan-g72e04c7b3e06 System.map-4.19.0-rc4-1065-ayufan-g72e04c7b3e06 vmlinuz-4.19.0-rc4-1065-ayufan-g72e04c7b3e06 Und den Ordner /boot/dtbs/4.19.0-rc4-1065-ayufan-g72e04c7b3e06 mit folgendem Inhalt rock64@rockpro64v2_0:/boot/dtbs/4.19.0-rc4-1065-ayufan-g72e04c7b3e06$ ls -la total 104 drwxr-xr-x 26 root root 4096 Sep 30 09:54 . drwxr-xr-x 6 root root 4096 Sep 30 09:55 .. drwxr-xr-x 2 root root 4096 Sep 30 09:54 al drwxr-xr-x 2 root root 4096 Sep 30 09:54 allwinner drwxr-xr-x 2 root root 4096 Sep 30 09:54 altera drwxr-xr-x 2 root root 4096 Sep 30 09:54 amd drwxr-xr-x 2 root root 4096 Sep 30 09:54 amlogic drwxr-xr-x 2 root root 4096 Sep 30 09:54 apm drwxr-xr-x 2 root root 4096 Sep 30 09:54 arm drwxr-xr-x 4 root root 4096 Sep 30 09:54 broadcom drwxr-xr-x 2 root root 4096 Sep 30 09:54 cavium drwxr-xr-x 2 root root 4096 Sep 30 09:54 exynos drwxr-xr-x 2 root root 4096 Sep 30 09:54 freescale drwxr-xr-x 2 root root 4096 Sep 30 09:54 hisilicon drwxr-xr-x 2 root root 4096 Sep 30 09:54 lg drwxr-xr-x 2 root root 4096 Sep 30 09:54 marvell drwxr-xr-x 2 root root 4096 Sep 30 09:54 mediatek drwxr-xr-x 2 root root 4096 Sep 30 09:54 nvidia drwxr-xr-x 2 root root 4096 Sep 30 09:54 qcom drwxr-xr-x 2 root root 4096 Sep 30 09:54 renesas drwxr-xr-x 2 root root 4096 Sep 30 09:54 rockchip drwxr-xr-x 2 root root 4096 Sep 30 09:54 socionext drwxr-xr-x 2 root root 4096 Sep 30 09:54 sprd drwxr-xr-x 2 root root 4096 Sep 30 09:54 synaptics drwxr-xr-x 2 root root 4096 Sep 30 09:54 xilinx drwxr-xr-x 2 root root 4096 Sep 30 09:54 zte Unter /boot/extlinux liegt dann die Datei extlinux.conf Die sieht bei mir dann so aus timeout 10 menu title select kernel label kernel-4.19.0-rc4-1065-ayufan-g72e04c7b3e06 kernel /boot/vmlinuz-4.19.0-rc4-1065-ayufan-g72e04c7b3e06 initrd /boot/initrd.img-4.19.0-rc4-1065-ayufan-g72e04c7b3e06 devicetreedir /boot/dtbs/4.19.0-rc4-1065-ayufan-g72e04c7b3e06 append rw panic=10 init=/sbin/init coherent_pool=1M ethaddr=${ethaddr} eth1addr=${eth1addr} serial=${serial#} cgroup_enable=cpuset cgroup_memory=1 cgroup_enable=memory swapaccount=1 root=LABEL=TEST rootwait rootfstype=ext4 label kernel-4.19.0-rc4-1065-ayufan-g72e04c7b3e06-memtest kernel /boot/vmlinuz-4.19.0-rc4-1065-ayufan-g72e04c7b3e06 initrd /boot/initrd.img-4.19.0-rc4-1065-ayufan-g72e04c7b3e06 devicetreedir /boot/dtbs/4.19.0-rc4-1065-ayufan-g72e04c7b3e06 append rw panic=10 init=/sbin/init coherent_pool=1M ethaddr=${ethaddr} eth1addr=${eth1addr} serial=${serial#} cgroup_enable=cpuset cgroup_memory=1 cgroup_enable=memory swapaccount=1 root=LABEL=TEST rootwait rootfstype=ext4 memtest Darunter kommen dann evt. die alten Kernel die installiert waren, das habe ich hier im Beispiel weg gelassen.
  • DTS DTB Files bearbeiten

    Angeheftet ROCKPro64 rockpro64
    3
    0 Stimmen
    3 Beiträge
    2k Aufrufe
    FrankMF
    Oder, ganz einfach sudo dtedit
  • u-boot-flash-spi-rockpro64.img.xz

    Verschoben Tools rockpro64
    1
    0 Stimmen
    1 Beiträge
    2k Aufrufe
    Niemand hat geantwortet