Skip to content

Vorstellung Star64

Hardware
2 1 131
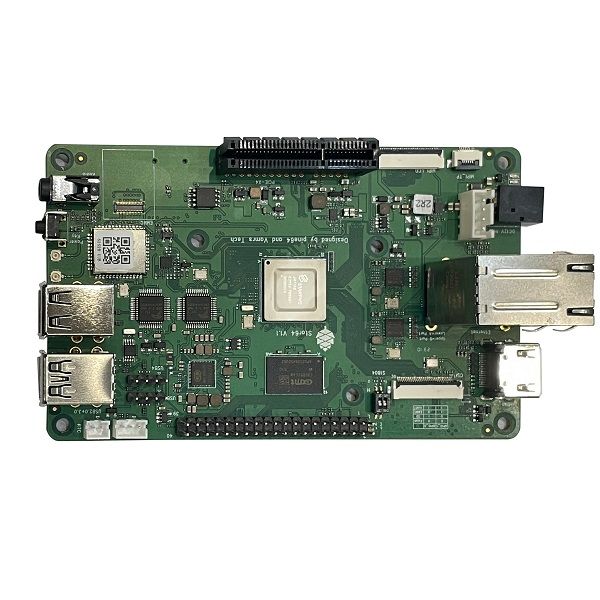
  • Was ist der Star64 der Firma Pine64 ?

    Ein Single Board Computer mit RISC-V CPU.

    The Star64 is a RISC-V based Single Board Computer powered by StarFive JH7110 Quad-Core SiFive U74 64-Bit CPU, Imagination Technology BX-4-32 GPU and supports up to 8GB 1866MHz LPDDR4 memory. It provides an eMMC module socket, MicroSD Card slot, PCI-e, Pi-2 Bus, USB 3.0, and many other peripheral interfaces for makers to integrate with sensors and other devices.

    Star64-SBC-1.jpg

    CPU Architecture

    • Quad-core U74 up to 1.5GHz CPU
    • Fully compliant with the RISC-V ISA specification
    • 64-bit RISC-V Application Core
    • 32KB L1 I-cache with ECC
    • 32KB L1 D-cache with ECC
    • 8 Region Physical Memory Protection
    • Virtual Memory support with up to 47 Physical Address bits
    • Integrated up to 2MB L2 Cache with ECC
    • includes RV64IMAC S7 monitor core, 16 KB L1 I-Cache with ECC, 8 KB DTIM with ECC
    • 32-bit RISC-V CPU core (E24) for real time control, support RV32IMFC RISC-V ISA

    GPU Architecture

    • Imagination Technology BXE-4-32 up to 600Mhz GPU
    • Support OpenCL 3.0
    • Support OpenGL ES 3.2
    • Support Vulkan 1.2
    • Tile-based deferred rendering architecture for 3D graphics workloads, with concurrent processing of multiple tiles
    • Support for GPU visualization, up to 8 virtual GPUs
    • On fly frame buffer compression and decompression (TFBC) algorithm
    • Performance: 128 FP32 FLOPs/Clock, 256 FP16 FLOPs/Clock

    System Memory

    • LPDDR4 RAM Memory Variants: 2GB, 4GB and 8GB.

    Quelle: https://wiki.pine64.org/wiki/STAR64

  • Ich konnte heute einen ergattern und die 8GB RAM Version ist unterwegs. Achtung, aktuell ist die Softwareunterstützung fast nicht vorhanden!

  • NodeBB - v3.9.0

    NodeBB nodebb linux
    1
    0 Stimmen
    1 Beiträge
    171 Aufrufe
    Niemand hat geantwortet
  • Rest-Server v0.13.0 released

    Restic rest-server restic linux
    2
    0 Stimmen
    2 Beiträge
    396 Aufrufe
    FrankMF
    Download Rest-Server und installieren Im Github Repository den aktuellen Release suchen. Hier am Beispiel der aktuellen Version 0.13.0 (27.07.2024) Datei herunterladen wget https://github.com/restic/rest-server/releases/download/v0.13.0/rest-server_0.13.0_linux_amd64.tar.gz Die Datei entpacken tar -xf rest-server_0.13.0_linux_amd64.tar.gz Ins Verzeichnis wechseln cd rest-server_0.13.0_linux_amd64 Wenn der Rest-Server läuft, dann muss man diesen erst mal stoppen. systemctl stop rest-server Danach kopiert man das File nach bin. Wer mag sichert vorher das alte File. cp rest-server /usr/local/bin Danach kann man den Rest-Server wieder starten. systemctl start rest-server Versionskontrolle root@rest-server:~# rest-server -v rest-server version rest-server 0.13.0 compiled with go1.22.5 on linux/amd64 Die Hilfe vom Rest-Server root@rest-server:~# rest-server -h Run a REST server for use with restic Usage: rest-server [flags] Flags: --append-only enable append only mode --cpu-profile string write CPU profile to file --debug output debug messages -h, --help help for rest-server --htpasswd-file string location of .htpasswd file (default: "<data directory>/.htpasswd)" --listen string listen address (default ":8000") --log filename write HTTP requests in the combined log format to the specified filename (use "-" for logging to stdout) --max-size int the maximum size of the repository in bytes --no-auth disable .htpasswd authentication --no-verify-upload do not verify the integrity of uploaded data. DO NOT enable unless the rest-server runs on a very low-power device --path string data directory (default "/tmp/restic") --private-repos users can only access their private repo --prometheus enable Prometheus metrics --prometheus-no-auth disable auth for Prometheus /metrics endpoint --tls turn on TLS support --tls-cert string TLS certificate path --tls-key string TLS key path -v, --version version for rest-server Systemd Wer noch ein passendes systemd File benötigt. [Unit] Description=Rest Server After=syslog.target After=network.target [Service] Type=simple User=rest-server Group=rest-server ExecStart=/usr/local/bin/rest-server --private-repos --tls --tls-cert /mnt/rest-server/<DOMAIN>/fullchain.pem --tls-key /mnt/rest-server/<DOMAIN>/key.pem --path /mnt/rest-server Restart=always RestartSec=5 # Optional security enhancements NoNewPrivileges=yes PrivateTmp=yes ProtectSystem=strict ProtectHome=yes ReadWritePaths=/mnt/rest-server [Install] WantedBy=multi-user.target
  • Flask Projekt auf einem anderen Rechner installieren

    Python3 python flask linux
    1
    0 Stimmen
    1 Beiträge
    192 Aufrufe
    Niemand hat geantwortet
  • Debian 13 - Trixie

    Linux linux debian
    1
    0 Stimmen
    1 Beiträge
    188 Aufrufe
    Niemand hat geantwortet
  • Kopia 0.7.0-rc1 Kurztest

    Kopia kopia linux
    2
    2
    0 Stimmen
    2 Beiträge
    411 Aufrufe
    FrankMF
    Nachdem ich doch ziemlich lange Snapshot Zeiten hatte, habe ich Jarek mal gefragt woran das liegt. I guess you could run it in the cloud but latency will be progressively worse because it's a chatty protocol sensitive to latency Technisch verstehe ich das nicht, aber ich habe dann mal als kurzen Test auf meine lokale SSD einen Snapshot gemacht. Der war nach 2 Minuten (ca. 11GB) fertig. Der zweite Snapshot brauchte ca. 12 Sekunden. Das hört sich schon mal viel besser an, als die Stunden. Aktuell ist der Plan den Kopia-Server im Internet zu nutzen damit beerdigt. Das scheint so nicht zu funktionieren. Ich mache da noch einen kurzen Test, diesmal Lokal auf meinem NAS.
  • Linux Befehle - ls & tail

    Linux linux
    1
    0 Stimmen
    1 Beiträge
    485 Aufrufe
    Niemand hat geantwortet
  • Restic - Einen ROCKPro64 als Datengrab benutzen

    Verschoben Restic linux restic
    2
    1
    0 Stimmen
    2 Beiträge
    915 Aufrufe
    FrankMF
    So, dann mal das Ganze testen wenn man seinen Haupt-PC neu installiert hat und ein paar Daten braucht. [image: 1534692579149-img_20180819_090116_ergebnis-resized.jpg] Also, mal Restic installiert. sudo apt-get install restic Nach erfolgter Installation ein Test frank@frank-MS-7A34:~/restic$ restic version restic 0.8.3 compiled with go1.10 on linux/amd64 Geht so weit. Snapshots auflisten. restic -r sftp:rock64@IP:/home/rock64/backup snapshots Sieht dann so aus. frank@frank-MS-7A34:~$ sudo restic -r sftp:rock64@192.168.3.207:/home/rock64/backup snapshots [sudo] Passwort für frank: rock64@192.168.3.207's password: enter password for repository: password is correct ID Date Host Tags Directory ---------------------------------------------------------------------- 7e2eddcb 2018-08-18 10:10:40 frank-MS-7A34 /home/frank/Bilder 073b7cb4 2018-08-18 14:21:17 frank-MS-7A34 /home/frank 6bc9b21b 2018-08-18 16:11:19 frank-MS-7A34 /home/frank ---------------------------------------------------------------------- 3 snapshots Snapshot wiederherstellen sudo restic -r sftp:rock64@IP:/home/rock64/backup restore latest --target /tmp/backup Hiermit stellen wir das Backup im temporären Ordner /tmp/backup wieder her. Hat ewig gedauert, aber ging !?!?!?
  • Sidebar im Theme Quark bearbeiten

    Grav grav linux
    1
    0 Stimmen
    1 Beiträge
    630 Aufrufe
    Niemand hat geantwortet