Skip to content

[HOWTO]ROCKPro64 - NAS bauen Teil 1

Angeheftet ROCKPro64
  • Der Artikel wendet sich an Einsteiger!

    Hardware

    • RockPro64 v2.1 2GB oder 4GB
    • Netzteil für ROCKPro64
    • SD-Karte / eMMC-Modul (siehe Erklärung 1)
    • PCIe SATA Adapter
    • 2 St. HDD 2,5 Zoll (z.B.: 2TB)
    • 2 St. SATA-Kabel
    • Spannungsversorgungsleitung für zwei SATA Laufwerke
    • UART-Adapter (serielle Konsole)

    0_1536253186731_DSC_0045_ergebnis.JPG

    Erklärung 1

    Das Betriebssystem kommt entweder auf eine SD-Karte, ein eMMC-Modul oder eine USB2 bzw. USB3-Platte. Was Ihr nehmt, bleibt Euch überlassen. Aus Geschwindigkeitsgründen, würde sich eine USB3-HDD lohnen. Ich gebe aber zu bedenken, das man dann keine HDD mehr anschließen kann (ohne USB-Hub). Das kann schlecht sein, wenn man wie ich an USB3 eine weitere HDD anschließen möchte, zur Datensicherung. Das muss aber für Euch nicht zutreffen. Das schöne am ROCKPro64 ist, das man eine ganze Reihe von Konfigurationen bauen kann. Also, nehmt Euch vorher die Zeit und macht euch ein vernünftiges Konzept.

    Mein aktuelles Konzept

    • System auf eMMC-Modul
    • 2 St. HDD als Raid1 an der SATA-Karte
    • 1 St. USB3 HDD als Backup-Medium

    0_1536253227565_DSC_0048_ergebnis.JPG

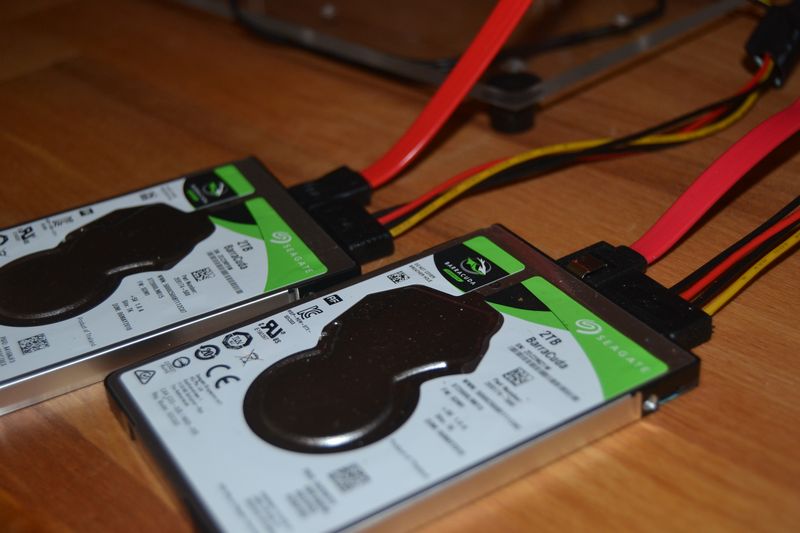
    Hier sieht man die Spannungsversorgung der zwei SATA HDDs.

    0_1536253344766_DSC_0049_ergebnis.JPG

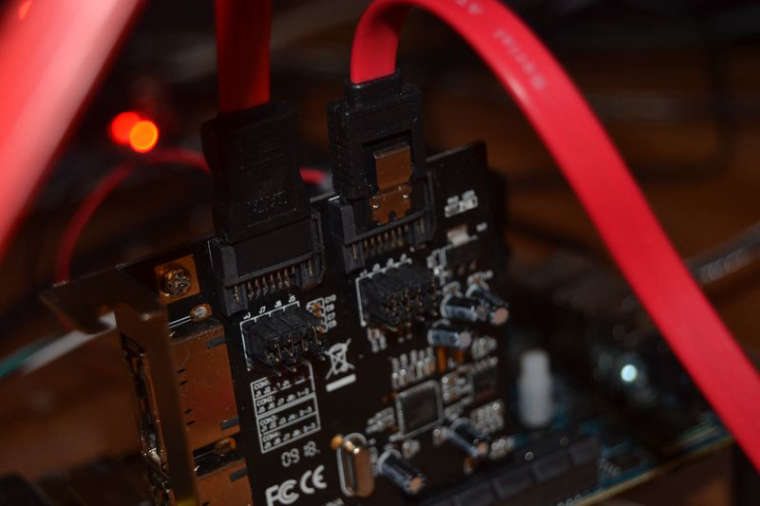
    Die zwei SATA-Kabel an der PCIe SATA Karte anschließen.

    0_1536253402000_DSC_0051_ergebnis.JPG

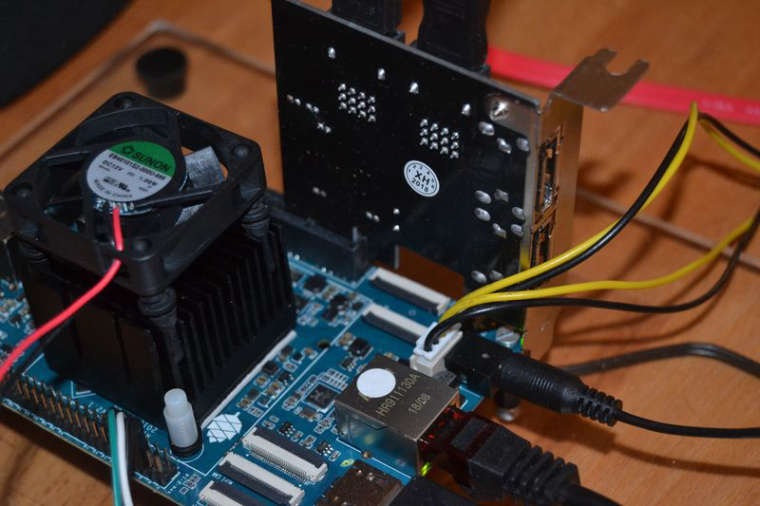
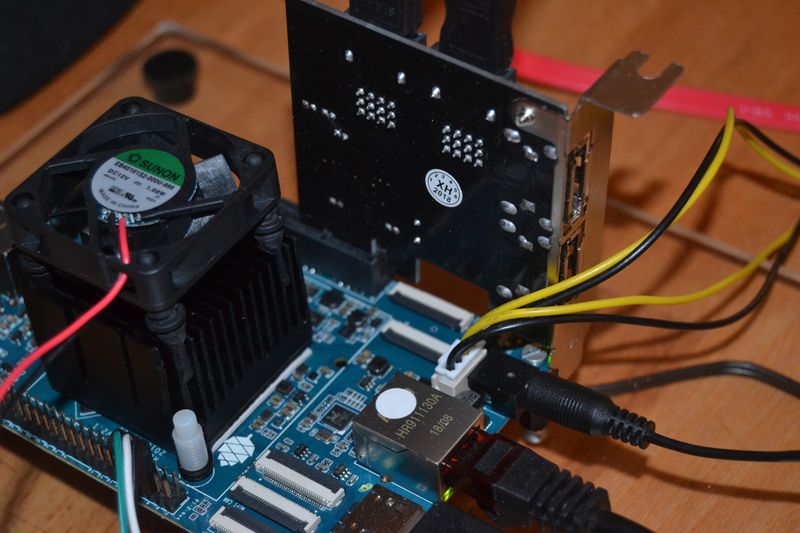
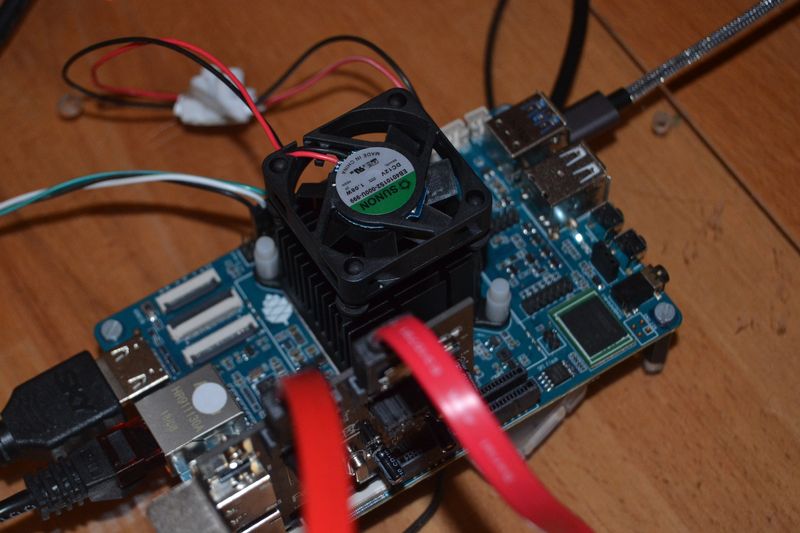
    Den Lüfter sollte man einsetzen, wenn man permanent mit dem ROCKPro64 arbeitet.

    0_1536253471618_DSC_0050_ergebnis.JPG

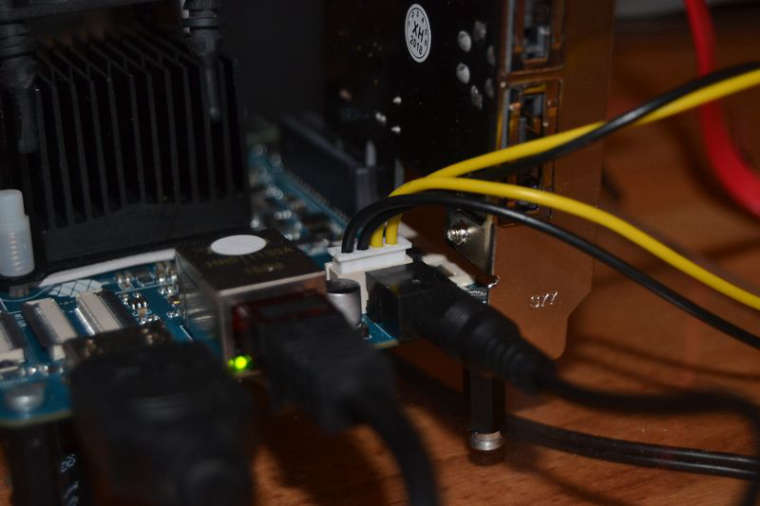
    Das gesteckte eMMC-Modul. Nun solltet Ihr genug Infos haben um so ein System zusammen zu bauen. Auf den Fotos sieht man noch ein HDMI-Kabel, das wird nicht benötigt. Außerdem ein Netzwerkkabel, ohne kein Internet 🙂 Und oben auf dem Bild kann man noch ein USB-C-Kabel sehen, das habe ich vergessen abzuziehen. Nur damit ihr als Einsteiger nicht durcheinander kommt.

    Im Wiki wird das alles sehr gut erklärt. Schaut es Euch da in Ruhe an.

    Stromverbrauch

    • 8,4 - 9,3 Watt mit 2 Stück 2,5 Zoll HDD (hdparm nicht aktiv)
    • 5,6 Watt mit 2 Stück 2,5 Zoll HDD (hdparm aktiv)
    • 10,2 - 11,2 Watt mit 3 Stück 2,5 Zoll HDD (hdparm nicht aktiv)
    • 6,5 Watt - 7,4 Watt mit 3 Stück 2,5 Zoll HDD (hdparm aktiv)
      *** alles im idle ***

    ... wird fortgesetzt

  • Ist es auch mit einem 4-Port Controller möglich 4 SATA Geräte gleichzeitig laufen zu lassen, oder gibt es da Limitierungen beim RockPro64?

    Ich hätte an so einen Controller gedacht : https://www.amazon.de/gp/product/B07MPG1DKD?pf_rd_p=d12b27d6-0a90-4a73-9da3-4e84e7c49e87&pf_rd_r=F2C7Z1TC8GT0SKV49X2M

  • Hallo smx52,

    würde nichts dagegen sprechen. Den Chipsatz haben wir ja gerade erfolgreich getestet.
    https://forum.frank-mankel.org/topic/299/sata-karte-marvell-88se9230-chipsatz

    Und @flockeee spielt auch gerade mit anderer Firmware herum, worauf ich sehr gespannt bin.

    Einziges Problem, du müsstest dir Gedanken über eine vernünftige Stromversorgung machen.

    @FrankM sagte in [HOWTO]ROCKPro64 - NAS bauen Teil 1:

    Hallo smx52,

    ...

    Einziges Problem, du müsstest dir Gedanken über eine vernünftige Stromversorgung machen.

    Zur Stromversorgung:
    Ich betreibe 2 HDD (WD Red 2TB) + 2 SSD am 12V Port des RP64.
    Dazu brauch man natürlich ein ordentliches Netzteil (bei mir 12V/7.5A) und Adapter.
    Ich habe den, welcher zum NAS case beigelegt war(ROCKPro64 Power Cable for dual SATA Drives und einen Verteiler in Verwendung (S-ATA Strom-Adapter).

    Ich bin mir nicht sicher welche Leistung der 12V Port des RP64 liefern kann, habe dazu leider keine specs gefunden. Mein Setup sollte maximal 6A unter Last für die Laufwerke ziehen. Für den RP64 sollte man auch nochmal max 2A rechnen. Demzufolge könnte mein NT unter Last hier schon an seine Grenzen gelangen (wird auch "handwarm" unter Last).
    Bei der Benutzung von 4xHDDs braucht man natürlich mehr Leistung (>=120W) und ich weiß wie gesagt auch nicht, wieviel Leistung der 12V Anschluß zu liefern vermag. Das sollte man dabei bedenken.

  • Die Pinne für den Adapter liegen ja nur parallel zum Eingang des Steckers vom Netzteil. Also, solange da nichts abfackelt kann man da eine Menge Strom drüber jagen 🙂

    Wenn es funktioniert ist ja alles gut.

  • [V] RockPro64 V2.1

    Frank's Resterampe rockpro64 verkauf
    1
    1
    0 Stimmen
    1 Beiträge
    147 Aufrufe
    Niemand hat geantwortet
  • ROCKPro64 - Samsung Portable SSD T5 500GB

    Hardware rockpro64
    1
    0 Stimmen
    1 Beiträge
    317 Aufrufe
    Niemand hat geantwortet
  • ROCKPro64 - Kamils neuer 0.10.x Release

    ROCKPro64 linux rockpro64
    1
    1
    0 Stimmen
    1 Beiträge
    256 Aufrufe
    Niemand hat geantwortet
  • Unterstützung Lüfter

    ROCKPro64 rockpro64
    5
    0 Stimmen
    5 Beiträge
    2k Aufrufe
    FrankMF
    Mit dem neuen Release hatte jemand das mal ausprobiert -> https://forum.frank-mankel.org/topic/795/fan-control-omv-auyfan-0-10-12-gitlab-ci-linux-build-184-kernel-5-6/6 Dieser Kernel kam zur Anwendung Linux rockpro64 5.6.0-1137-ayufan-ge57f05e7bf8f #ayufan SMP Wed Apr 15 10:16:02 UTC 2020 aarch64 GNU/Linux Dort stellt man dann fest, das sich eine Kleinigkeit geändert hat. Der Pfad und der Dateiname hat sich geändert. Kontrollieren kann man das mit nano /sys/devices/platform/pwm-fan/hwmon/hwmon3/pwm1 Der Wert geht von 0 - 255, wie gehabt.
  • Recover Button

    Hardware hardware rockpro64
    2
    2
    0 Stimmen
    2 Beiträge
    887 Aufrufe
    FrankMF
    Ich hab das mal ausprobiert. Den Recover Button so lange drücken, bis folgendes erscheint. In: serial@ff1a0000 Out: serial@ff1a0000 Err: serial@ff1a0000 Model: Pine64 RockPro64 rockchip_dnl_mode = 1 mode rockchip_dnl_mode = 2 mode rockchip_dnl_mode = 3 mode rockchip_dnl_mode = 4 mode entering maskrom mode... RKFlashTool clonen root@thinkpad:/home/frank/test# git clone https://github.com/rockchip-linux/rkflashtool Klone nach 'rkflashtool' ... remote: Counting objects: 663, done. remote: Total 663 (delta 0), reused 0 (delta 0), pack-reused 663 Empfange Objekte: 100% (663/663), 114.94 KiB | 0 bytes/s, Fertig. Löse Unterschiede auf: 100% (367/367), Fertig. In das Verzeichnis wechseln root@thinkpad:/home/frank/test# cd rkflashtool/ Inhalt root@thinkpad:/home/frank/test/rkflashtool# ls doc Makefile rkcrc.h rkflashtool.h rkparametersblock examples README rkflashall rkmisc rkunpack.c fixversion.sh release.sh rkflashloader rkpad rkunsign flashuboot rkcrc.c rkflashtool.c rkparameters version.h RKFlashtool bauen root@thinkpad:/home/frank/test/rkflashtool# make gcc -O2 -W -Wall -I/usr/include/libusb-1.0 rkflashtool.c -o rkflashtool -lusb-1.0 gcc -O2 -W -Wall -I/usr/include/libusb-1.0 rkcrc.c -o rkcrc -lusb-1.0 gcc -O2 -W -Wall -I/usr/include/libusb-1.0 rkunpack.c -o rkunpack -lusb-1.0 Ich habe ein USB-A to USB-A Kabel vom USB-C Port des ROCKPro64 zu meinem Notebook hergestellt. root@thinkpad:/home/frank/test/rkflashtool# sudo ./rkflashtool v rkflashtool: info: rkflashtool v5.2 rkflashtool: info: Detected RK3399... rkflashtool: info: interface claimed rkflashtool: info: MASK ROM MODE rkflashtool: info: chip version: -..- Ok, Verbindung steht. Eine Übersicht der Befehle root@thinkpad:/home/frank/test/rkflashtool# sudo ./rkflashtool rkflashtool: info: rkflashtool v5.2 rkflashtool: fatal: usage: rkflashtool b [flag] reboot device rkflashtool l <file load DDR init (MASK ROM MODE) rkflashtool L <file load USB loader (MASK ROM MODE) rkflashtool v read chip version rkflashtool n read NAND flash info rkflashtool i offset nsectors >outfile read IDBlocks rkflashtool j offset nsectors <infile write IDBlocks rkflashtool m offset nbytes >outfile read SDRAM rkflashtool M offset nbytes <infile write SDRAM rkflashtool B krnl_addr parm_addr exec SDRAM rkflashtool r partname >outfile read flash partition rkflashtool w partname <infile write flash partition rkflashtool r offset nsectors >outfile read flash rkflashtool w offset nsectors <infile write flash rkflashtool p >file fetch parameters rkflashtool P <file write parameters rkflashtool e partname erase flash (fill with 0xff) rkflashtool e offset nsectors erase flash (fill with 0xff)
  • OMV Images

    ROCKPro64 rockpro64
    3
    0 Stimmen
    3 Beiträge
    975 Aufrufe
    FrankMF
    Kurzes Update https://github.com/ayufan-rock64/linux-build/releases/download/0.8.0rc10/stretch-openmediavault-rockpro64-0.8.0rc10-1125-armhf.img.xz Startet Incl. WiFi & PCIe NVMe SSD War aber nur ein ganz kurzer Test!!
  • stretch-minimal-rockpro64

    Verschoben Linux rockpro64
    3
    0 Stimmen
    3 Beiträge
    1k Aufrufe
    FrankMF
    Mal ein Test was der Speicher so kann. rock64@rockpro64:~/tinymembench$ ./tinymembench tinymembench v0.4.9 (simple benchmark for memory throughput and latency) ========================================================================== == Memory bandwidth tests == == == == Note 1: 1MB = 1000000 bytes == == Note 2: Results for 'copy' tests show how many bytes can be == == copied per second (adding together read and writen == == bytes would have provided twice higher numbers) == == Note 3: 2-pass copy means that we are using a small temporary buffer == == to first fetch data into it, and only then write it to the == == destination (source -> L1 cache, L1 cache -> destination) == == Note 4: If sample standard deviation exceeds 0.1%, it is shown in == == brackets == ========================================================================== C copy backwards : 2812.7 MB/s C copy backwards (32 byte blocks) : 2811.9 MB/s C copy backwards (64 byte blocks) : 2632.8 MB/s C copy : 2667.2 MB/s C copy prefetched (32 bytes step) : 2633.5 MB/s C copy prefetched (64 bytes step) : 2640.8 MB/s C 2-pass copy : 2509.8 MB/s C 2-pass copy prefetched (32 bytes step) : 2431.6 MB/s C 2-pass copy prefetched (64 bytes step) : 2424.1 MB/s C fill : 4887.7 MB/s (0.5%) C fill (shuffle within 16 byte blocks) : 4883.0 MB/s C fill (shuffle within 32 byte blocks) : 4889.3 MB/s C fill (shuffle within 64 byte blocks) : 4889.2 MB/s --- standard memcpy : 2807.3 MB/s standard memset : 4890.4 MB/s (0.3%) --- NEON LDP/STP copy : 2803.7 MB/s NEON LDP/STP copy pldl2strm (32 bytes step) : 2802.1 MB/s NEON LDP/STP copy pldl2strm (64 bytes step) : 2800.7 MB/s NEON LDP/STP copy pldl1keep (32 bytes step) : 2745.5 MB/s NEON LDP/STP copy pldl1keep (64 bytes step) : 2745.8 MB/s NEON LD1/ST1 copy : 2801.9 MB/s NEON STP fill : 4888.9 MB/s (0.3%) NEON STNP fill : 4850.1 MB/s ARM LDP/STP copy : 2803.8 MB/s ARM STP fill : 4893.0 MB/s (0.5%) ARM STNP fill : 4851.7 MB/s ========================================================================== == Framebuffer read tests. == == == == Many ARM devices use a part of the system memory as the framebuffer, == == typically mapped as uncached but with write-combining enabled. == == Writes to such framebuffers are quite fast, but reads are much == == slower and very sensitive to the alignment and the selection of == == CPU instructions which are used for accessing memory. == == == == Many x86 systems allocate the framebuffer in the GPU memory, == == accessible for the CPU via a relatively slow PCI-E bus. Moreover, == == PCI-E is asymmetric and handles reads a lot worse than writes. == == == == If uncached framebuffer reads are reasonably fast (at least 100 MB/s == == or preferably >300 MB/s), then using the shadow framebuffer layer == == is not necessary in Xorg DDX drivers, resulting in a nice overall == == performance improvement. For example, the xf86-video-fbturbo DDX == == uses this trick. == ========================================================================== NEON LDP/STP copy (from framebuffer) : 602.5 MB/s NEON LDP/STP 2-pass copy (from framebuffer) : 551.6 MB/s NEON LD1/ST1 copy (from framebuffer) : 667.1 MB/s NEON LD1/ST1 2-pass copy (from framebuffer) : 605.6 MB/s ARM LDP/STP copy (from framebuffer) : 445.3 MB/s ARM LDP/STP 2-pass copy (from framebuffer) : 428.8 MB/s ========================================================================== == Memory latency test == == == == Average time is measured for random memory accesses in the buffers == == of different sizes. The larger is the buffer, the more significant == == are relative contributions of TLB, L1/L2 cache misses and SDRAM == == accesses. For extremely large buffer sizes we are expecting to see == == page table walk with several requests to SDRAM for almost every == == memory access (though 64MiB is not nearly large enough to experience == == this effect to its fullest). == == == == Note 1: All the numbers are representing extra time, which needs to == == be added to L1 cache latency. The cycle timings for L1 cache == == latency can be usually found in the processor documentation. == == Note 2: Dual random read means that we are simultaneously performing == == two independent memory accesses at a time. In the case if == == the memory subsystem can't handle multiple outstanding == == requests, dual random read has the same timings as two == == single reads performed one after another. == ========================================================================== block size : single random read / dual random read 1024 : 0.0 ns / 0.0 ns 2048 : 0.0 ns / 0.0 ns 4096 : 0.0 ns / 0.0 ns 8192 : 0.0 ns / 0.0 ns 16384 : 0.0 ns / 0.0 ns 32768 : 0.0 ns / 0.0 ns 65536 : 4.5 ns / 7.2 ns 131072 : 6.8 ns / 9.7 ns 262144 : 9.8 ns / 12.8 ns 524288 : 11.4 ns / 14.7 ns 1048576 : 16.0 ns / 22.6 ns 2097152 : 114.0 ns / 175.3 ns 4194304 : 161.7 ns / 219.9 ns 8388608 : 190.7 ns / 241.5 ns 16777216 : 205.3 ns / 250.5 ns 33554432 : 212.9 ns / 255.5 ns 67108864 : 222.3 ns / 271.1 ns
  • Serielle Konsole UART2

    Angeheftet Verschoben Hardware hardware rockpro64
    8
    2
    0 Stimmen
    8 Beiträge
    3k Aufrufe
    FrankMF
    Ich verweise mal auf einen Artikel auf einer Webseite von mir, der Einsteiger Niveau hat. https://frank-mankel.de/wichtig/serielle-konsole Wenn es dann noch Probleme gibt, einfach fragen. Und beachte bitte, das wir hier nicht über PIs schreiben, sondern über ROCKPros. Da könnte es kleine Unterschiede geben. https://www.raspberrypi.org/documentation/configuration/uart.md