Skip to content

Recover Button

Hardware
  • In der Version v2.0 fehlte dieser Button noch, er war einfach nicht bestückt.
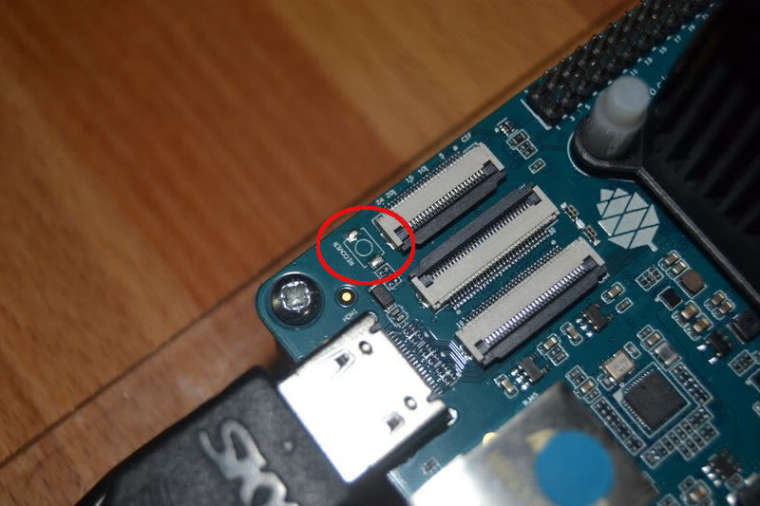
    0_1532793266131_DSC_0040_ergebnis.JPG

    Wenn jemand den vermisst, zur Not kann man da was dran löten. Sollte machbar sein.

    v2.1
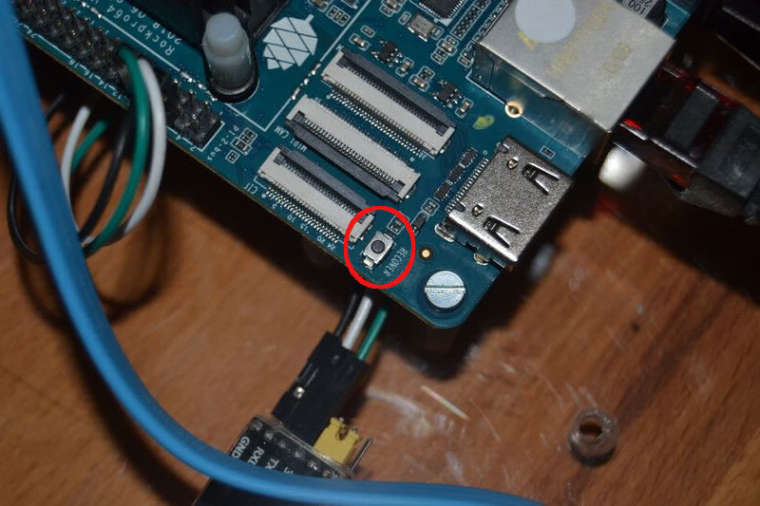
    0_1532793316445_DSC_0039_ergebnis.JPG

    Die Frage, was macht das Ding? Gehen wir mal auf die Suche.....

    Kamil hat auf seiner Release Seite einen Link zu u-boot recovery selection

    Kamil erklärt das so

    ayufan: introduce recovery button mode selection

    Press and hold recovery button to choose suitable boot mode.
    When given mode is selected release the button.
    Each mode exposes device over USB-OTG and can be connected via USB A-to-A cable

    1 blink: share eMMC or SD as virtual disk
    2 blinks: enter fastboot (Android's)
    3 blinks: enter RockUSB download mode
    4 blinks: enter MaskROM download mode

    Ob das so funktioniert kann ich nicht sagen, da ich nicht 100% weiß wofür das ist.

    Spekulation

    An die USB-C Buchse kann man ein USB A-to-A Kabel anschliessen, damit kann man dann mit verschiedenen Programmen auf das Board zugreifen.

    Für Entwickler vermutlich total wichtig, denke ich das es für den durchschnittlichen Anwender unwichtig ist.

  • Ich hab das mal ausprobiert.

    Den Recover Button so lange drücken, bis folgendes erscheint.

    In:    serial@ff1a0000                                                          
    Out:   serial@ff1a0000                                                          
    Err:   serial@ff1a0000                                                          
    Model: Pine64 RockPro64                                                         
    rockchip_dnl_mode = 1 mode                                                      
    rockchip_dnl_mode = 2 mode                                                      
    rockchip_dnl_mode = 3 mode                                                      
    rockchip_dnl_mode = 4 mode                                                      
    entering maskrom mode...
    

    RKFlashTool clonen

     root@thinkpad:/home/frank/test# git clone https://github.com/rockchip-linux/rkflashtool
     Klone nach 'rkflashtool' ...
     remote: Counting objects: 663, done.
     remote: Total 663 (delta 0), reused 0 (delta 0), pack-reused 663
     Empfange Objekte: 100% (663/663), 114.94 KiB | 0 bytes/s, Fertig.
     Löse Unterschiede auf: 100% (367/367), Fertig.
    

    In das Verzeichnis wechseln

    root@thinkpad:/home/frank/test# cd rkflashtool/
    

    Inhalt

    root@thinkpad:/home/frank/test/rkflashtool# ls
    doc	       Makefile    rkcrc.h	  rkflashtool.h  rkparametersblock
    examples       README	   rkflashall	  rkmisc	 rkunpack.c
    fixversion.sh  release.sh  rkflashloader  rkpad		 rkunsign
    flashuboot     rkcrc.c	   rkflashtool.c  rkparameters	 version.h
    

    RKFlashtool bauen

    root@thinkpad:/home/frank/test/rkflashtool# make
    gcc -O2 -W -Wall -I/usr/include/libusb-1.0 rkflashtool.c -o rkflashtool  -lusb-1.0
    gcc -O2 -W -Wall -I/usr/include/libusb-1.0 rkcrc.c -o rkcrc  -lusb-1.0
    gcc -O2 -W -Wall -I/usr/include/libusb-1.0 rkunpack.c -o rkunpack  -lusb-1.0
    

    Ich habe ein USB-A to USB-A Kabel vom USB-C Port des ROCKPro64 zu meinem Notebook hergestellt.

    root@thinkpad:/home/frank/test/rkflashtool# sudo ./rkflashtool v
    rkflashtool: info: rkflashtool v5.2
    rkflashtool: info: Detected RK3399...
    rkflashtool: info: interface claimed
    rkflashtool: info: MASK ROM MODE
    rkflashtool: info: chip version: -..-
    

    Ok, Verbindung steht.

    Eine Übersicht der Befehle

    root@thinkpad:/home/frank/test/rkflashtool# sudo ./rkflashtool
    rkflashtool: info: rkflashtool v5.2
    rkflashtool: fatal: usage:
    	rkflashtool b [flag]            	reboot device
    	rkflashtool l <file             	load DDR init (MASK ROM MODE)
    	rkflashtool L <file             	load USB loader (MASK ROM MODE)
    	rkflashtool v                   	read chip version
    	rkflashtool n                   	read NAND flash info
    	rkflashtool i offset nsectors >outfile 	read IDBlocks
    	rkflashtool j offset nsectors <infile  	write IDBlocks
    	rkflashtool m offset nbytes   >outfile 	read SDRAM
    	rkflashtool M offset nbytes   <infile  	write SDRAM
    	rkflashtool B krnl_addr parm_addr      	exec SDRAM
    	rkflashtool r partname >outfile 	read flash partition
    	rkflashtool w partname <infile  	write flash partition
    	rkflashtool r offset nsectors >outfile 	read flash
    	rkflashtool w offset nsectors <infile  	write flash
    	rkflashtool p >file             	fetch parameters
    	rkflashtool P <file             	write parameters
    	rkflashtool e partname          	erase flash (fill with 0xff)
    	rkflashtool e offset nsectors   	erase flash (fill with 0xff)
    
  • FrankMF FrankM hat am auf dieses Thema verwiesen

  • Kernel 6.0.0-rc7

    ROCKPro64
    2
    0 Stimmen
    2 Beiträge
    143 Aufrufe
    FrankMF

    Geht 🙂

    fb1bc176-5c57-48bf-8d75-1834b5548552-grafik.png

    Link Preview Image Releases · ayufan-rock64/linux-mainline-kernel

    Linux kernel source tree. Contribute to ayufan-rock64/linux-mainline-kernel development by creating an account on GitHub.

    favicon

    GitHub (github.com)

    Altes Image installieren, die zwei .deb Files vom Kamil herunterladen.

    dpkg -i *.deb

    und neustarten.

    Und hochgezogen auf Debian Bullseye

    root@rockpro64:~# cat /etc/debian_version 11.5
  • Mainline 5.4.x

    Images
    2
    0 Stimmen
    2 Beiträge
    348 Aufrufe
    FrankMF

    Bootet bei mir weder von USB3-SSD noch von SD-Karte.

    USB3-SSD -> https://pastebin.com/QAS92sme
    SD-Karte -> https://pastebin.com/Bsr3WLJ7

  • Mainline 5.3.x

    Images
    3
    0 Stimmen
    3 Beiträge
    400 Aufrufe
    FrankMF

    5.3.0-1119-ayufan released

    ayufan: defconfig: enable DRM_PANFROST/DRM_LIMA
  • ROCKPro64 - RP64.GPIO

    Angeheftet Verschoben Hardware
    6
    0 Stimmen
    6 Beiträge
    6k Aufrufe
    FrankMF

    Hallo zusammen,

    da ich weiß das dieser Artikel recht beliebt ist, wollen wir den heute mal aktualisieren. Vieles aus den vorherigen Beiträgen passt noch. Es gibt aber kleine Anpassungen.

    Hardware ROCKPro64v21. 2GB RAM Software Kamils Release 0.10.9 Linux rockpro64 5.6.0-1132-ayufan-g81043e6e109a #ayufan SMP Tue Apr 7 10:07:35 UTC 2020 aarch64 GNU/Linux Installation apt install python

    Danach laden wir das Projekt

    git clone https://github.com/Leapo/Rock64-R64.GPIO

    PIN Nummern anpassen

    cd Rock64-R64.GPIO/R64 nano _GPIO.py

    Datei ergänzen

    # Define GPIO arrays #ROCK_valid_channels = [27, 32, 33, 34, 35, 36, 37, 38, 64, 65, 67, 68, 69, 76, 79, 80, 81, 82, 83, 84, 85, 86, 87, 88, 89, 96, 97, 98, 100, 101, 102, 103, 104] #BOARD_to_ROCK = [0, 0, 0, 89, 0, 88, 0, 0, 64, 0, 65, 0, 67, 0, 0, 100, 101, 0, 102, 97, 0, 98, 103, 96, 104, 0, 76, 68, 69, 0, 0, 0, 38, 32, 0, 33, 37, 34, 36, 0, 35, 0, 0, 81, 82, 87, 83, 0, 0, 80, 79, 85, 84, 27, 86, 0, 0, 0, 0, 0, 0, 89, 88] #BCM_to_ROCK = [68, 69, 89, 88, 81, 87, 83, 76, 104, 98, 97, 96, 38, 32, 64, 65, 37, 80, 67, 33, 36, 35, 100, 101, 102, 103, 34, 82] ROCK_valid_channels = [52,53,152,54,50,33,48,39,41,43,155,156,125,122,121,148,147,120,36,149,153,42,45,44,124,126,123,127] BOARD_to_ROCK = [0,0,0,52,0,53,0,152,148,0,147,54,120,50,0,33,36,0,149,48,0,39,153,41,42,0,45,43,44,155,0,156,124,125,0,122,126,121,123,0,127] BCM_to_ROCK = [43,44,52,53,152,155,156,45,42,39,48,41,124,125,148,147,124,54,120,122,123,127,33,36,149,153,121,50]

    Abspeichern.

    Datei test.py anlegen

    nano test.py

    Inhalt

    #!/usr/bin/env python # Frank Mankel, 2018, LGPLv3 License # Rock 64 GPIO Library for Python # Thanks Allison! Thanks smartdave! import R64.GPIO as GPIO from time import sleep print("Output Test R64.GPIO Module...") # Set Variables var_gpio_out = 156 var_gpio_in = 155 # GPIO Setup GPIO.setwarnings(True) GPIO.setmode(GPIO.ROCK) GPIO.setup(var_gpio_out, GPIO.OUT, initial=GPIO.HIGH) # Set up GPIO as an output, with an initial state of HIGH GPIO.setup(var_gpio_in, GPIO.IN, pull_up_down=GPIO.PUD_UP) # Set up GPIO as an input, pullup enabled # Test Output print("") print("Testing GPIO Input/Output:") while True: var_gpio_state_in = GPIO.input(var_gpio_in) var_gpio_state = GPIO.input(var_gpio_out) # Return State of GPIO if var_gpio_state == 0 and var_gpio_state_in == 1: GPIO.output(var_gpio_out,GPIO.HIGH) # Set GPIO to HIGH print("Input State: " + str(var_gpio_state_in)) # Print results print("Output State IF : " + str(var_gpio_state)) # Print results else: GPIO.output(var_gpio_out,GPIO.LOW) # Set GPIO to LOW print("Input State: " + str(var_gpio_state_in)) # Print results print("Output State ELSE: " + str(var_gpio_state)) # Print results sleep(0.5) exit() Beispiel

    Bild Text

    Wenn der Taster im Bild betätigt wird, soll die LED blinken.

    Wir benutzen folgende Ein- Augänge des ROCKPro64.

    # Set Variables var_gpio_out = 156 var_gpio_in = 155

    Das heißt:

    an Pin 1 (3,3V) kommt eine Strippe des Tasters an Pin 29 (Input) kommt eine Strippe des Tasters an Pin 31 (Output) kommt der Plus-Pol der LED an Pin 39 (GND) kommt der Minus-Pol der LED

    Somit wird auf den Eingang (Pin 29) bei Betätigung des Tasters 3,3 Volt angelegt. Damit wird dann der Eingang als High (1) erkannt. Die LED wird über den Ausgang (Pin 31) gesteuert.

    Starten kann man das Script mit

    python test.py

  • PCI-e X4 to M.2/NGFF NVMe SSD Interface Card

    Hardware
    1
    0 Stimmen
    1 Beiträge
    654 Aufrufe
    Niemand hat geantwortet
  • RockPro64 - Firewall mit zwei LAN Schnittstellen!

    Verschoben ROCKPro64
    1
    0 Stimmen
    1 Beiträge
    801 Aufrufe
    Niemand hat geantwortet
  • ROCKPro64 - Der Bootvorgang

    Verschoben Hardware
    3
    0 Stimmen
    3 Beiträge
    2k Aufrufe
    FrankMF

    Um einen neuen Kernel booten zu können, brauche ich diese 4 Dateien unter /boot

    config-4.19.0-rc4-1065-ayufan-g72e04c7b3e06 initrd.img-4.19.0-rc4-1065-ayufan-g72e04c7b3e06 System.map-4.19.0-rc4-1065-ayufan-g72e04c7b3e06 vmlinuz-4.19.0-rc4-1065-ayufan-g72e04c7b3e06

    Und den Ordner /boot/dtbs/4.19.0-rc4-1065-ayufan-g72e04c7b3e06 mit folgendem Inhalt

    rock64@rockpro64v2_0:/boot/dtbs/4.19.0-rc4-1065-ayufan-g72e04c7b3e06$ ls -la total 104 drwxr-xr-x 26 root root 4096 Sep 30 09:54 . drwxr-xr-x 6 root root 4096 Sep 30 09:55 .. drwxr-xr-x 2 root root 4096 Sep 30 09:54 al drwxr-xr-x 2 root root 4096 Sep 30 09:54 allwinner drwxr-xr-x 2 root root 4096 Sep 30 09:54 altera drwxr-xr-x 2 root root 4096 Sep 30 09:54 amd drwxr-xr-x 2 root root 4096 Sep 30 09:54 amlogic drwxr-xr-x 2 root root 4096 Sep 30 09:54 apm drwxr-xr-x 2 root root 4096 Sep 30 09:54 arm drwxr-xr-x 4 root root 4096 Sep 30 09:54 broadcom drwxr-xr-x 2 root root 4096 Sep 30 09:54 cavium drwxr-xr-x 2 root root 4096 Sep 30 09:54 exynos drwxr-xr-x 2 root root 4096 Sep 30 09:54 freescale drwxr-xr-x 2 root root 4096 Sep 30 09:54 hisilicon drwxr-xr-x 2 root root 4096 Sep 30 09:54 lg drwxr-xr-x 2 root root 4096 Sep 30 09:54 marvell drwxr-xr-x 2 root root 4096 Sep 30 09:54 mediatek drwxr-xr-x 2 root root 4096 Sep 30 09:54 nvidia drwxr-xr-x 2 root root 4096 Sep 30 09:54 qcom drwxr-xr-x 2 root root 4096 Sep 30 09:54 renesas drwxr-xr-x 2 root root 4096 Sep 30 09:54 rockchip drwxr-xr-x 2 root root 4096 Sep 30 09:54 socionext drwxr-xr-x 2 root root 4096 Sep 30 09:54 sprd drwxr-xr-x 2 root root 4096 Sep 30 09:54 synaptics drwxr-xr-x 2 root root 4096 Sep 30 09:54 xilinx drwxr-xr-x 2 root root 4096 Sep 30 09:54 zte

    Unter /boot/extlinux liegt dann die Datei extlinux.conf

    Die sieht bei mir dann so aus

    timeout 10 menu title select kernel label kernel-4.19.0-rc4-1065-ayufan-g72e04c7b3e06 kernel /boot/vmlinuz-4.19.0-rc4-1065-ayufan-g72e04c7b3e06 initrd /boot/initrd.img-4.19.0-rc4-1065-ayufan-g72e04c7b3e06 devicetreedir /boot/dtbs/4.19.0-rc4-1065-ayufan-g72e04c7b3e06 append rw panic=10 init=/sbin/init coherent_pool=1M ethaddr=${ethaddr} eth1addr=${eth1addr} serial=${serial#} cgroup_enable=cpuset cgroup_memory=1 cgroup_enable=memory swapaccount=1 root=LABEL=TEST rootwait rootfstype=ext4 label kernel-4.19.0-rc4-1065-ayufan-g72e04c7b3e06-memtest kernel /boot/vmlinuz-4.19.0-rc4-1065-ayufan-g72e04c7b3e06 initrd /boot/initrd.img-4.19.0-rc4-1065-ayufan-g72e04c7b3e06 devicetreedir /boot/dtbs/4.19.0-rc4-1065-ayufan-g72e04c7b3e06 append rw panic=10 init=/sbin/init coherent_pool=1M ethaddr=${ethaddr} eth1addr=${eth1addr} serial=${serial#} cgroup_enable=cpuset cgroup_memory=1 cgroup_enable=memory swapaccount=1 root=LABEL=TEST rootwait rootfstype=ext4 memtest

    Darunter kommen dann evt. die alten Kernel die installiert waren, das habe ich hier im Beispiel weg gelassen.

  • Interessante Links

    ROCKPro64
    1
    0 Stimmen
    1 Beiträge
    640 Aufrufe
    Niemand hat geantwortet