Skip to content

Intel I350 T4V2

Hardware
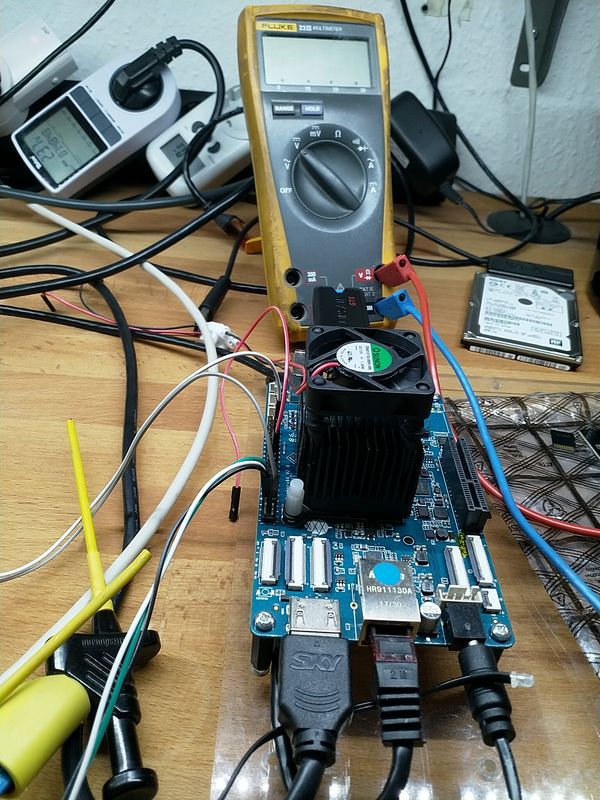
  • Es gab welche im Pine64-Forum, die schrieben das diese Karte auf dem ROCKPro64 läuft. Ok, da ich an so einer Karte sehr interessiert bin, mal eben bestellt und eingebaut.

    0_1534361077398_Intel_I350_T4V2_ergebnis.jpg

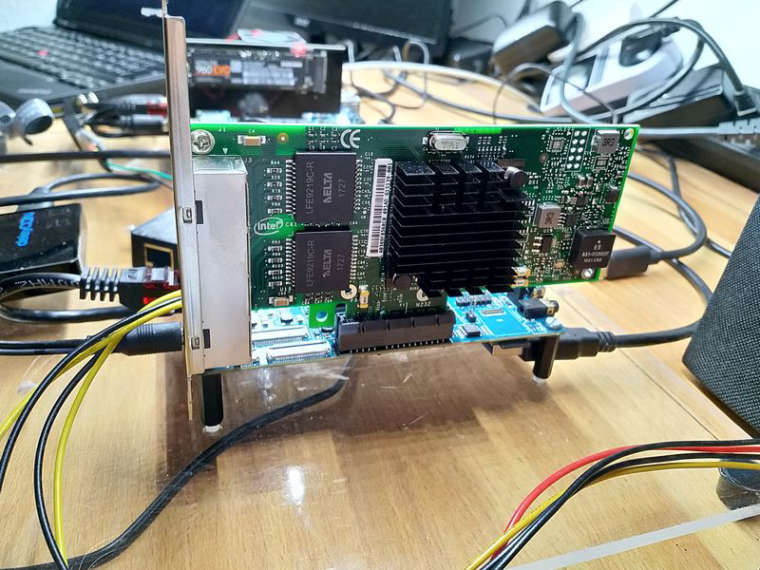
    Ich bekomme sie leider nicht zum Laufen 😞

    Software

    rock64@rockpro64:~$ uname -a
    Linux rockpro64 4.4.132-1075-rockchip-ayufan-ga83beded8524 #1 SMP Thu Jul 26 08:22:22 UTC 2018 aarch64 GNU/Linux
    

    Treiber

    https://downloadcenter.intel.com/download/13663

    Modul

    Modul gebaut nach Anleitung

    rock64@rockpro64:~$ lsmod
    Module                  Size  Used by
    midgard_kbase         651264  0
    dw_hdmi_i2s_audio      16384  0
    rockchip_saradc        16384  0
    igb                   196608  0
    ip_tables              24576  0
    x_tables               32768  1 ip_tables
    autofs4                40960  0
    phy_rockchip_pcie      16384  0
    

    Wird dann wohl geladen. In /etc/modules eingetragen, damit es beim Start geladen wird.

    Problem

    Wenn ich das Modul entlade und erneut lade, bekomme ich diese Meldung mit dmesg

    [ 1047.587217] Intel(R) Gigabit Ethernet Linux Driver - version 5.3.5.18
    [ 1047.587897] Copyright(c) 2007 - 2018 Intel Corporation.
    

    Das kann nicht alles sein, weil danach die Schnittstellen gesetzt werden müssten.

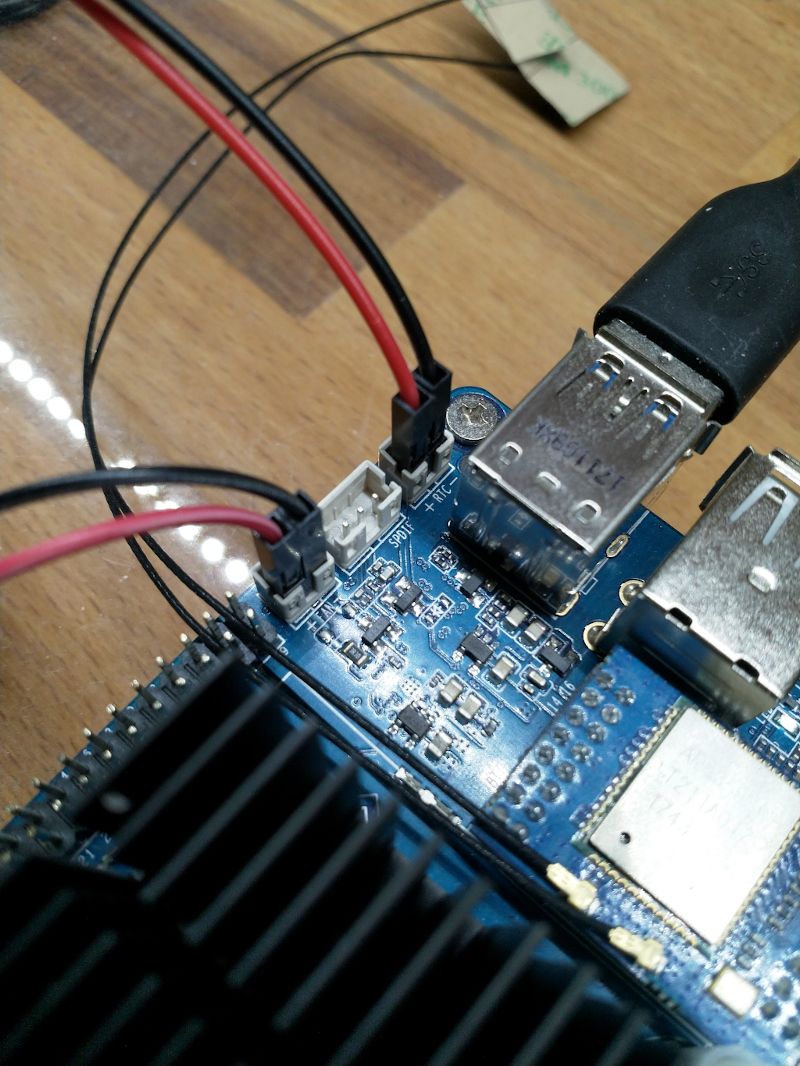
    Da die Hardware auch nicht wirklich aussieht, als wenn sie lebt. Keine LED leuchtet wenn ich ein Kabel einstecke, kann da was nicht richtig sein. Das Kommando

    sudo lspci -vvv
    

    spuckt auch gar nichts aus. Also scheint die Karte nicht zu funktionieren.

    root@rockpro64:/home/rock64# dmesg | grep -E pcie                
    [    0.504076] of_get_named_gpiod_flags: parsed 'gpio' property of node '/vcc3v3-pcie-regulator[0]' - status (0)
    [    0.504126] reg-fixed-voltage vcc3v3-pcie-regulator: Looking up vin-supply from device tree
    [    0.504165] vcc3v3_pcie: supplied by dc_12v
    [    0.504230] vcc3v3_pcie: 3300 mV 
    [    0.504383] reg-fixed-voltage vcc3v3-pcie-regulator: vcc3v3_pcie supplying 3300000uV
    [    2.040888] vcc3v3_pcie: disabling
    [    2.311600] phy phy-pcie-phy.9: Looking up phy-supply from device tree
    [    2.311617] phy phy-pcie-phy.9: Looking up phy-supply property in node /pcie-phy failed
    [    2.313550] rockchip-pcie f8000000.pcie: GPIO lookup for consumer ep
    [    2.313567] rockchip-pcie f8000000.pcie: using device tree for GPIO lookup
    [    2.313613] of_get_named_gpiod_flags: parsed 'ep-gpios' property of node '/pcie@f8000000[0]' - status (0)
    [    2.314014] rockchip-pcie f8000000.pcie: Looking up vpcie3v3-supply from device tree
    [    2.314148] rockchip-pcie f8000000.pcie: Looking up vpcie1v8-supply from device tree
    [    2.314164] rockchip-pcie f8000000.pcie: Looking up vpcie1v8-supply property in node /pcie@f8000000 failed
    [    2.314200] rockchip-pcie f8000000.pcie: no vpcie1v8 regulator found
    [    2.318356] rockchip-pcie f8000000.pcie: Looking up vpcie0v9-supply from device tree
    [    2.318372] rockchip-pcie f8000000.pcie: Looking up vpcie0v9-supply property in node /pcie@f8000000 failed
    [    2.318399] rockchip-pcie f8000000.pcie: no vpcie0v9 regulator found
    [    2.323371] rockchip-pcie f8000000.pcie: invalid power supply
    [    2.827428] rockchip-pcie f8000000.pcie: PCIe link training gen1 timeout!
    [    2.827625] rockchip-pcie: probe of f8000000.pcie failed with error -110
    root@rockpro64:/home/rock64# 
    

    Zum Vergleich, erfolgreiche Initialisierung der NVMe PCIe Karte.

    rock64@rockpro64v2_0:/sys/class/hwmon/hwmon0$ dmesg | grep -E pcie
    [    0.503626] of_get_named_gpiod_flags: parsed 'gpio' property of node '/vcc3v3-pcie-regulator[0]' - status (0)
    [    0.503677] reg-fixed-voltage vcc3v3-pcie-regulator: Looking up vin-supply from device tree
    [    0.503716] vcc3v3_pcie: supplied by dc_12v
    [    0.503781] vcc3v3_pcie: 3300 mV 
    [    0.503932] reg-fixed-voltage vcc3v3-pcie-regulator: vcc3v3_pcie supplying 3300000uV
    [    2.654296] vcc3v3_pcie: disabling
    [    3.143787] phy phy-pcie-phy.9: Looking up phy-supply from device tree
    [    3.143792] phy phy-pcie-phy.9: Looking up phy-supply property in node /pcie-phy failed
    [    3.190780] rockchip-pcie f8000000.pcie: GPIO lookup for consumer ep
    [    3.190793] rockchip-pcie f8000000.pcie: using device tree for GPIO lookup
    [    3.190867] of_get_named_gpiod_flags: parsed 'ep-gpios' property of node '/pcie@f8000000[0]' - status (0)
    [    3.191154] rockchip-pcie f8000000.pcie: Looking up vpcie3v3-supply from device tree
    [    3.191314] rockchip-pcie f8000000.pcie: Looking up vpcie1v8-supply from device tree
    [    3.191323] rockchip-pcie f8000000.pcie: Looking up vpcie1v8-supply property in node /pcie@f8000000 failed
    [    3.191353] rockchip-pcie f8000000.pcie: no vpcie1v8 regulator found
    [    3.197618] rockchip-pcie f8000000.pcie: Looking up vpcie0v9-supply from device tree
    [    3.197634] rockchip-pcie f8000000.pcie: Looking up vpcie0v9-supply property in node /pcie@f8000000 failed
    [    3.197660] rockchip-pcie f8000000.pcie: no vpcie0v9 regulator found
    [    3.202254] rockchip-pcie f8000000.pcie: invalid power supply
    [    3.262707] PCI host bridge /pcie@f8000000 ranges:
    [    3.280803] rockchip-pcie f8000000.pcie: PCI host bridge to bus 0000:00
    [    3.339349] pcieport 0000:00:00.0: enabling device (0000 -> 0002)
    [    3.350365] pcieport 0000:00:00.0: Signaling PME through PCIe PME interrupt
    [    3.365292] pcie_pme 0000:00:00.0:pcie01: service driver pcie_pme loaded
    [    3.368352] aer 0000:00:00.0:pcie02: service driver aer loaded
    

    Und noch eine merkwürdige Meldung, die ich aber nach Recherche vergessen kann. Soll den Kernel wohl nur als modifiziert flaggen.

    root@rockpro64:/home/rock64# dmesg | grep -E  igb
    [    3.511084] igb: loading out-of-tree module taints kernel.
    

    Ja, ich gebe zu, das ich von dieser Materie so gut wie Null Ahnung habe. Aber auch daran muss man arbeiten 😉

    Irgend jemand eine gute Idee? Oder sieht wo ich was übersehe?

  • Dank eines Hinweises gehe ich im Moment davon aus, das die Karte China Müll ist. Die 50$ Karten sollen billige Nachbauten sein. Karte zurück gesendet!

  • ROCKPro64 - RTC

    Hardware
    1
    0 Stimmen
    1 Beiträge
    300 Aufrufe
    Niemand hat geantwortet
  • 1 Stimmen
    13 Beiträge
    1k Aufrufe
    FrankMF

    Ich möchte das dann hier zum Abschluss bringen, das NAS ist heute zusammengebaut worden. Hier zwei Fotos.

    IMG_20200425_102156_ergebnis.jpg

    IMG_20200425_102206_ergebnis.jpg

  • 0 Stimmen
    4 Beiträge
    360 Aufrufe
    K

    na denn, tippe ich mal so auf default konfiguriert per dhcp 🙂

  • 0 Stimmen
    1 Beiträge
    293 Aufrufe
    Niemand hat geantwortet
  • Serielle Konsole UART2 (2)

    Angeheftet Hardware
    1
    0 Stimmen
    1 Beiträge
    212 Aufrufe
    Niemand hat geantwortet
  • 0 Stimmen
    2 Beiträge
    1k Aufrufe
    FrankMF

    This repo contains the tn40xx Linux driver for 10Gbit NICs based on the TN4010 MAC from Tehuti Networks.

    This driver enables the following 10Gb SFP+ NICs:

    D-Link DXE-810S
    Edimax EN-9320SFP+
    StarTech PEX10000SFP
    Synology E10G15-F1
    ... as well as the following 10GBase-T/NBASE-T NICs:

    D-Link DXE-810T
    Edimax EN-9320TX-E
    EXSYS EX-6061-2
    Intellinet 507950
    StarTech ST10GSPEXNB

    Quelle: https://github.com/ayufan-rock64/tn40xx-driver/tree/master

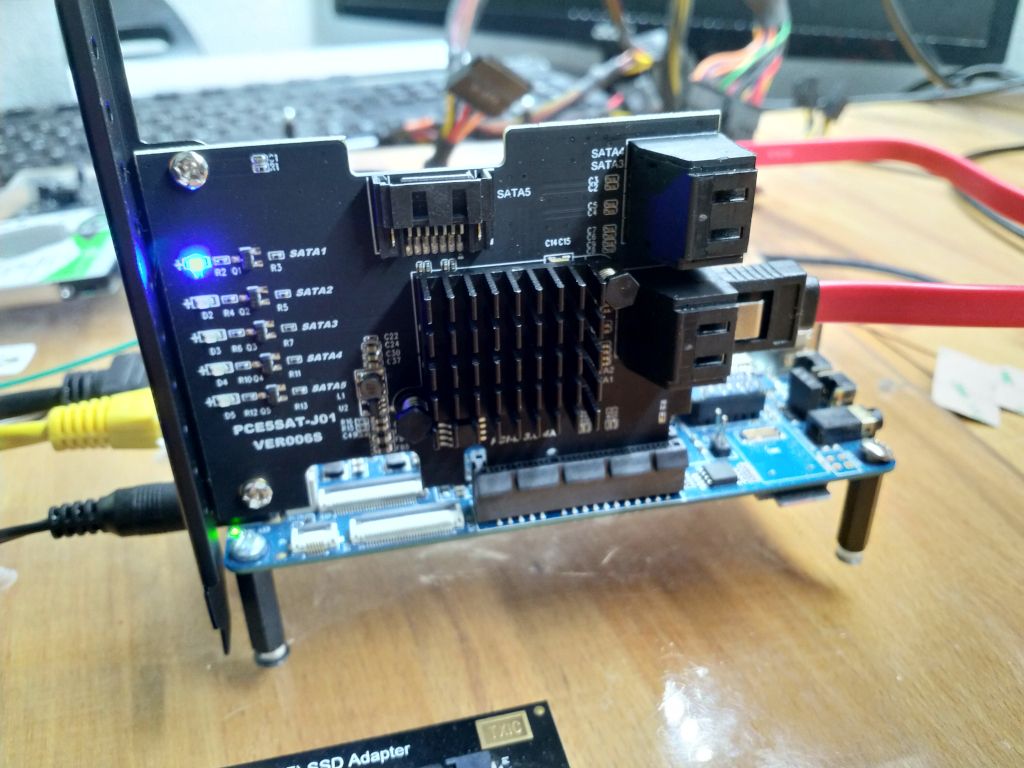
  • SATA Karte Marvell 88SE9230 Chipsatz

    Angeheftet Hardware
    19
    0 Stimmen
    19 Beiträge
    6k Aufrufe
    FrankMF

    Ok, es gibt noch eine andere Möglichkeit.

    Kamil hat mir noch ein wenig geholfen. Mit folgender Änderung werden die Platten gefunden.

    hmm, I had to add /etc/default/extlinux: libahci.skip_host_reset=1

    Sieht dann so aus.

    # Configure timeout to choose the kernel # TIMEOUT="10" # Configure default kernel to boot: check all kernels in `/boot/extlinux/extlinux.conf` # DEFAULT="kernel-4.4.126-rockchip-ayufan-253" # Configure additional kernel configuration options APPEND="$APPEND root=LABEL=linux-root rootwait rootfstype=ext4 libahci.skip_host_reset=1"

    Danach waren die Platten zu sehen.

    root@rockpro64:/tmp/etc/default# blkid /dev/sda2: SEC_TYPE="msdos" LABEL_FATBOOT="boot-efi" LABEL="boot-efi" UUID="ABCD-FC7D" TYPE="vfat" PARTLABEL="boot_efi" PARTUUID="72e36967-4050-4bb3-8f8f-bf6755c38f28" /dev/sda3: LABEL="linux-boot" UUID="8e289a3e-0f9b-4da1-a147-51e03390637c" TYPE="ext4" PARTLABEL="linux_boot" PARTUUID="fe944fd2-3e42-4202-8a95-656e9bdb4be6" /dev/sda4: LABEL="linux-root" UUID="3e9513c6-dfd1-48c9-bee2-04bb5a153056" TYPE="ext4" PARTLABEL="linux_root" PARTUUID="d2d1dd88-030d-4f74-998f-7c9ce7d385d0" /dev/sdb2: SEC_TYPE="msdos" LABEL_FATBOOT="boot-efi" LABEL="boot-efi" UUID="56C9-F745" TYPE="vfat" PARTLABEL="boot_efi" PARTUUID="919c8f73-5f25-4a01-9072-3a5ed9a88ff2" /dev/sdb3: LABEL="linux-boot" UUID="23c19647-f4a1-4197-a877-f1bb03456bef" TYPE="ext4" PARTLABEL="linux_boot" PARTUUID="093d0cc0-d122-4dce-aeb5-4e266b4b7d9d" /dev/sdb4: LABEL="linux-root" UUID="f1c74331-8318-4ee8-a4f7-f0c169fb9944" TYPE="ext4" PARTLABEL="linux_root" PARTUUID="964ab457-58d5-40c4-bb02-dfd37bd2f0da" /dev/sda1: PARTLABEL="loader1" PARTUUID="37466429-e4a4-495c-b9a1-3f74625a3cae" /dev/sdb1: PARTLABEL="loader1" PARTUUID="33f692b3-54cb-4a37-b602-21a2baf32fa0"

    Aber auch hiermit ist ein Boot von der SATA Platte nicht möglich.

    Ich möchte hier noch was vom kamil zitieren.

    (11:44:09) ayufanWithPM: will look later, but this controller is tricky, also on x86 as well
    (11:44:16) ayufanWithPM: jms585 seems to be significantly more stable

    Evt. bekommt er das gefixt 😉

  • ROCKPro64 - RP64.GPIO

    Angeheftet Verschoben Hardware
    6
    0 Stimmen
    6 Beiträge
    6k Aufrufe
    FrankMF

    Hallo zusammen,

    da ich weiß das dieser Artikel recht beliebt ist, wollen wir den heute mal aktualisieren. Vieles aus den vorherigen Beiträgen passt noch. Es gibt aber kleine Anpassungen.

    Hardware ROCKPro64v21. 2GB RAM Software Kamils Release 0.10.9 Linux rockpro64 5.6.0-1132-ayufan-g81043e6e109a #ayufan SMP Tue Apr 7 10:07:35 UTC 2020 aarch64 GNU/Linux Installation apt install python

    Danach laden wir das Projekt

    git clone https://github.com/Leapo/Rock64-R64.GPIO

    PIN Nummern anpassen

    cd Rock64-R64.GPIO/R64 nano _GPIO.py

    Datei ergänzen

    # Define GPIO arrays #ROCK_valid_channels = [27, 32, 33, 34, 35, 36, 37, 38, 64, 65, 67, 68, 69, 76, 79, 80, 81, 82, 83, 84, 85, 86, 87, 88, 89, 96, 97, 98, 100, 101, 102, 103, 104] #BOARD_to_ROCK = [0, 0, 0, 89, 0, 88, 0, 0, 64, 0, 65, 0, 67, 0, 0, 100, 101, 0, 102, 97, 0, 98, 103, 96, 104, 0, 76, 68, 69, 0, 0, 0, 38, 32, 0, 33, 37, 34, 36, 0, 35, 0, 0, 81, 82, 87, 83, 0, 0, 80, 79, 85, 84, 27, 86, 0, 0, 0, 0, 0, 0, 89, 88] #BCM_to_ROCK = [68, 69, 89, 88, 81, 87, 83, 76, 104, 98, 97, 96, 38, 32, 64, 65, 37, 80, 67, 33, 36, 35, 100, 101, 102, 103, 34, 82] ROCK_valid_channels = [52,53,152,54,50,33,48,39,41,43,155,156,125,122,121,148,147,120,36,149,153,42,45,44,124,126,123,127] BOARD_to_ROCK = [0,0,0,52,0,53,0,152,148,0,147,54,120,50,0,33,36,0,149,48,0,39,153,41,42,0,45,43,44,155,0,156,124,125,0,122,126,121,123,0,127] BCM_to_ROCK = [43,44,52,53,152,155,156,45,42,39,48,41,124,125,148,147,124,54,120,122,123,127,33,36,149,153,121,50]

    Abspeichern.

    Datei test.py anlegen

    nano test.py

    Inhalt

    #!/usr/bin/env python # Frank Mankel, 2018, LGPLv3 License # Rock 64 GPIO Library for Python # Thanks Allison! Thanks smartdave! import R64.GPIO as GPIO from time import sleep print("Output Test R64.GPIO Module...") # Set Variables var_gpio_out = 156 var_gpio_in = 155 # GPIO Setup GPIO.setwarnings(True) GPIO.setmode(GPIO.ROCK) GPIO.setup(var_gpio_out, GPIO.OUT, initial=GPIO.HIGH) # Set up GPIO as an output, with an initial state of HIGH GPIO.setup(var_gpio_in, GPIO.IN, pull_up_down=GPIO.PUD_UP) # Set up GPIO as an input, pullup enabled # Test Output print("") print("Testing GPIO Input/Output:") while True: var_gpio_state_in = GPIO.input(var_gpio_in) var_gpio_state = GPIO.input(var_gpio_out) # Return State of GPIO if var_gpio_state == 0 and var_gpio_state_in == 1: GPIO.output(var_gpio_out,GPIO.HIGH) # Set GPIO to HIGH print("Input State: " + str(var_gpio_state_in)) # Print results print("Output State IF : " + str(var_gpio_state)) # Print results else: GPIO.output(var_gpio_out,GPIO.LOW) # Set GPIO to LOW print("Input State: " + str(var_gpio_state_in)) # Print results print("Output State ELSE: " + str(var_gpio_state)) # Print results sleep(0.5) exit() Beispiel

    Bild Text

    Wenn der Taster im Bild betätigt wird, soll die LED blinken.

    Wir benutzen folgende Ein- Augänge des ROCKPro64.

    # Set Variables var_gpio_out = 156 var_gpio_in = 155

    Das heißt:

    an Pin 1 (3,3V) kommt eine Strippe des Tasters an Pin 29 (Input) kommt eine Strippe des Tasters an Pin 31 (Output) kommt der Plus-Pol der LED an Pin 39 (GND) kommt der Minus-Pol der LED

    Somit wird auf den Eingang (Pin 29) bei Betätigung des Tasters 3,3 Volt angelegt. Damit wird dann der Eingang als High (1) erkannt. Die LED wird über den Ausgang (Pin 31) gesteuert.

    Starten kann man das Script mit

    python test.py