Skip to content

Scanner unterLinux Mint 20.1.

Linux
  • Servus
    ich bin der Stefan(Steff).
    Habe das leidige Thema HP Drucker mit Scanner zu installieren.
    Es geht um der HP Laser MFP 135 wg. Drucken tut er, bloß das mit dem Scanner kann ich nicht von PC aus. Kann mir jemand dabei helfen den Scanner einzu binden. BS ist Linux Mint 20.1.
    Ich danke im Vor raus.

  • @seff Hahaha, ich habe auch einen HP Drucker MFP M28-M31 irgendwas, und genau das gleiche Problem. Drucken geht prima, scannen leider nicht. Sieht bei mir nach Benutzerrechten aus. Ich habe aber leider keine Lösung für das Problem bis heute gefunden. Was hast Du bis jetzt versucht?

  • Noch was mehr zum Thema.

    Es gibt folgende Seite von HP -> https://developers.hp.com/hp-linux-imaging-and-printing/

    Dort kann man sich hplip runterladen. Dieses ist aber auch in den Repos von Linux Mint.

    :~$ apt search hplip
    i   hplip                           - HP Linux Druck- und Darstellungssystem (HP
    i   hplip-data                      - HP Linux Printing and Imaging - Datendatei
    p   hplip-doc                       - HP Linux Druck- und Darstellungssystem – D
    c   hplip-gui                       - HP Linux Printing and Imaging - GUI-Werkze
    v   hplip-ppds                      -      
    

    Da sehe ich gerade, das das GUI nicht installiert ist. Ok, mal eben nachgeholt.
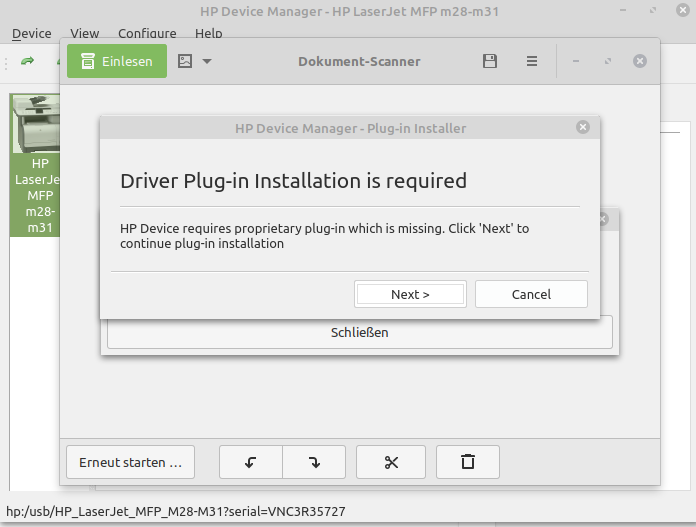
    e6d65f6e-f8c9-4192-add4-52c7e037c23d-grafik.png

    Das kommt nachdem ich auf Scan geklickt habe. Danach das
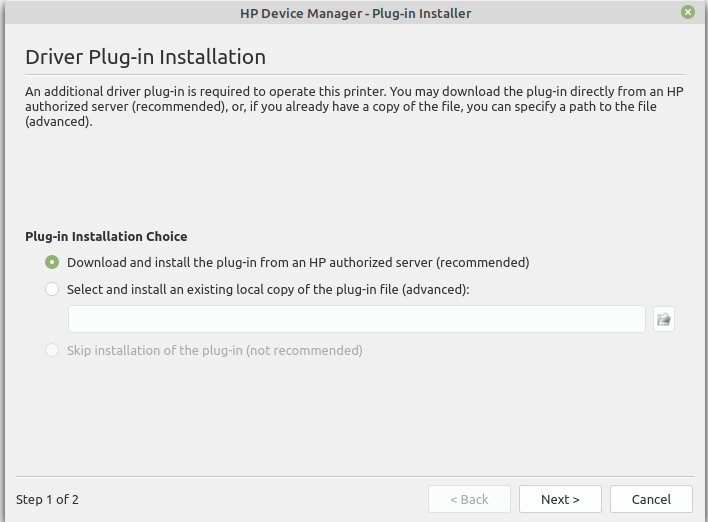
    0ed7a452-0d35-48cc-b316-6f3c868b931d-grafik.png

    Bei Klick auf Download passiert nix 😞

    Wenn ich das File von der HP-Seite runterlade und in der Konsole aufrufe kommt das hier...

    error: linuxmint-20.1 version is not supported, so all dependencies may not be installed. However trying to install using linuxmint-20 version packages.
    

    Ich habe da schon Stunden mit verbracht, finde aber keine Lösung. Also, wenn jemand einen Tipp hätte, es würde mich und vermutlich viele andere, freuen 😉

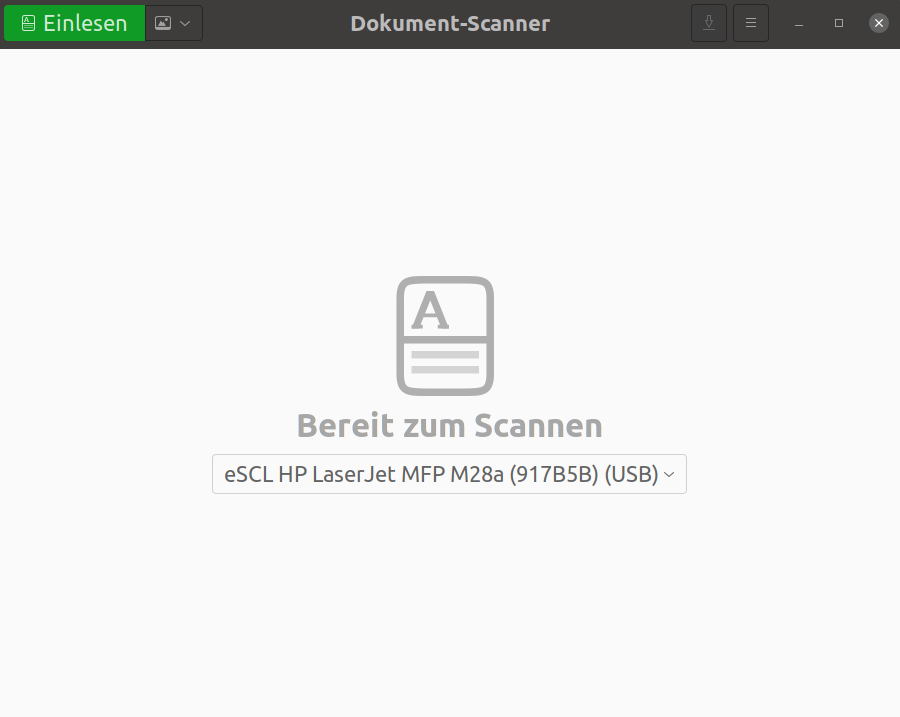
  • Auch wenn das wahrscheinlich jetzt niemanden hilft, möchte das jetzt hier trotzdem posten.

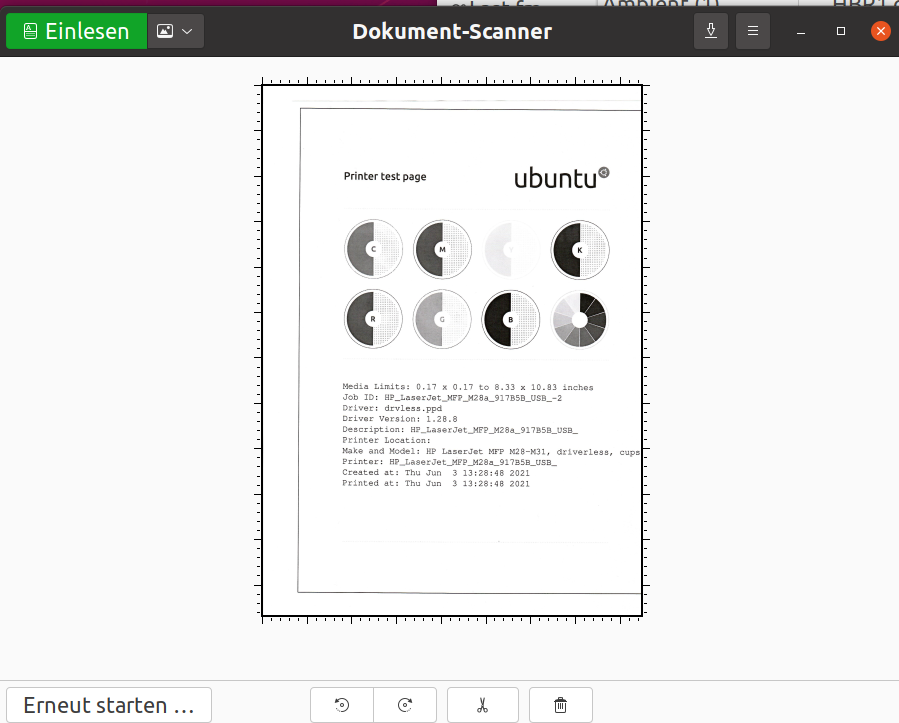
    Unter Ubuntu 21.04 funktioniert der Scanner einwandfrei, ohne das man was machen muss. Tool Dokument-Scanner aufrufen.

    2201d580-4df6-4579-95fc-dec2627ec64b-grafik.png

    Und das Ergebnis

    05513f38-96df-4baf-8cc3-7c87c54a2f55-grafik.png

  • Leider hilft das nicht, es kommt nach wie vor eine Fehlermeldung. Scannen kann ich nur als .jpg auf SD-Karte, PDF erzeuge ich anschließend mit PDF-Arranger. Anbei 2 Screenshots.

    Linux Mint xfce 20.1, Motherboard ASRock Z590 mit Intel i5-11400 (2,6Ghz), 32GiB DDR4 (2,133Ghz), Samsung 980pro 1TB, NVidia GT630, 2x27" ASUS VL278H
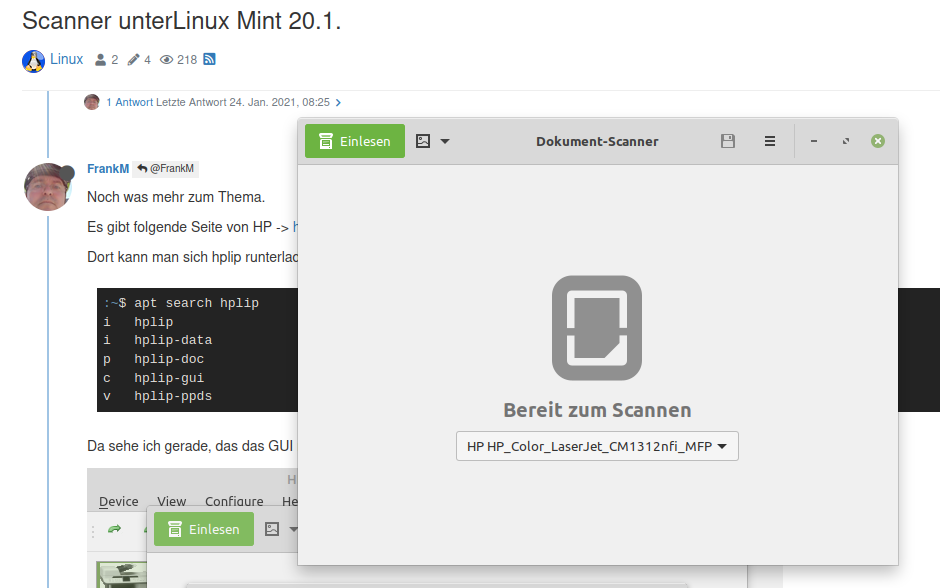
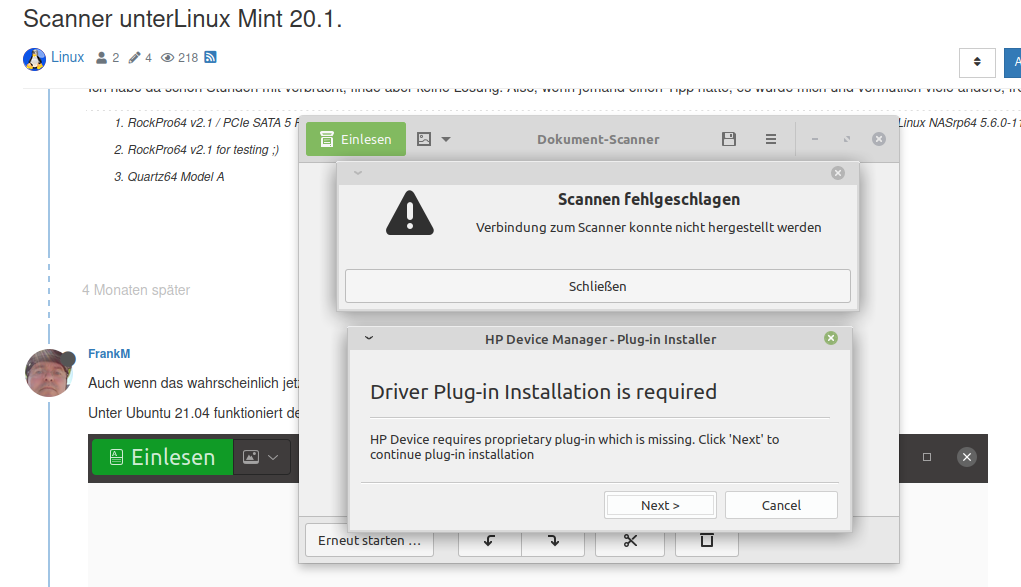
    Bildschirmfoto_2021-09-02_09-32-52.png Bildschirmfoto_2021-09-02_09-29-14.png

  • @timovomwald Das letzte Bild ist dein Fehler?

  • @frankm
    Ja, das war die Fehlermeldung. Die Driver Plug-in installation habe ich vielfach probiert, konnte jedoch kein Plug-in herunterladen. Heute früh verlangte Mint eine Aktualisierung für hplib. Nach der Installation probierte ich erneut das Driver Plug-in zu installieren und da hat es endlich funktioniert. >>>> Problem gelöst!

  • OpenSuse auf RockPro64 V2.1

    Linux
    3
    0 Stimmen
    3 Beiträge
    211 Aufrufe
    T

    Bootet auch nichtg durch. Ist langsamer beim Bootversuch als mein Amiga von Diskette und gibt dann irgendwann etwas von "Bug Kernel image not alligned to 64k" aus.

    Wo kann ich ein 5er Image mit ayufan Kernel runterladen? Das waren die Einzigen, die wirklich zuverlässig sind. Selbst mein Fedora auf dem Odroid H2+ spuckt beim Booten etwas von Page Table State Bugs aus bootet aber durch. Und nachdem ich den Audio Silent Stream abgestellt habe, kann ich auch den Monitor mit meinem KVM Switch umschalten.

    Ich glaube, ich probiere mal wieder ein BSD, bis ich Antwort von Dir habe.

  • FAN control OMV Auyfan 0.10.12: gitlab-ci-linux-build-184, Kernel 5.6

    Linux
    12
    1 Stimmen
    12 Beiträge
    1k Aufrufe
    M

    Hi,

    since I'm currently change my rockpro64 setup I came across this.

    With the kernel from ayufan you need to set PWM_CTL to

    /sys/devices/platform/pwm-fan/hwmon/hwmon3/pwm1

    for my self compiled one I need

    /sys/devices/platform/pwm-fan/hwmon/hwmon0/pwm1

    But I got it only working with one entry for PWM_CTL e.g.

    PWM_CTL = "/sys/devices/platform/pwm-fan/hwmon/hwmon0/pwm1",

    after that you need to start ats again

    sudo systemctl stop ats sudo systemctl start ats

    initially the fan should start immediately for a short period of time.

    In case it is even a different one on your kernel you can find the right one using this command.

    sudo find /sys -name pwm1 | grep hwmon

    So far I'm not sure which kernel parameter or modul changes this.

    Martin

  • Armbian Image

    Linux
    23
    0 Stimmen
    23 Beiträge
    2k Aufrufe
    F

    Hi @FrankM ,

    danke dir. Richtig, falschen Link zum Ayufan-Image gepostet.

    Ich bin gerade am ersten Testen mit dem 4.4er Armbian. Auf den ersten Blick scheint alles gut zu laufen. Positiv ist mir gleich einmal die I/O aufgefallen (128gb Samsung Evo Plus), offensichtlich kann man diese gut ausreizen. Zudem bin ich ebenso vom armbian-config begeistert, Plex und OMV laufen prima. Bis jetzt hab ich mich mit armbian eher mit nanopi&co herumgeschlagen, wo das kein Thema war.

    Leider habe ich offensichtlich vergessen die PCIe-Sata mitzubestellen, insofern musste ich mir nun eine beim großen A bestellen.

    Ich berichte dann gerne ausführlich darüber sobald bei mir alles läuft.

    Grüße,
    Flow

  • Mainline Kernel 4.18.0-rc3

    Linux
    1
    0 Stimmen
    1 Beiträge
    961 Aufrufe
    Niemand hat geantwortet
  • stretch-minimal-rockpro64

    Verschoben Linux
    3
    0 Stimmen
    3 Beiträge
    1k Aufrufe
    FrankMF

    Mal ein Test was der Speicher so kann.

    rock64@rockpro64:~/tinymembench$ ./tinymembench tinymembench v0.4.9 (simple benchmark for memory throughput and latency) ========================================================================== == Memory bandwidth tests == == == == Note 1: 1MB = 1000000 bytes == == Note 2: Results for 'copy' tests show how many bytes can be == == copied per second (adding together read and writen == == bytes would have provided twice higher numbers) == == Note 3: 2-pass copy means that we are using a small temporary buffer == == to first fetch data into it, and only then write it to the == == destination (source -> L1 cache, L1 cache -> destination) == == Note 4: If sample standard deviation exceeds 0.1%, it is shown in == == brackets == ========================================================================== C copy backwards : 2812.7 MB/s C copy backwards (32 byte blocks) : 2811.9 MB/s C copy backwards (64 byte blocks) : 2632.8 MB/s C copy : 2667.2 MB/s C copy prefetched (32 bytes step) : 2633.5 MB/s C copy prefetched (64 bytes step) : 2640.8 MB/s C 2-pass copy : 2509.8 MB/s C 2-pass copy prefetched (32 bytes step) : 2431.6 MB/s C 2-pass copy prefetched (64 bytes step) : 2424.1 MB/s C fill : 4887.7 MB/s (0.5%) C fill (shuffle within 16 byte blocks) : 4883.0 MB/s C fill (shuffle within 32 byte blocks) : 4889.3 MB/s C fill (shuffle within 64 byte blocks) : 4889.2 MB/s --- standard memcpy : 2807.3 MB/s standard memset : 4890.4 MB/s (0.3%) --- NEON LDP/STP copy : 2803.7 MB/s NEON LDP/STP copy pldl2strm (32 bytes step) : 2802.1 MB/s NEON LDP/STP copy pldl2strm (64 bytes step) : 2800.7 MB/s NEON LDP/STP copy pldl1keep (32 bytes step) : 2745.5 MB/s NEON LDP/STP copy pldl1keep (64 bytes step) : 2745.8 MB/s NEON LD1/ST1 copy : 2801.9 MB/s NEON STP fill : 4888.9 MB/s (0.3%) NEON STNP fill : 4850.1 MB/s ARM LDP/STP copy : 2803.8 MB/s ARM STP fill : 4893.0 MB/s (0.5%) ARM STNP fill : 4851.7 MB/s ========================================================================== == Framebuffer read tests. == == == == Many ARM devices use a part of the system memory as the framebuffer, == == typically mapped as uncached but with write-combining enabled. == == Writes to such framebuffers are quite fast, but reads are much == == slower and very sensitive to the alignment and the selection of == == CPU instructions which are used for accessing memory. == == == == Many x86 systems allocate the framebuffer in the GPU memory, == == accessible for the CPU via a relatively slow PCI-E bus. Moreover, == == PCI-E is asymmetric and handles reads a lot worse than writes. == == == == If uncached framebuffer reads are reasonably fast (at least 100 MB/s == == or preferably >300 MB/s), then using the shadow framebuffer layer == == is not necessary in Xorg DDX drivers, resulting in a nice overall == == performance improvement. For example, the xf86-video-fbturbo DDX == == uses this trick. == ========================================================================== NEON LDP/STP copy (from framebuffer) : 602.5 MB/s NEON LDP/STP 2-pass copy (from framebuffer) : 551.6 MB/s NEON LD1/ST1 copy (from framebuffer) : 667.1 MB/s NEON LD1/ST1 2-pass copy (from framebuffer) : 605.6 MB/s ARM LDP/STP copy (from framebuffer) : 445.3 MB/s ARM LDP/STP 2-pass copy (from framebuffer) : 428.8 MB/s ========================================================================== == Memory latency test == == == == Average time is measured for random memory accesses in the buffers == == of different sizes. The larger is the buffer, the more significant == == are relative contributions of TLB, L1/L2 cache misses and SDRAM == == accesses. For extremely large buffer sizes we are expecting to see == == page table walk with several requests to SDRAM for almost every == == memory access (though 64MiB is not nearly large enough to experience == == this effect to its fullest). == == == == Note 1: All the numbers are representing extra time, which needs to == == be added to L1 cache latency. The cycle timings for L1 cache == == latency can be usually found in the processor documentation. == == Note 2: Dual random read means that we are simultaneously performing == == two independent memory accesses at a time. In the case if == == the memory subsystem can't handle multiple outstanding == == requests, dual random read has the same timings as two == == single reads performed one after another. == ========================================================================== block size : single random read / dual random read 1024 : 0.0 ns / 0.0 ns 2048 : 0.0 ns / 0.0 ns 4096 : 0.0 ns / 0.0 ns 8192 : 0.0 ns / 0.0 ns 16384 : 0.0 ns / 0.0 ns 32768 : 0.0 ns / 0.0 ns 65536 : 4.5 ns / 7.2 ns 131072 : 6.8 ns / 9.7 ns 262144 : 9.8 ns / 12.8 ns 524288 : 11.4 ns / 14.7 ns 1048576 : 16.0 ns / 22.6 ns 2097152 : 114.0 ns / 175.3 ns 4194304 : 161.7 ns / 219.9 ns 8388608 : 190.7 ns / 241.5 ns 16777216 : 205.3 ns / 250.5 ns 33554432 : 212.9 ns / 255.5 ns 67108864 : 222.3 ns / 271.1 ns
  • bionic-minimal-rockpro64

    Verschoben Linux
    4
    0 Stimmen
    4 Beiträge
    1k Aufrufe
    FrankMF
    Neue Version 0.7.3

    Soll gefixt sein.

    USB2/3 PCIe LED's LED's

    Weiße LED starten nach dem Booten dauerhaft OK

    PCIe

    Treiber soll drin sein, aber die 3,3V werden nicht zur Karte durchgeschaltet. Somit funktioniert PCIe nicht.
    Nicht OK

    USB2

    USB-Funkadapter wird erkannt

    Bus 004 Device 001: ID 1d6b:0003 Linux Foundation 3.0 root hub Bus 003 Device 001: ID 1d6b:0002 Linux Foundation 2.0 root hub Bus 002 Device 002: ID 1113:3163 Medion AG Bus 002 Device 001: ID 1d6b:0001 Linux Foundation 1.1 root hub Bus 001 Device 001: ID 1d6b:0002 Linux Foundation 2.0 root hub Bus 006 Device 001: ID 1d6b:0001 Linux Foundation 1.1 root hub Bus 005 Device 001: ID 1d6b:0002 Linux Foundation 2.0 root hub

    Funktastur getestet OK

    USB3

    Angeschlossene SSD wird erkannt OK

    Kurzer Speed-Test. Bitte dran denken, wir haben hier noch kein optimiertes Release, sondern einen ersten Gehversuch. Da sind noch ganz viele Dinge anzupassen, was sicherlich noch Wochen, wenn nicht Monate dauert! Also, die Messergebnisse mit der nötigen Vorsicht genießen. Und dran denken, wenn @tkaiser das Ding richtig untersucht, dann haben wir auch ordentliche Meßergebnisse! 😉

    Haupt-PC

    2,5Zoll am USB3-Port

    sudo dd if=/dev/zero of=sd.img bs=1M count=4096 conv=fdatasync [sudo] Passwort für frank: 4096+0 Datensätze ein 4096+0 Datensätze aus 4294967296 bytes (4,3 GB, 4,0 GiB) copied, 38,171 s, **113 MB/s** ROCKPro64

    Ich benutze eine SAN Disk 240GB SSD an einem Inateck USB 3.0 2,5 Zoll Adapter.

    Info zum USB-Adapter

    lsusb Bus 004 Device 002: ID 174c:55aa ASMedia Technology Inc. ASM1051E SATA 6Gb/s bridge, ASM1053E SATA 6Gb/s bridge, ASM1153 SATA 3Gb/s bridge

    2,5 Zoll SSD am USB2-Port

    sudo dd if=/dev/zero of=sd.img bs=1M count=4096 conv=fdatasync 4096+0 records in 4096+0 records out 4294967296 bytes (4.3 GB, 4.0 GiB) copied, 160.058 s, **26.8 MB/s**

    2,5 Zoll SSD am USB3 Port

    sudo dd if=/dev/zero of=sd.img bs=1M count=4096 conv=fdatasync 4096+0 records in 4096+0 records out 4294967296 bytes (4.3 GB, 4.0 GiB) copied, 36.2588 s, **118 MB/s**

    Der @tkaiser erreicht deutlich höhere Geschwindigkeiten. Bis zu 400 MB/s. Hier nachzulesen.

    Wenn ich so einen iozone Test mache wie der Thomas, dann erreiche ich ähnliche Werte

    sudo iozone -a -g 1000m -s 1000m -i 0 -i 1 -r 16384K Iozone: Performance Test of File I/O Version $Revision: 3.429 $ Compiled for 64 bit mode. Build: linux Contributors:William Norcott, Don Capps, Isom Crawford, Kirby Collins Al Slater, Scott Rhine, Mike Wisner, Ken Goss Steve Landherr, Brad Smith, Mark Kelly, Dr. Alain CYR, Randy Dunlap, Mark Montague, Dan Million, Gavin Brebner, Jean-Marc Zucconi, Jeff Blomberg, Benny Halevy, Dave Boone, Erik Habbinga, Kris Strecker, Walter Wong, Joshua Root, Fabrice Bacchella, Zhenghua Xue, Qin Li, Darren Sawyer, Vangel Bojaxhi, Ben England, Vikentsi Lapa. Run began: Sat May 26 05:16:40 2018 Auto Mode Using maximum file size of 1024000 kilobytes. File size set to 1024000 kB Record Size 16384 kB Command line used: iozone -a -g 1000m -s 1000m -i 0 -i 1 -r 16384K Output is in kBytes/sec Time Resolution = 0.000001 seconds. Processor cache size set to 1024 kBytes. Processor cache line size set to 32 bytes. File stride size set to 17 * record size. random random bkwd record stride kB reclen write rewrite read reread read write read rewrite read fwrite frewrite fread freread 1024000 16384 383912 348782 1515506 1659394

    Da muss ich den Thomas nochmal was zu fragen. ?? 🤔

    UART2

    Und zum Schluss ist mir noch aufgefallen, das die UART2 Schnittstelle jetzt funktioniert 🙂 Ok, den Adapter, der morgen kommt, habe ich dann umsonst bestellt. LOL

    OK

  • bionic-lxde-rockpro64

    Verschoben Linux
    2
    0 Stimmen
    2 Beiträge
    912 Aufrufe
    FrankMF
    Neue Version 0.7.3 USB2

    Funktastur und Maus funktioniert.

    LED's

    Weiße LED leuchtet dauerhaft nach dem Starten

    Youtube

    Video läuft, aber nach einiger Zeit startet das System neu. Sieht nach Grafiktreiber aus. ALSA hat auch ein Problem, kein Ton. Aber das ist erst mal völlig unwichtig. Erst mal muss die Hardware laufen.

    0_1527276353347_Desktop.jpg

  • bionic-containers-rockpro64

    Verschoben Linux
    2
    0 Stimmen
    2 Beiträge
    901 Aufrufe
    FrankMF

    Ich habe das jetzt mal endlich getestet 🙂

    https://forum.frank-mankel.org/topic/296/rockpro64-docker-image