Skip to content

Python3 - Eingabeformular

Python3
  • So als Einsteiger, gibt es immer wieder Dinge, die einen fast verzweifeln lassen 😉

    Ich brauche ein Eingabeformular, wo der User verschiedene Eingaben machen kann. Eine Möglichkeit, wie man das machen kann ist folgendes.

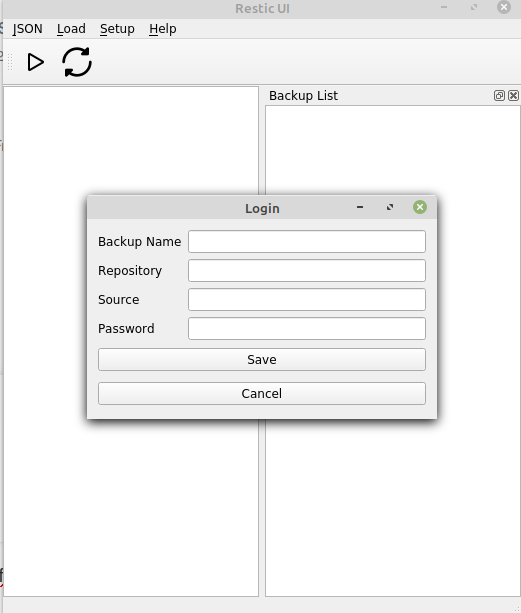
    class Loginpage(QWidget):
          def __init__(self):
            super().__init__()
            
            self.setWindowTitle('Login')
            self.resize(350,200)
            layout = QGridLayout()
            
            label1 = QLabel("Backup Name")
            self.backup_name = QLineEdit()
            layout.addWidget(label1, 0, 0)
            layout.addWidget(self.backup_name, 0, 1)
            
            label2 = QLabel("Repository")
            self.repository = QLineEdit()
            layout.addWidget(label2, 1, 0)
            layout.addWidget(self.repository, 1, 1)
            
            label3 = QLabel("Source")
            self.source = QLineEdit()
            layout.addWidget(label3, 2, 0)
            layout.addWidget(self.source, 2, 1)
            
            label4 = QLabel("Password")
            self.password = QLineEdit()
            layout.addWidget(label4, 3, 0)
            layout.addWidget(self.password, 3, 1)
            
            button_save = QPushButton('Save')
            layout.addWidget(button_save, 5, 0, 2, 2)
            button_save.clicked.connect(self.save)
            
            
            button_cancel = QPushButton('Cancel')
            layout.addWidget(button_cancel, 7, 0, 2, 2)
            button_cancel.clicked.connect(lambda:self.close())
            
            self.setLayout(layout)
            
          def save(self):
             #mainWin.listWidget.clear()
             print("SAVE")
    

    Der entsprechende Menüaufruf

    #----Load Menu ----#
    test = QAction(QIcon('icons/info-circle.svg'), 'TEST', self)
    test.triggered.connect(self.test)
    test.setShortcut('Ctrl+T')
    loadMenu.addAction(test)
    

    Die Funktion zum Aufrufen des Fensters

    def test(self):
        form.show()
    

    Ergebnis

    e7185e0a-9948-48ca-a70d-26925dc6bd88-image.png

  • Ich habe drei Ergebnisse gehabt, beim Ausprobieren. Hier jetzt noch eines, was mir aber nicht gefiel. Es macht vier mal einen Input Dialog auf und fragt die Eingaben ab.

     def add_entry(self):
                  
             msg = QInputDialog(self)
                               
             a = msg.getText(self, "Backup Name","Backup Name:", QLineEdit.Normal , "")
             b = msg.getText(self, "Repository","Repository:", QLineEdit.Normal, "")
             c = msg.getText(self, "Source","Source:", QLineEdit.Normal, "")
             d = msg.getText(self, "Password","Password:", QLineEdit.Password, "")
    

    Wie gesagt, gefällt nicht.

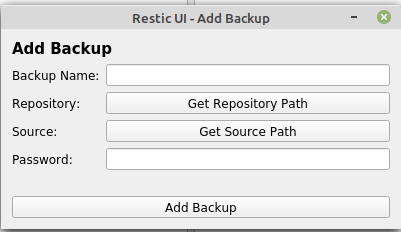
  • Meine endgültige Lösung, zu mindestens im Moment 😉 
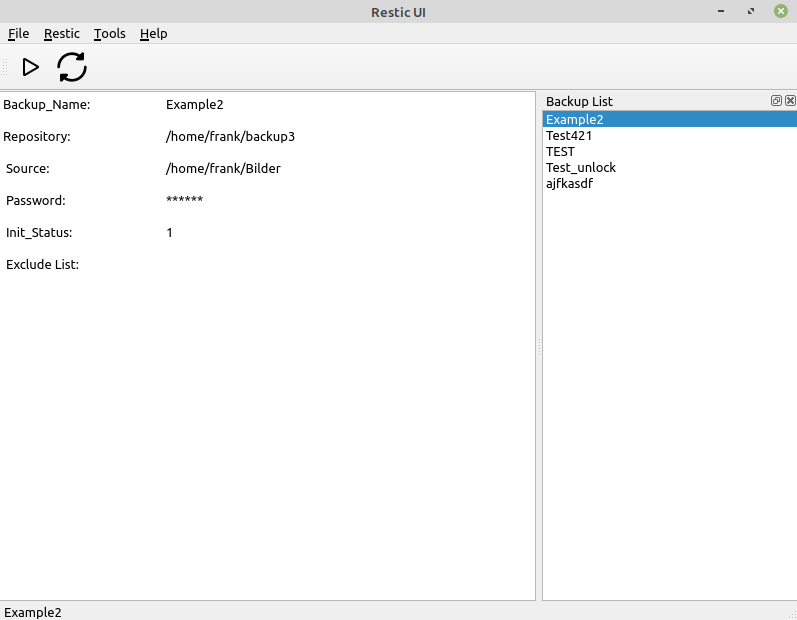
, ist ein zweites Window. Das gefällt mir am Besten, komme ich zu mindestens im Moment einfach besser mit klar. Aber, eines der größten Probleme war für mich, wie aktualisiere ich die Liste im Hauptfenster!? Da habe ich doch etliche Stunden dran rum gefummelt....

    Hier nur mal das Layout

            #####################
            # Layout
            #####################
    
            self.formGroupBox = QGroupBox("Form layout")
    
            layout = QFormLayout()
            layout.addRow(self.label_1)
            layout.addRow(QLabel("Backup Name:"), self.input1)
            layout.addRow(QLabel("Repository:"), self.button3)
            layout.addRow(QLabel("Source:"), self.button4)
            layout.addRow(QLabel("Password:"), self.input4)
            layout.addRow(self.label_6)
            layout.addRow(self.button2)
           
            self.formGroupBox.setLayout(layout)
    
            self.setLayout(layout)
    

    Das mit dem SecondWindow ist aber was aufwändiger. Da mach ich dann mal einen eigenen Beitrag zu. Aktuell sieht das so aus.

    6c68c956-9127-438f-bc54-4dcef8e18f00-image.png

  • Python - Formatumwandlung str -> float

    Python3
    1
    0 Stimmen
    1 Beiträge
    161 Aufrufe
    Niemand hat geantwortet
  • Python - Dict -> JSON und umgekehrt

    Python3
    1
    0 Stimmen
    1 Beiträge
    192 Aufrufe
    Niemand hat geantwortet
  • Python - Match-Case Statement

    Python3
    1
    0 Stimmen
    1 Beiträge
    83 Aufrufe
    Niemand hat geantwortet
  • Python3 - enumerate()

    Python3
    2
    0 Stimmen
    2 Beiträge
    89 Aufrufe
    FrankMF

    Ich habe noch was Code gefunden, den ich mal dringend aufräumen musste 🙂 Wenn ich mit dem Restic UI die Snapshots anzeige, dann sieht das so aus.

    reading repository password from stdin ID Time Host Tags Paths ---------------------------------------------------------------------------- 4e769748 2021-12-31 21:48:34 frank-MS-7C37 /home/frank/Bilder 34298934 2022-01-26 20:15:53 frank-MS-7C37 /home/frank/Bilder 0d5d88f2 2022-01-27 21:05:07 frank-MS-7C37 /home/frank/Bilder f0e7d5a7 2022-01-29 13:46:12 frank-MS-7C37 /home/frank/Bilder 79918d70 2022-01-29 13:52:56 frank-MS-7C37 /home/frank/Bilder d74272a3 2022-01-30 11:54:20 frank-MS-7C37 /home/frank/Bilder 11b0b5ad 2022-01-30 11:57:44 frank-MS-7C37 /home/frank/Bilder 4a7450d2 2022-02-20 09:35:56 frank-MS-7C37 /home/frank/Bilder c1a4a51d 2022-02-20 09:36:43 frank-MS-7C37 /home/frank/Bilder d178ded5 2022-02-20 09:38:53 frank-MS-7C37 /home/frank/Bilder 997e2259 2022-02-20 16:35:57 frank-MS-7C37 /home/frank/Bilder 3320ad5c 2022-02-20 16:49:19 frank-MS-7C37 /home/frank/Bilder ---------------------------------------------------------------------------- 12 snapshots

    Mich interessieren die IDs, weil ich bei der Eingabe der IDs überprüfen möchte, ob die eingegebene ID existiert. Also muss ich das irgendwie auslesen und speichern. Das habe ich bis jetzt so gemacht.

    def id_append(self, result): # We split the result into individual lines. # Result was passed. And create an list. result_list = result.split('\n') # We count the number of repositories and search for 'source'. count = result.count(backup_data[row].source) # Offset added, first interesting line is line 3! count = count + 3 # We loop through the list and output the ID's and store in snapshot_id x = 3 while x < count: a = result_list[x] y = a[0:8] snapshot_id.append(y) x = x + 1

    Das erschien mir heute, beim erneuten Betrachten, Spaghetticode zu sein. Machen wir das mal etwas ordentlicher.

    Ich nehme die Ausgabe (stdout) und erzeuge eine Liste, jede Zeile ein Element.

    result_list = result.split('\n')

    Sieht so aus

    ['reading repository password from stdin', 'ID Time Host Tags Paths', '----------------------------------------------------------------------------', '4e769748 2021-12-31 21:48:34 frank-MS-7C37 /home/frank/Bilder', '34298934 2022-01-26 20:15:53 frank-MS-7C37 /home/frank/Bilder', '0d5d88f2 2022-01-27 21:05:07 frank-MS-7C37 /home/frank/Bilder', 'f0e7d5a7 2022-01-29 13:46:12 frank-MS-7C37 /home/frank/Bilder', '79918d70 2022-01-29 13:52:56 frank-MS-7C37 /home/frank/Bilder', 'd74272a3 2022-01-30 11:54:20 frank-MS-7C37 /home/frank/Bilder', '11b0b5ad 2022-01-30 11:57:44 frank-MS-7C37 /home/frank/Bilder', '4a7450d2 2022-02-20 09:35:56 frank-MS-7C37 /home/frank/Bilder', 'c1a4a51d 2022-02-20 09:36:43 frank-MS-7C37 /home/frank/Bilder', 'd178ded5 2022-02-20 09:38:53 frank-MS-7C37 /home/frank/Bilder', '997e2259 2022-02-20 16:35:57 frank-MS-7C37 /home/frank/Bilder', '3320ad5c 2022-02-20 16:49:19 frank-MS-7C37 /home/frank/Bilder', '----------------------------------------------------------------------------', '12 snapshots', '']

    Diesmal benutzen wir die enumerate() Funktion

    for count, value in enumerate(result_list): print(count, value)

    Das was raus kommt, sieht so aus

    0 reading repository password from stdin 1 ID Time Host Tags Paths 2 ---------------------------------------------------------------------------- 3 4e769748 2021-12-31 21:48:34 frank-MS-7C37 /home/frank/Bilder 4 34298934 2022-01-26 20:15:53 frank-MS-7C37 /home/frank/Bilder 5 0d5d88f2 2022-01-27 21:05:07 frank-MS-7C37 /home/frank/Bilder 6 f0e7d5a7 2022-01-29 13:46:12 frank-MS-7C37 /home/frank/Bilder 7 79918d70 2022-01-29 13:52:56 frank-MS-7C37 /home/frank/Bilder 8 d74272a3 2022-01-30 11:54:20 frank-MS-7C37 /home/frank/Bilder 9 11b0b5ad 2022-01-30 11:57:44 frank-MS-7C37 /home/frank/Bilder 10 4a7450d2 2022-02-20 09:35:56 frank-MS-7C37 /home/frank/Bilder 11 c1a4a51d 2022-02-20 09:36:43 frank-MS-7C37 /home/frank/Bilder 12 d178ded5 2022-02-20 09:38:53 frank-MS-7C37 /home/frank/Bilder 13 997e2259 2022-02-20 16:35:57 frank-MS-7C37 /home/frank/Bilder 14 3320ad5c 2022-02-20 16:49:19 frank-MS-7C37 /home/frank/Bilder 15 ---------------------------------------------------------------------------- 16 12 snapshots 17

    Mich interessieren nur die Zeilen mit /home/frank/Bilder Das kann man so abfragen

    if backup_data[row].source in value:

    Und jetzt nur die ID entsprechend abspeichern

    snapshot_id.append(value[0:8])

    Sieht jetzt komplett so aus

    result_list = result.split('\n') for count, value in enumerate(result_list): if backup_data[row].source in value: snapshot_id.append(value[0:8]) print(count, value[0:8])

    Somit speichert er jetzt nur noch die IDs, der folgenden Ausgabe.

    3 4e769748 4 34298934 5 0d5d88f2 6 f0e7d5a7 7 79918d70 8 d74272a3 9 11b0b5ad 10 4a7450d2 11 c1a4a51d 12 d178ded5 13 997e2259 14 3320ad5c

    Diese IDs, kann ich dann weiterverarbeiten.

  • Python3 - HTML Text ausgeben

    Python3
    1
    0 Stimmen
    1 Beiträge
    121 Aufrufe
    Niemand hat geantwortet
  • Python3 - class BackupList

    Python3
    2
    0 Stimmen
    2 Beiträge
    224 Aufrufe
    FrankMF

    Mir hat heute jemand auf Twitter zu meinem Problem geantwortet.

    Das habe ich natürlich direkt, bei einer Tasse Kaffee, ausprobiert. Geht einwandfrei und ein Problem ist damit Vergangenheit. Bei meiner Konstruktion musste ich immer eine Länge für die Liste p vorgeben.

    p = list(range(10))

    Das wird jetzt nicht mehr benötigt. Schön 🙂

    Jetzt muss ich mir das noch in Ruhe anschauen, nachlesen und verstehen.

    Danke für den netten Hinweis!

  • Python3 - PyQt5 Layout

    Python3
    1
    0 Stimmen
    1 Beiträge
    147 Aufrufe
    Niemand hat geantwortet
  • Python3 - virtuelle Entwicklungsumgebung

    Angeheftet Python3
    3
    0 Stimmen
    3 Beiträge
    301 Aufrufe
    FrankMF

    Nach Systemwechsel erneut Probleme. Hier noch mal aufgelistet.

    Aufpassen, das kein venv Ordner vorhanden ist! Neu anlegen!

    python3 -m venv venv

    Dann meckert mein Linux Mint Cinnamon

    The virtual environment was not created successfully because ensurepip is not available. On Debian/Ubuntu systems, you need to install the python3-venv package using the following command. apt install python3.8-venv You may need to use sudo with that command. After installing the python3-venv package, recreate your virtual environment. Failing command: ['/home/frank/Restic_UI_Produktiv/restic-ui-public/venv/bin/python3', '-Im', 'ensurepip', '--upgrade', '--default-pip']

    Ok, das ist einfach 😉

    apt install python3.8-venv python3 -m venv venv

    Danach aktivieren

    source venv/bin/activate Installation von PyQt5 (venv) frank@frank-MS-7C37:~/Restic_UI_Produktiv/restic-ui-public$ pip3 install PyQt5 Collecting PyQt5 Downloading PyQt5-5.15.4-cp36.cp37.cp38.cp39-abi3-manylinux2014_x86_64.whl (8.3 MB) |████████████████████████████████| 8.3 MB 1.7 MB/s Collecting PyQt5-Qt5>=5.15 Downloading PyQt5_Qt5-5.15.2-py3-none-manylinux2014_x86_64.whl (59.9 MB) |████████████████████████████████| 59.9 MB 18.3 MB/s Collecting PyQt5-sip<13,>=12.8 Downloading PyQt5_sip-12.9.0-cp38-cp38-manylinux1_x86_64.whl (332 kB) |████████████████████████████████| 332 kB 46.1 MB/s Installing collected packages: PyQt5-Qt5, PyQt5-sip, PyQt5 Successfully installed PyQt5-5.15.4 PyQt5-Qt5-5.15.2 PyQt5-sip-12.9.0

    Danach meckert er über ein fehlendes Modul requests

    (venv) frank@frank-MS-7C37:~/Restic_UI_Produktiv/restic-ui-public$ python3 restic_ui.py Traceback (most recent call last): File "restic_ui.py", line 41, in <module> from functions import ( File "/home/frank/Restic_UI_Produktiv/restic-ui-public/functions.py", line 19, in <module> import requests as req ModuleNotFoundError: No module named 'requests' Installation requests (venv) frank@frank-MS-7C37:~/Restic_UI_Produktiv/restic-ui-public$ pip3 install requests Collecting requests Downloading requests-2.25.1-py2.py3-none-any.whl (61 kB) |████████████████████████████████| 61 kB 802 kB/s Collecting chardet<5,>=3.0.2 Downloading chardet-4.0.0-py2.py3-none-any.whl (178 kB) |████████████████████████████████| 178 kB 2.7 MB/s Collecting certifi>=2017.4.17 Downloading certifi-2021.5.30-py2.py3-none-any.whl (145 kB) |████████████████████████████████| 145 kB 14.0 MB/s Collecting idna<3,>=2.5 Downloading idna-2.10-py2.py3-none-any.whl (58 kB) |████████████████████████████████| 58 kB 9.4 MB/s Collecting urllib3<1.27,>=1.21.1 Downloading urllib3-1.26.6-py2.py3-none-any.whl (138 kB) |████████████████████████████████| 138 kB 11.5 MB/s Installing collected packages: chardet, certifi, idna, urllib3, requests Successfully installed certifi-2021.5.30 chardet-4.0.0 idna-2.10 requests-2.25.1 urllib3-1.26.6

    Und schwupps, geht mein Tool wieder 🙂

    4968ce42-7c66-4c8a-a2ad-424b9a529d87-grafik.png