Skip to content

Wireguard UI - mein erstes Python3 Projekt

Python3
  • Ich habe mich dann man ran gesetzt und ein kleines UI für Wireguard gebastelt. Es sollte mir ermöglichen, auf meinem Rechner, den Wireguard Tunnel zu starten und ein wenig Infos zu liefern usw. Das ganze habe ich mit PyQt5 realisiert. Den Wireguard Server, zu dem ich verbinde, betreibe ich selber.

    8ff40803-a5d2-4084-9902-b40aa672ede0-grafik.png

    Man hat folgende Möglichkeiten

    • Start WG
    • Stop WG
    • Show IP
    • Show WG Status
    • Open File
    • Save File
    • SaveAs File
    • Load Client example
    • Load Server example
    • Setup private.key
    • Setup psk.key
    • Setup public.key
    • About

    Oben die Toolbar, in der Mitte das Editor Fenster und unten eine Status Bar.
    Rechts unten seht Ihr den Wireguard Status. Rot für nicht verbunden, grün für verbunden.

    02cead06-0d7d-4daf-b159-6bc75f47117c-grafik.png

    Und hier mit aktivierter Wireguard Verbindung.

    wg_status.png

    Es gibt auch mit Sicherheit noch ganz viel Raum für Verbesserungen 🙂

  • Dinge entwickeln sich. Es sieht alles schon wieder was anders aus 🙂

    Hauptfenster
    270b5c68-3d64-44ca-9a01-e3f24ba4a26c-grafik.png

    Setup Fenster zum Erstellen der wg0.conf
    27c3cb28-50f5-4e00-b03d-de47c07372a0-grafik.png

    Und alles funktioniert so weit 🤓

  • Python - Formatumwandlung str -> float

    Python3
    1
    0 Stimmen
    1 Beiträge
    161 Aufrufe
    Niemand hat geantwortet
  • Python - Frameworks

    Python3
    2
    0 Stimmen
    2 Beiträge
    76 Aufrufe
    FrankMF

    Und mal hier parken

  • Python - Match-Case Statement

    Python3
    1
    0 Stimmen
    1 Beiträge
    84 Aufrufe
    Niemand hat geantwortet
  • Python3 - Struktur eines Projektes

    Python3
    1
    0 Stimmen
    1 Beiträge
    109 Aufrufe
    Niemand hat geantwortet
  • 0 Stimmen
    3 Beiträge
    330 Aufrufe
    FrankMF

    Kein globalen Variablen mehr im Projekt 🙂

    Das Widget ließ sich relativ einfach erledigen.

    Vorher #----QPlainTextEdit ----# layout = QVBoxLayout() widget = QTextEdit() widget.setReadOnly(True) widget.setLayout(layout) setCentralWidget(widget) Nachher #----QPlainTextEdit ----# layout = QVBoxLayout() self.widget = QTextEdit() self.widget.setReadOnly(True) self.widget.setLayout(layout) self.setCentralWidget(self.widget)

    Aufruf dann nicht mehr mit

    # UI widget.setHtml("")

    sondern mit

    # UI mainWin.widget.setHtml("")

    Problem erledeigt und hoffentlich auch verstanden 😉

  • 0 Stimmen
    5 Beiträge
    724 Aufrufe
    FrankMF

    @berthold Hallo Berthold. Ich bin eigentlich immer noch nicht mit meinem Code zufrieden. Ist man das jemals? Da ich auch noch ein kleines Problem habe, würde ich da ungerne jemanden reinschauen lassen. Der Code ist stellenweise in deutsch kommentiert, stellenweise in englisch. Kennt man ja, man will es irgendwann mal ordentlich machen und dann kommt das nächste Problem auf einen zu.

    Hast Du Python3 Vorkenntnisse? Wenn Du "brennend" dran interessiert bist, könnte ich Dir evt. Zugang zu meinem Gitlab-Projekt geben.

    Wenn Du interessiert bist und ich dich nicht los werde :), dann schreib mir eine PN.

  • Python3 - virtuelle Entwicklungsumgebung

    Angeheftet Python3
    3
    0 Stimmen
    3 Beiträge
    301 Aufrufe
    FrankMF

    Nach Systemwechsel erneut Probleme. Hier noch mal aufgelistet.

    Aufpassen, das kein venv Ordner vorhanden ist! Neu anlegen!

    python3 -m venv venv

    Dann meckert mein Linux Mint Cinnamon

    The virtual environment was not created successfully because ensurepip is not available. On Debian/Ubuntu systems, you need to install the python3-venv package using the following command. apt install python3.8-venv You may need to use sudo with that command. After installing the python3-venv package, recreate your virtual environment. Failing command: ['/home/frank/Restic_UI_Produktiv/restic-ui-public/venv/bin/python3', '-Im', 'ensurepip', '--upgrade', '--default-pip']

    Ok, das ist einfach 😉

    apt install python3.8-venv python3 -m venv venv

    Danach aktivieren

    source venv/bin/activate Installation von PyQt5 (venv) frank@frank-MS-7C37:~/Restic_UI_Produktiv/restic-ui-public$ pip3 install PyQt5 Collecting PyQt5 Downloading PyQt5-5.15.4-cp36.cp37.cp38.cp39-abi3-manylinux2014_x86_64.whl (8.3 MB) |████████████████████████████████| 8.3 MB 1.7 MB/s Collecting PyQt5-Qt5>=5.15 Downloading PyQt5_Qt5-5.15.2-py3-none-manylinux2014_x86_64.whl (59.9 MB) |████████████████████████████████| 59.9 MB 18.3 MB/s Collecting PyQt5-sip<13,>=12.8 Downloading PyQt5_sip-12.9.0-cp38-cp38-manylinux1_x86_64.whl (332 kB) |████████████████████████████████| 332 kB 46.1 MB/s Installing collected packages: PyQt5-Qt5, PyQt5-sip, PyQt5 Successfully installed PyQt5-5.15.4 PyQt5-Qt5-5.15.2 PyQt5-sip-12.9.0

    Danach meckert er über ein fehlendes Modul requests

    (venv) frank@frank-MS-7C37:~/Restic_UI_Produktiv/restic-ui-public$ python3 restic_ui.py Traceback (most recent call last): File "restic_ui.py", line 41, in <module> from functions import ( File "/home/frank/Restic_UI_Produktiv/restic-ui-public/functions.py", line 19, in <module> import requests as req ModuleNotFoundError: No module named 'requests' Installation requests (venv) frank@frank-MS-7C37:~/Restic_UI_Produktiv/restic-ui-public$ pip3 install requests Collecting requests Downloading requests-2.25.1-py2.py3-none-any.whl (61 kB) |████████████████████████████████| 61 kB 802 kB/s Collecting chardet<5,>=3.0.2 Downloading chardet-4.0.0-py2.py3-none-any.whl (178 kB) |████████████████████████████████| 178 kB 2.7 MB/s Collecting certifi>=2017.4.17 Downloading certifi-2021.5.30-py2.py3-none-any.whl (145 kB) |████████████████████████████████| 145 kB 14.0 MB/s Collecting idna<3,>=2.5 Downloading idna-2.10-py2.py3-none-any.whl (58 kB) |████████████████████████████████| 58 kB 9.4 MB/s Collecting urllib3<1.27,>=1.21.1 Downloading urllib3-1.26.6-py2.py3-none-any.whl (138 kB) |████████████████████████████████| 138 kB 11.5 MB/s Installing collected packages: chardet, certifi, idna, urllib3, requests Successfully installed certifi-2021.5.30 chardet-4.0.0 idna-2.10 requests-2.25.1 urllib3-1.26.6

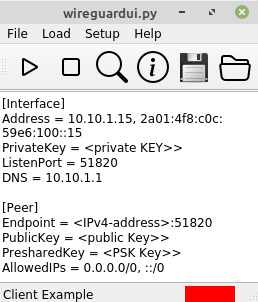
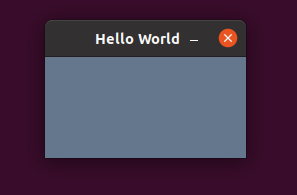
    Und schwupps, geht mein Tool wieder 🙂

    4968ce42-7c66-4c8a-a2ad-424b9a529d87-grafik.png

  • Python3 - zwei Webseiten als Empfehlung

    Python3
    1
    0 Stimmen
    1 Beiträge
    168 Aufrufe
    Niemand hat geantwortet