Skip to content

Wireguard UI - mein erstes Python3 Projekt

Python3
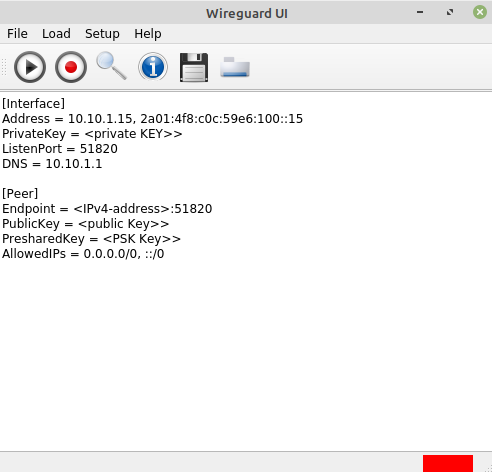
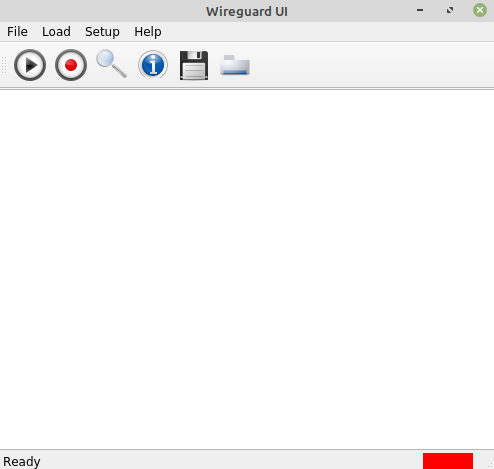
  • Ich habe mich dann man ran gesetzt und ein kleines UI für Wireguard gebastelt. Es sollte mir ermöglichen, auf meinem Rechner, den Wireguard Tunnel zu starten und ein wenig Infos zu liefern usw. Das ganze habe ich mit PyQt5 realisiert. Den Wireguard Server, zu dem ich verbinde, betreibe ich selber.

    8ff40803-a5d2-4084-9902-b40aa672ede0-grafik.png

    Man hat folgende Möglichkeiten

    • Start WG
    • Stop WG
    • Show IP
    • Show WG Status
    • Open File
    • Save File
    • SaveAs File
    • Load Client example
    • Load Server example
    • Setup private.key
    • Setup psk.key
    • Setup public.key
    • About

    Oben die Toolbar, in der Mitte das Editor Fenster und unten eine Status Bar.
    Rechts unten seht Ihr den Wireguard Status. Rot für nicht verbunden, grün für verbunden.

    02cead06-0d7d-4daf-b159-6bc75f47117c-grafik.png

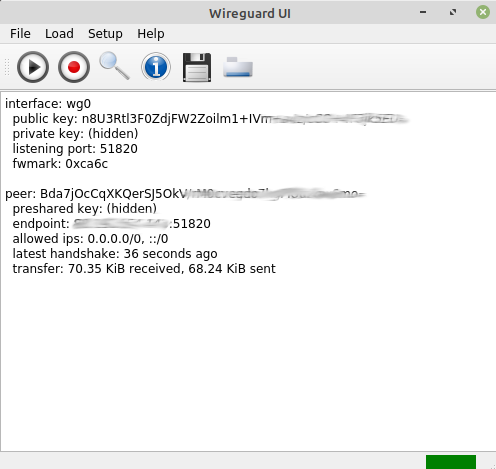
    Und hier mit aktivierter Wireguard Verbindung.

    wg_status.png

    Es gibt auch mit Sicherheit noch ganz viel Raum für Verbesserungen 🙂

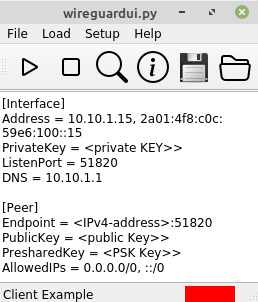
  • Dinge entwickeln sich. Es sieht alles schon wieder was anders aus 🙂

    Hauptfenster
    270b5c68-3d64-44ca-9a01-e3f24ba4a26c-grafik.png

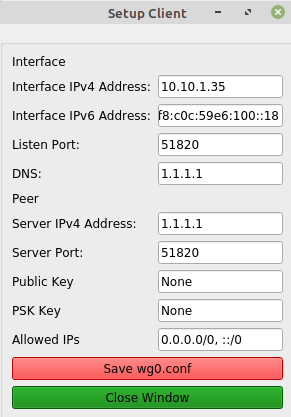
    Setup Fenster zum Erstellen der wg0.conf
    27c3cb28-50f5-4e00-b03d-de47c07372a0-grafik.png

    Und alles funktioniert so weit 🤓

  • 0 Stimmen
    5 Beiträge
    136 Aufrufe
    FrankMF

    Hab ChatGPT nochmal nach der Installation auf einem Production Server befragt.

    ChatGPT

    Certainly! Here's a short example of the steps you can follow to deploy a Flask application on a production server using Nginx and Gunicorn:

    Prepare your server:

    Set up a server (e.g., using a cloud provider like AWS, DigitalOcean, or a dedicated server) and ensure it has a clean, up-to-date installation of a Linux distribution (e.g., Ubuntu or CentOS).

    Install required software:

    Install necessary software packages on your server. You'll need Python, pip (Python package manager), Nginx, and Gunicorn. You can use your distribution's package manager (e.g., apt for Ubuntu or yum for CentOS) to install these dependencies.

    Deploy your Flask application:

    Copy your Flask application code and any required dependencies to your server.

    Set up a virtual environment (optional but recommended):

    Create a virtual environment for your Flask application to isolate its dependencies. You can use venv or virtualenv for this purpose.

    Install Flask and any required Python packages within your virtual environment:

    pip install flask

    Test your Flask application:

    Ensure your Flask application runs correctly within your server's virtual environment.

    Configure Gunicorn:

    Create a Gunicorn configuration file (e.g., gunicorn_config.py) to specify the settings for running your Flask application. Here's a simple example: workers = 4 # Number of Gunicorn worker processes bind = '0.0.0.0:8000' # The address and port Gunicorn should listen on

    Start Gunicorn:

    Start Gunicorn with your Flask application: gunicorn -c gunicorn_config.py your_app:app

    Configure Nginx:

    Create an Nginx server block (often located in /etc/nginx/sites-available) to define how Nginx should handle incoming requests. Here's a simplified example: server { listen 80; server_name your_domain.com www.your_domain.com; location / { proxy_pass http://127.0.0.1:8000; # Pass requests to Gunicorn proxy_set_header Host $host; proxy_set_header X-Real-IP $remote_addr; } }

    Enable the Nginx server block and restart Nginx:

    sudo ln -s /etc/nginx/sites-available/your_config /etc/nginx/sites-enabled/ sudo nginx -t # Test Nginx configuration sudo systemctl restart nginx

    Configure your DNS:

    Point your domain name to your server's IP address.

    Secure your server (optional but recommended):

    Set up SSL/TLS certificates for your domain to enable HTTPS. You can use Let's Encrypt for free SSL certificates.

    Monitor your application:

    Set up monitoring tools and logs to keep track of your application's performance and troubleshoot any issues.

    These are the basic steps to deploy a Flask application on a production server with Nginx and Gunicorn. Please note that this is a simplified example, and there are many additional considerations, such as database configuration, security, and optimization, depending on your specific application and requirements. It's also important to keep your server and software up to date and follow security best practices to ensure the stability and security of your production environment.

    Das werde ich doch mal ausprobieren 😎
  • Python - mehrsprachiges GUI

    Python3
    1
    0 Stimmen
    1 Beiträge
    119 Aufrufe
    Niemand hat geantwortet
  • Python3 - PyQt6 installieren

    Python3
    1
    0 Stimmen
    1 Beiträge
    267 Aufrufe
    Niemand hat geantwortet
  • Python3 - class BackupList

    Python3
    2
    0 Stimmen
    2 Beiträge
    224 Aufrufe
    FrankMF

    Mir hat heute jemand auf Twitter zu meinem Problem geantwortet.

    Das habe ich natürlich direkt, bei einer Tasse Kaffee, ausprobiert. Geht einwandfrei und ein Problem ist damit Vergangenheit. Bei meiner Konstruktion musste ich immer eine Länge für die Liste p vorgeben.

    p = list(range(10))

    Das wird jetzt nicht mehr benötigt. Schön 🙂

    Jetzt muss ich mir das noch in Ruhe anschauen, nachlesen und verstehen.

    Danke für den netten Hinweis!

  • Python3 - RegEx für ein LineEdit

    Python3
    2
    0 Stimmen
    2 Beiträge
    153 Aufrufe
    FrankMF

    Gut, Menschen die mich kennen, wissen das IPv6 nicht so mein Spezialgebiet ist. Es hilft aber nichts, auch damit muss man sich beschäftigen 🙂

    Es war etwas schwierig was Passendes zu finden, aber ich denke das hier ist ganz gut. Ob es alle Möglichkeiten bei IPv6 beinhaltet, weiß ich nicht zu 100%.

    Hier eine Seite, wo ich was Passendes gefunden habe.
    https://ihateregex.io/expr/ipv6/

    Code # regex für IPv6 reg_ex = QRegExp('^(([0-9a-fA-F]{1,4}:){7,7}[0-9a-fA-F]{1,4}|([0-9a-fA-F]{1,4}:){1,7}:|([0-9a-fA-F]{1,4}:){1,6}:[0-9a-fA-F]{1,4}|([0-9a-fA-F]{1,4}:){1,5}(:[0-9a-fA-F]{1,4}){1,2}|([0-9a-fA-F]{1,4}:){1,4}(:[0-9a-fA-F]{1,4}){1,3}|([0-9a-fA-F]{1,4}:){1,3}(:[0-9a-fA-F]{1,4}){1,4}|([0-9a-fA-F]{1,4}:){1,2}(:[0-9a-fA-F]{1,4}){1,5}|[0-9a-fA-F]{1,4}:((:[0-9a-fA-F]{1,4}){1,6})|:((:[0-9a-fA-F]{1,4}){1,7}|:)|fe80:(:[0-9a-fA-F]{0,4}){0,4}%[0-9a-zA-Z]{1,}|::(ffff(:0{1,4}){0,1}:){0,1}((25[0-5]|(2[0-4]|1{0,1}[0-9]){0,1}[0-9])\.){3,3}(25[0-5]|(2[0-4]|1{0,1}[0-9]){0,1}[0-9])|([0-9a-fA-F]{1,4}:){1,4}:((25[0-5]|(2[0-4]|1{0,1}[0-9]){0,1}[0-9])\.){3,3}(25[0-5]|(2[0-4]|1{0,1}[0-9]){0,1}[0-9]))$') input_validator = QRegExpValidator(reg_ex, self.lineedit2_ipv6) self.lineedit2_ipv6.setValidator(input_validator)

    Ein paar Test von mir ergaben, das es so aussieht als wenn es funktioniert 🙂

  • Python3 - zwei Webseiten als Empfehlung

    Python3
    1
    0 Stimmen
    1 Beiträge
    168 Aufrufe
    Niemand hat geantwortet
  • PyQt5

    Python3
    1
    0 Stimmen
    1 Beiträge
    134 Aufrufe
    Niemand hat geantwortet
  • Python und GUI

    Verschoben Python3
    1
    0 Stimmen
    1 Beiträge
    155 Aufrufe
    Niemand hat geantwortet